
The Customer Journey
Great! If you’ve been following along our multi-part tutorial then you’ve already read the first part of the process, where we focused on Box Sizes & Delivery Schedules, so now we’re going to tackle the second area of focus when it comes to crafting a Meal Box Subscription site, the Customer Journey.
Box Sizes & Delivery Schedules
View Step 1 SummaryCustomer Journey
View Step 2 SummaryCart Requirements
View Step 3 SummaryCreating the Scheduled Order
View Step 4 SummaryAs with any eCommerce site, it’s especially important to create a customer journey that makes ordering easy and conversion turnkey. There are quite a few different approaches to this and here at QPilot we’ve seen quite a few. Here are some of the current Meal Box Subscription sites and how they approach the customer journey…

- Step 1: Select Box Size
- Step 2: Always Weekly
- Step 3: Register
- Step 4: Checkout
- Step 5: Select Meals
- Step 1: Register
- Step 2: Select Box Size
- Step 3: Always Weekly
- Step 4: Choose Delivery Date
- Step 5: Select Meals
- Step 6: Checkout

- Step 1: Register
- Step 2: Select Box Size
- Step 3: Weekly or Monthly
- Step 4: Select Meals
- Step 5: Checkout

- Step 1: Register
- Step 2: Select Box Size
- Step 3: Always Weekly
- Step 4: Checkout
- Step 5: Select Meals
While these journeys are similar, they do vary in a few ways, like when they capture the customer’s email address, if the customer can choose different schedules, when the customer enters their address information, and finally at what point the customer actually goes through the checkout and pays ( or if they even pay yet! ).
Our Customer Journey
Not only will we focus our Journey on the importance of being able to retarget potential customers that don’t convert ( hence we’ll capture their email first! ) but we’ll also need to include steps to capture our customer’s address information and payment method, something the other sites do at checkout. In addition, we’re going to give our customers the ability to choose between several different weekly schedules ( though you may decide logistically you only allow one schedule ). With these points in mind we’re going to use the following journey:

- Step 1: Register
- Step 2: Select Box Size
- Step 3: Select Meals
- Step 4: Select Schedule
- Step 5: Enter Address Info
- Step 6: Enter Payment Method
- Step 7: Place Order
Our Customer Journey
Setup Pages, Templates, & Content
Now that we have an outline of what we want our customer journey to be we’ll need to setup the pages that correspond to each step in the journey and the content that we’re going to display on each page.
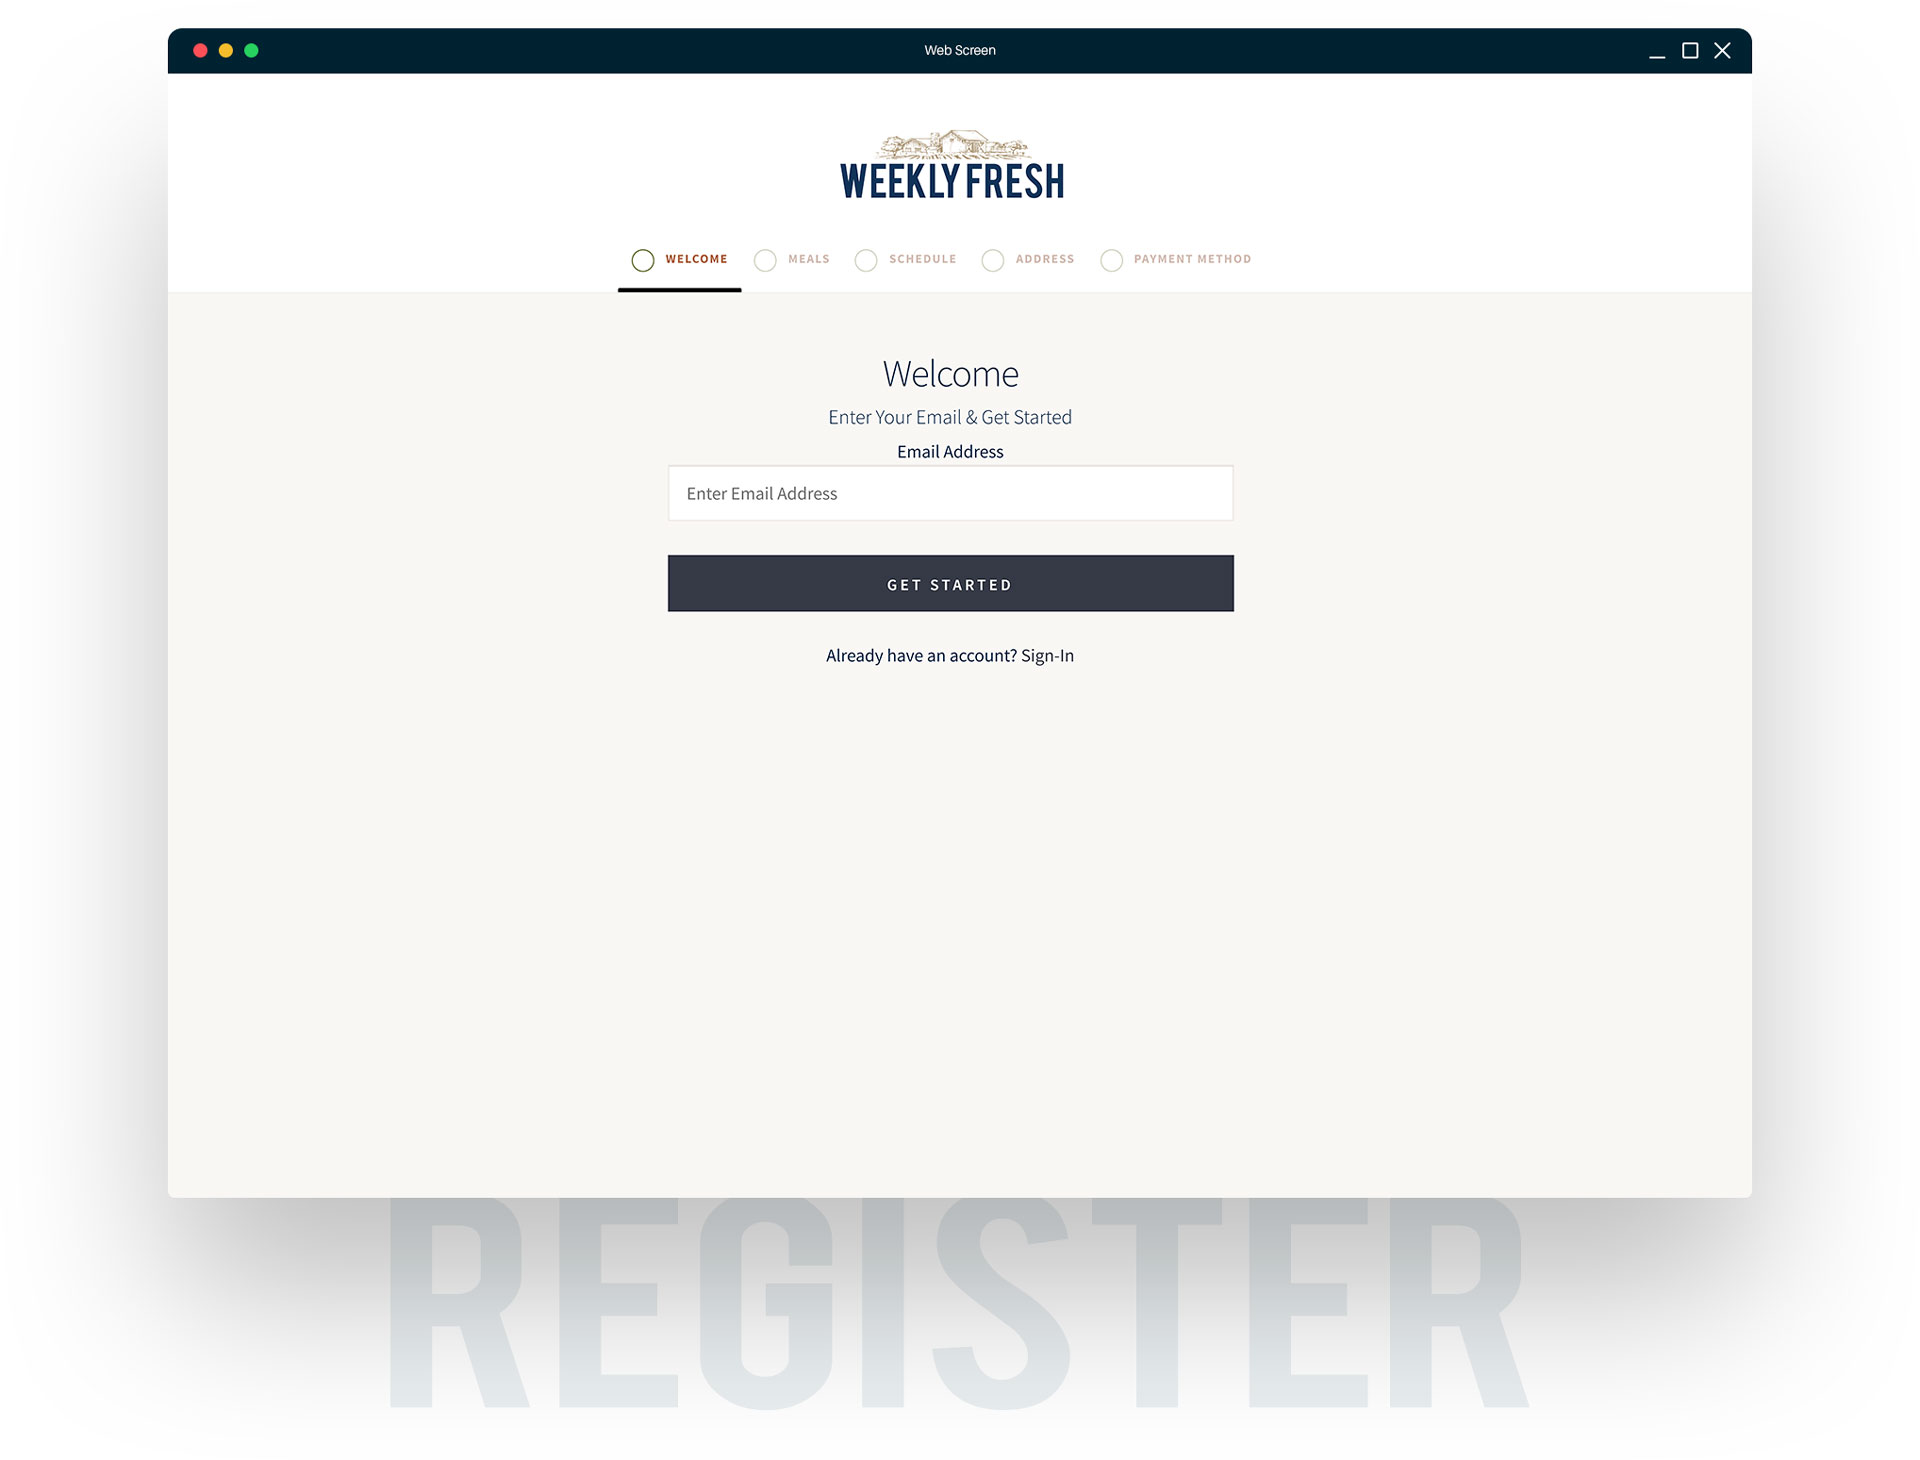
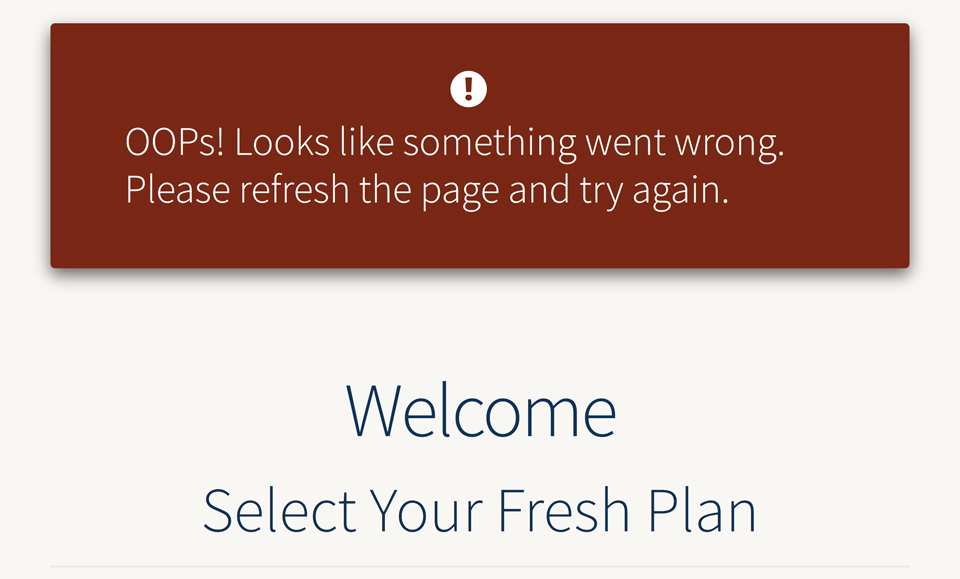
Get started by creating a Welcome Parent Page ( welcome as the slug ), this page will be both the first and second steps in our journey ( Register & Select your Plan ). Next create five child pages to our Welcome page, a Select Your Meals ( meals slug ), Select Your Schedule ( schedule slug ), Address ( address slug ), Payment Method ( payment slug ), and finally an Order page ( order slug ). Setting up our steps as child pages will allow us to distinguish when a customer is on the journey, and help us keep the process organized and controlled ( more on this later ). Now set the menu order on each page to the step in the journey:
Our Customer Journey Step 1
Register & Select Plan
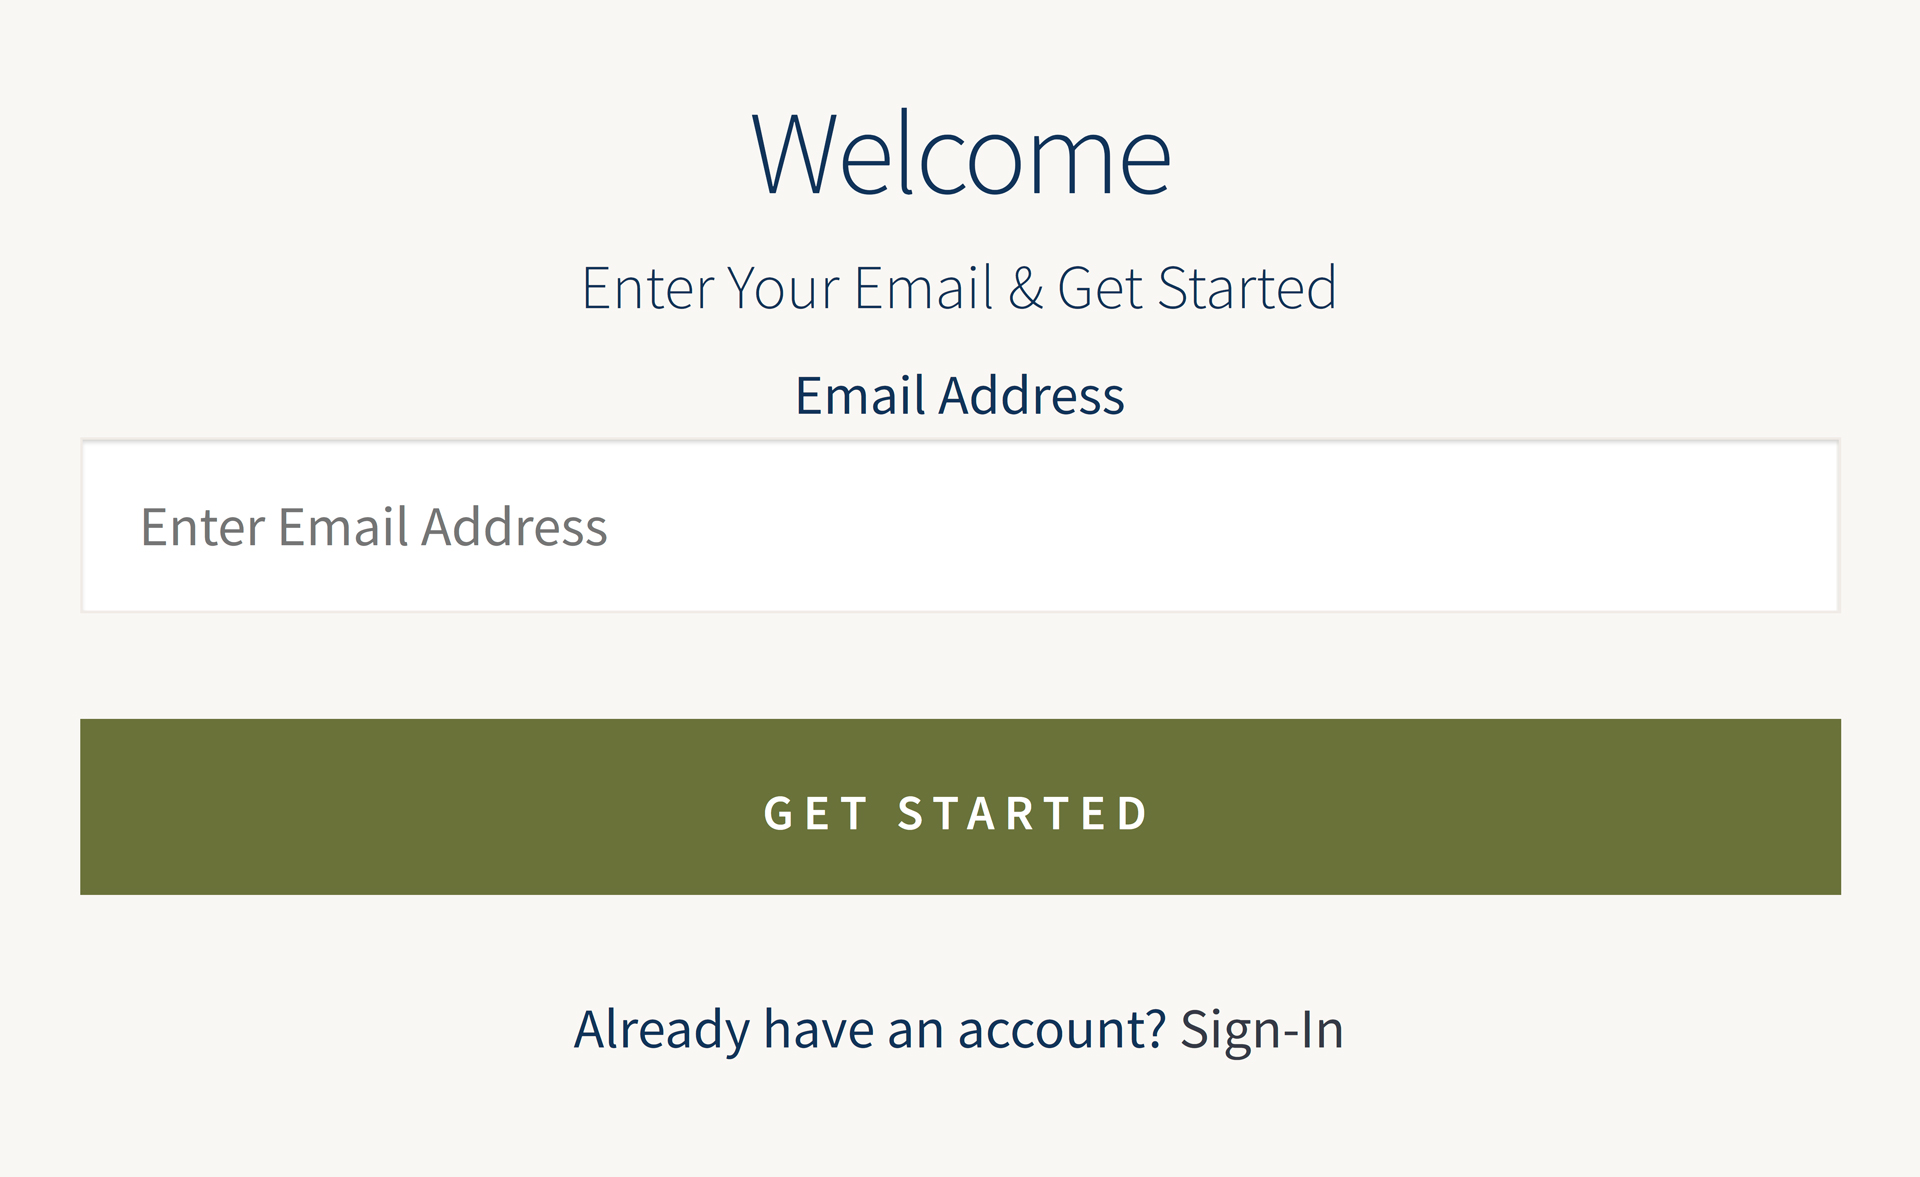
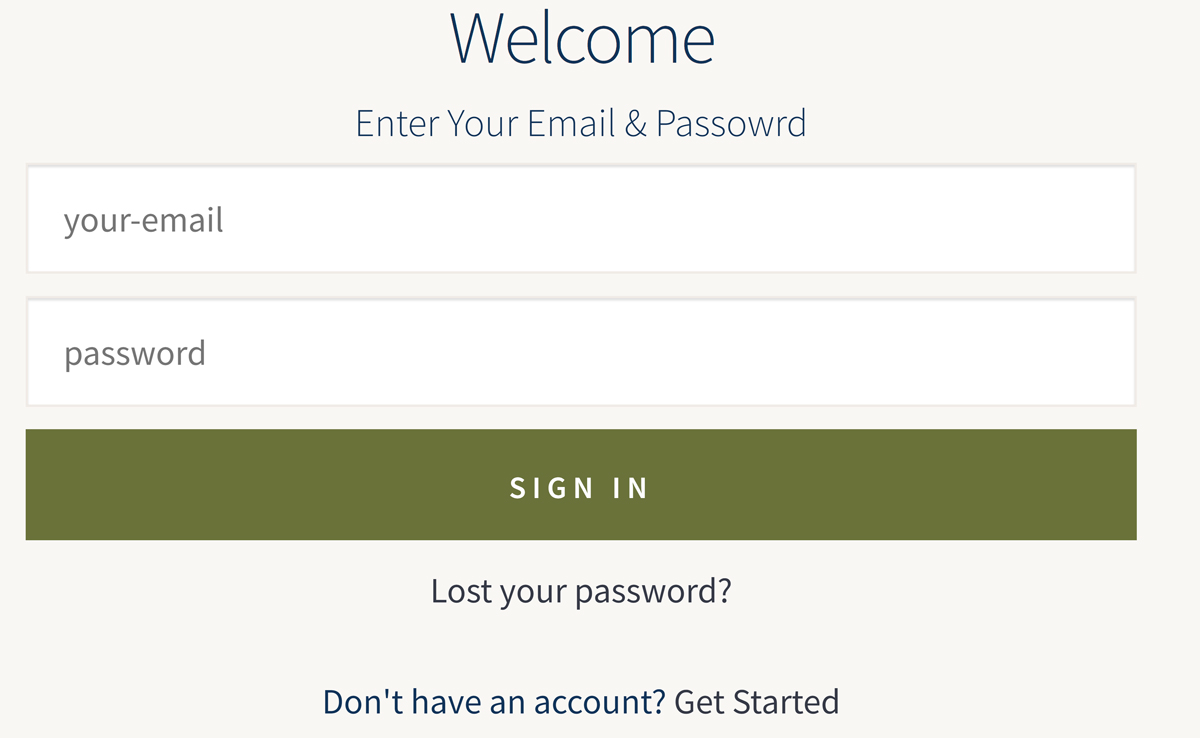
The Welcome Page, the page on which our customer will register for an account and select / change their plan and will be the first step in the journey. Menu Order 1.
Our Customer Journey Step 2
Select Meals
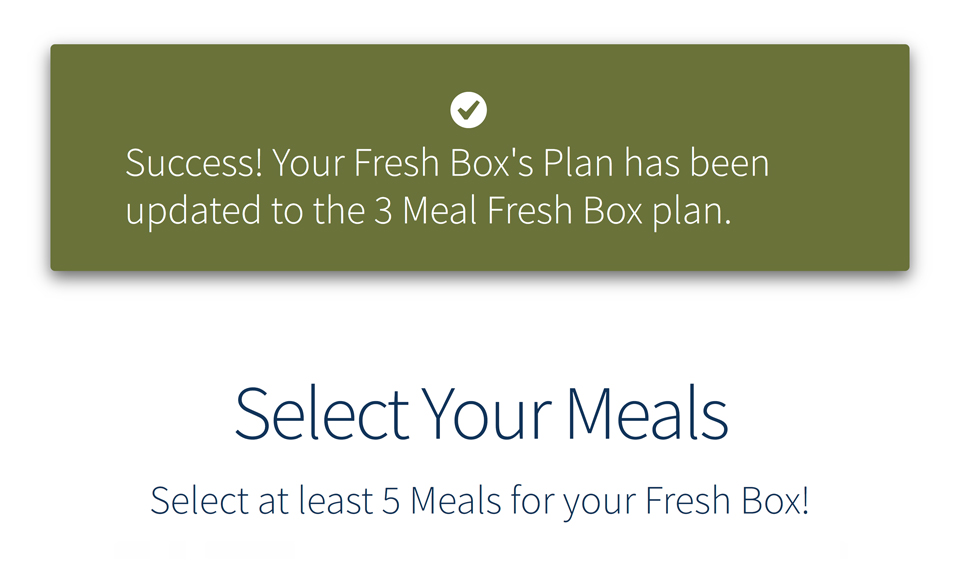
The Welcome / Select Your Meals Child Page, the page on which our customer will select the meals for their box and the second step in our journey. Menu Order 2.
Our Customer Journey Step 3
Select Your Schedule
The Welcome / Select Your Schedule Child Page, the page on which our customer will select how often they want their Meal Box Subscription shipped and the third step in our journey. Menu Order 3.
Our Customer Journey Step 4
Address
The Welcome / Address Child Page, the page on which our customer enters their shipping and billing address information and the fourth step in our journey. Menu Order 4.
Our Customer Journey Step 5
Payment Method
The Welcome / Payment Method Child Page, the last page on which our customers interact and the page on which they enter their Payment Method. This is the fifth step in our journey. Menu Order 5.
Our Customer Journey Step 6
Order
The Welcome / Order Child Page, the last page in our customer’s journey doesn’t actually have any content but will be used to trigger the creation of their scheduled order ( i.e. Meal Box Subscription ). This is the sixth step in our journey. Menu Order 6.
However, before adding content to each of our pages we’re going to add a couple more helper functions that will help us to understand if the customer is on one of our steps, and to push a customer to a specific step if needed.
Our Customer Journey Utility Function
Prev, Current, and Next Step URLs
First, lets create a new xx_journey_steps() function that takes an optional string ( $step ) as it’s only parameter. This function will return an array of all steps along with each step’s associated URLs or a single step’s URLs ( if the optional step name is supplied ). The URLs included for each step will include a previous record ( contains the URL to the previous steps page ), current record ( contains the URL to the current steps page ), and a next record ( contains the URL to the next steps page ). While we could hard code the URLs and steps, there’s no need to since we setup our steps as child pages to our Welcome page and used menu order numbers to help specify the order.
In the new xx_journey_steps() function first get the post object for the first page ( i.e. main parent page ) of the journey using WordPress’ WP_Query::get_posts() method, with the query post_type argument set to page, post_status to publish, and the menu_order argument set to 1. This will return an array of pages ( WP_Post objects ) with a menu order number 1. Since we only have one we’re going to get the first WP_Post from the array and set up our first step values using the get_permalink() WordPress function.
IMPORTANT! If you are already using the order number field and could have multiple pages with order number 1 it might be better to use another method to return the first page in our journey ( like get_page_by_path() ).
The next component to add to our utility function will be to get all the child pages to our first step page, ordered by menu order number. The resulting array will have each step in our journey in order, which means the first WP_Post object is actually our second step in the journey so lets also add the next record to our first step.
Last step in creating our new xx_journey_steps() function is adding a for loop, within which we set the previous, current, and next records. Note, rather than using a foreach loop, we’re using a for loop along with the next() PHP function for moving the internal array pointer forward by one.
Our Customer Journey Utility Function
Check if Customer is on Journey Page
The second utility function we’re going to create is a new xx_is_customer_journey() function which takes an optional step slug as a parameter and returns a page id ( of the journey page the customer is on or if the slug supplied matches the page the customer is on ) or 0 if the customer is not on a journey page or the page doesn’t match the supplied slug. This will help us guide our customers through the journey by knowing which step they are on or if they are even on our journey.
In our new function, start by retrieving the current global $post object. Assuming we’re not on a special WooCommerce page ( like the shop, checkout, order received or cart pages – more on this later ) then the global $post object should contain the current page’s WP_Post object. We’re going to track the current post / page id in a $page_id variable so lets set that variable to the current Page’s id using $post->ID to retrieve the ID property of the WP_Post class.
The second section of our function is going to check if we’re on the WooCommerce Shop, Checkout, Order Received or Cart pages. These are unique pages in that they aren’t always “real” pages so the global $post object doesn’t necessarily match up to the slug being supplied. In this case we’re going to check for each of these pages using the WooCommerce conditional functions, is_shop(), is_checkout(), is_order_recieved_page() and is_cart(). Then we’ll use the wc_get_page_id() function along with the option name ( i.e. “shop”, “checkout”, or “cart” ) to retrieve the respective page id. When it comes to the Order Received page we’re going to simply return 0 since even though it’s under the Order / Checkout Page we’re not considering it a part of our journey.
The last step to our function is to retrieve all our journey step pages using our xx_journey_steps() function. Remember this function returns an array of our custom journey steps where the keys are the page slugs. We’re going to check to see if the slug for the current page exists in our journey steps by using the get_post_field() function to retrieve the ‘post_name’ field value for our current $page_id. If the current page is not one of our journey pages then we return 0 otherwise the current page id to signify that it is a journey page. If an optional step parameter (i.e. slug ) was supplied we also check to see if it matches the slug for the current page, again if it doesn’t then we also return a 0.
Our Customer Journey Utility Function
Redirect Customer to Journey Page
A third utility function we’re going to create related to the journey is a new xx_send_to_journey_step() function which takes three arguments, a String ( $step ), an Array ( $args ), and a Boolean ( $redirect ). The function will either return a URL or redirect the customer using the wp_safe_redirect() function depending on the $redirect parameter. The URL returned/redirected to will be the page URL based on the slug supplied and if arguments are also supplied in the $args parameter, they will be appended to the URL.
Our Customer Journey Step 1
Welcome Register & Plan Page
We have our utilities and now it’s time to setup our pages. The first step in our journey, and the step that starts the customer in our funnel, is to get the customer registered and capture their email. This will be done on our Welcome Page. While we could use the build in WooCommerce registration form we’re going to create a custom form instead, one that’s more streamlined ( requiring less information ) and built for better conversion. This entails adjusting the WooCommerce account setup options for username and passwords, creating a custom form(s), and lastly redirecting our customer to the next step in the journey.
Our Customer Journey Step 1a
WooCommerce Account Settings
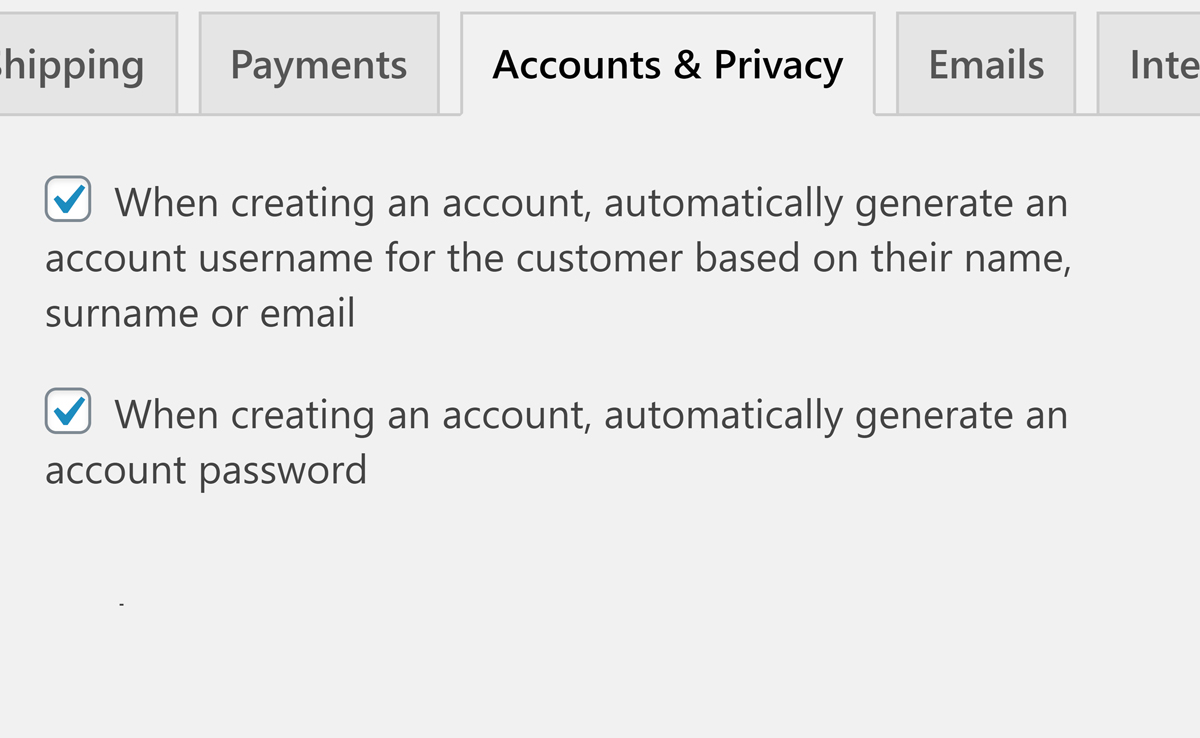
First, we’re going to set our WooCommerce Account Settings so that Passwords and Usernames are automatically generated for new customers, which will allow us to create a new customer account using only an email. To do this ensure that the following two options are checked under the WP Admin > WooCommerce > Settings > Account & Privacy ( tab ):
Our Customer Journey Step 1b
Page Content Creation
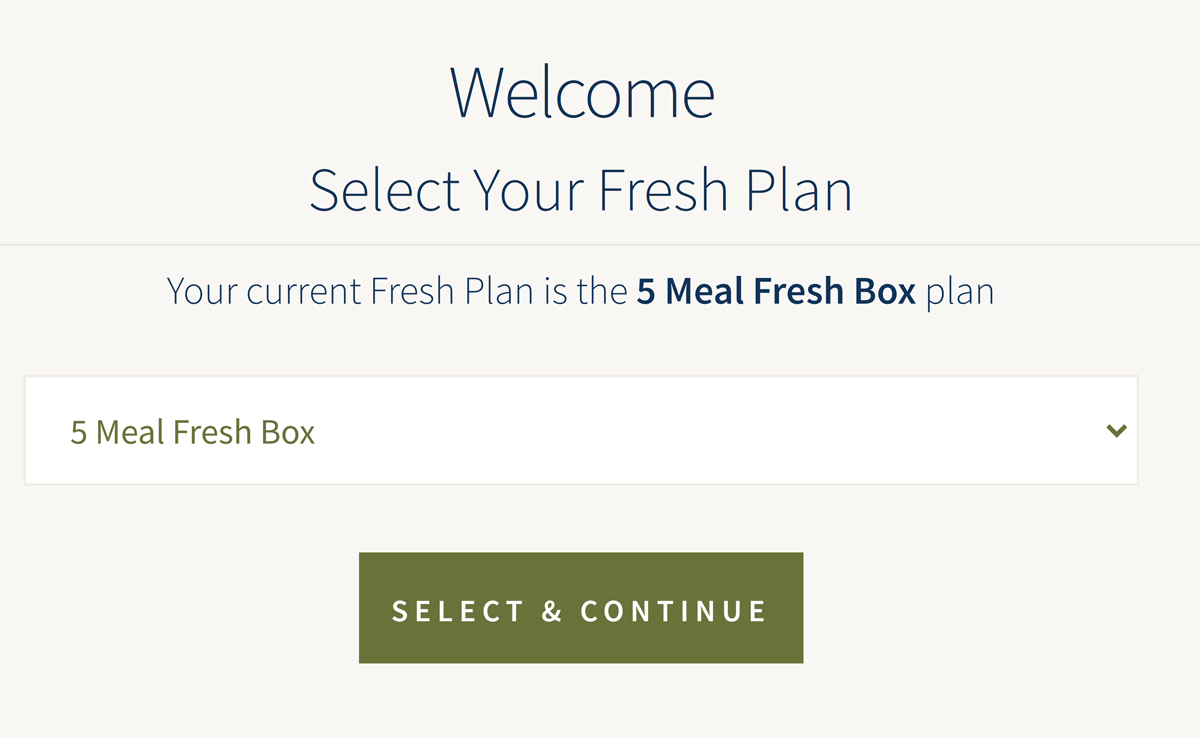
Our second step is to create the content for our Welcome page and, as we mentioned earlier, this page will be our registration page. However, not only will our customers need to be able to register, and all the other typical actions for a registration page, but they will also need to be able to select the plan they would like their fresh box to be assigned ( even if we default it for them ). Let’s start by creating a new xx_output_registration_form() function which will contain our form(s) and HTML.
Our Customer Journey Step 1c
Registration Form Creation
We now have the function that will hold our forms and HTML, so let’s get started by creating a custom registration HTML. Your HTML is going to have two parts ( at least ), the first is the registration form and the second is the form for selecting / changing plans. To make this easy first copy the registration form from the WooCommerce login form from woocommerce/templates/myaccount/form-login.php and delete all the components we’re not going to use ( all paragraph html elements except those that contain the email field and the registration button ).
Our Customer Journey Step 1d
Select Plan Form Creation
Next, create a form our customer can use to select the fresh plan. We’re going to use the xx_get_user_plans() function we created earlier to retrieve a list of available plans to populate our select drop down list. We’re also going to use the xx_get_user_plan() function to retrieve the current plan ( if there is one ) assigned to the user and then use the WordPress selected() function to add a selected attribute to the select option that matches the customers current plan.
Our Customer Journey Step 1e
Select Plan Form Action & Security
We’re going to need to process the form when the customer submits the plan and in order to know when this form is submitted we’re going to assign it a custom action. Add a new input field with the name set to “action” and the value set to “xx_assign_meal_plan“. This will be the value we’re going to look for in our function server side that will be processing the form submission in the next step. Now lets add a security nonce using the wp_nonce_field() function with the action set to xx-assign-meal-plan and the name set to xx-assign-meal-plan-nonce.
Our Customer Journey Step 1f
Sign-In Form
Great!….but wait, what happens if our customer already has an account? or what will they do if they have an account and lost their password? The new form will work to register a customer and for them to select / change their plan but doesn’t help them login if they already have an account or even recover their password if they forgot it.
We’re going to add two more else / if blocks to our code snippet. The first is going to be our login section which will be displayed if the current URL has an action parameter set to sign-in. Just like we did for our registration form, we’re going to port the WooCommerce login form from woocommerce/templates/myaccount/form-login.php, strip some of the un-needed html, adjust the classes and such to match our theme, and finally wrap it in the else if statement.
Our Customer Journey Step 1g
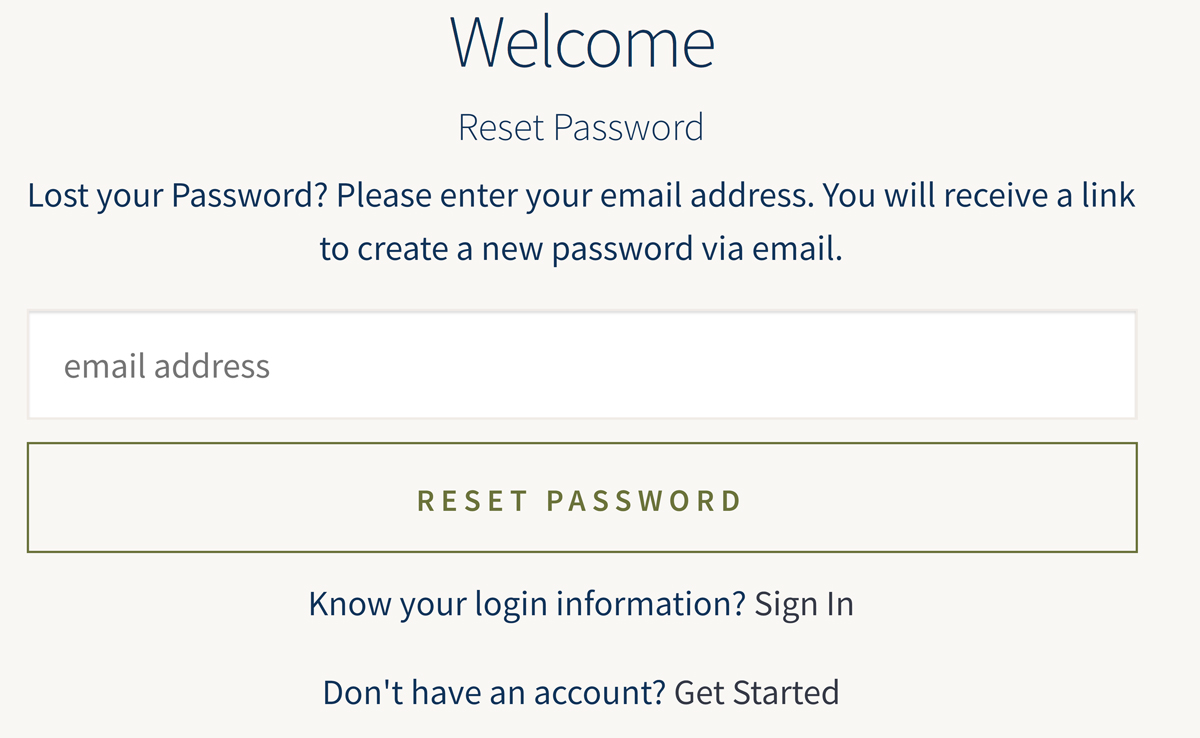
Password Recovery Form
The second else / if block we’re going to add is going to be our password recovery section which will be displayed if the current URL has an action parameter set to lost-login. Just like we did for our other forms, we’re going to port the WooCommerce lost password form from woocommerce/templates/myaccount/form-lost-password.php, strip out some of the un-needed html, adjust the classes and such to match our theme, and finally wrap it in the else if statement.
The final touch will be to add some navigation links to each form so that our customers can toggle between the views. Since we’re using an action parameter to determine which view should be shown, this is as simple as adding a link with a URL including the action set to the view ( i.e. /?action=sign-in ).
Our Customer Journey Step 1h
Creating The Shortcode
Our plan will be to make all our content as shortcodes, since we may want to try different customer journeys or even include our registration form on different landing pages ( hey, we’re all marketers at heart right?! ) we’re going to wrap this form ( and the next form ) in a function and attach that function to a custom shortcode using the WordPress add_shortcode() function call. This way including our registration form is as simple as including the shortcode on any page we want.>
NOTE Remember to return the content of the form in the shortcode function and not print it, hence our use of the ob_start() and ob_get_clean() buffer functions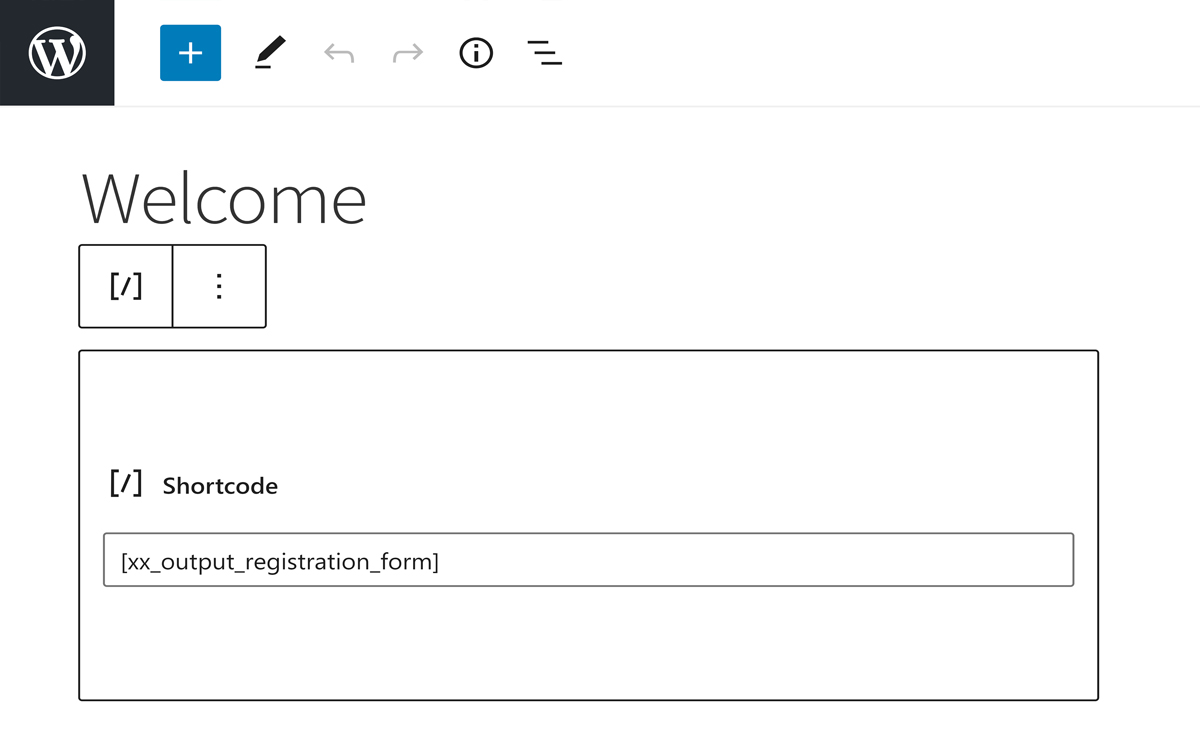
Our Customer Journey Step 1i
Process the Form Submission
Now that we’ve created the Select Plan Form HTML our customer can use to adjust their plan, we need to add a function to process the form when submitted to the server. Create a new xx_autoship_apply_meal_plan_handler() function ( which doesn’t take any arguments ) and add a new add_action() call with the action set to “wp“, our new function as the hooked function, and a priority of 99. Why the “wp” action? It’s a hook recommended by WordPress as a good place to perform high level validation before template redirects…
This hook is one effective place to perform any high-level filtering or validation, following queries, but before WordPress does any routing, processing, or handling….
WordPress Reference Docs
We’re going to add four checks, the first is to check for the xx_assign_meal_plan action we added as a hidden field, this will tell us if the post being submitted is our plan submission form and that we should process it. Assuming this is our form ( i.e. the action is there and it’s our action ), then the second is to verify that the customer is still logged in by using the WordPress is_user_logged_in() function. If not lets add a WooCommerce notice and return.
Note while the user no longer being logged in will most likely invalidate the nonce, we want to distinguish between the two so that we can customize our notification.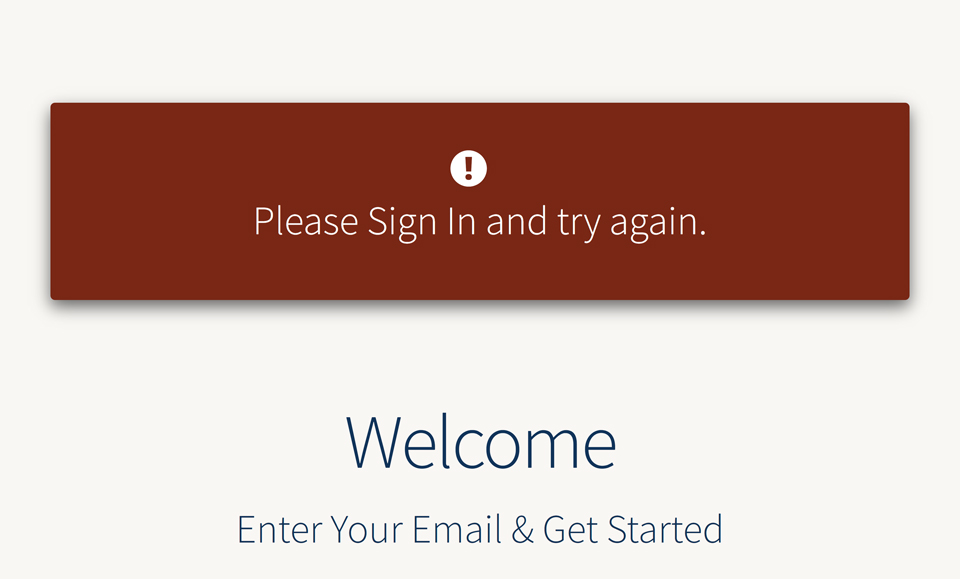
The third check is to add a wp_verify_nonce() function call to confirm that the nonce we added to the form is still valid. If the nonce fails, lets add a WooCommerce notice and return.
The last check we’re going to add is to validate the contents of the xx-plan-option form field. We’re going to validate the plan option submitted using our xx_get_user_plans() function and make sure the value submitted exists. If the value isn’t valid, add a notice like with the other checks and return.
Our Customer Journey Step 1j
Assign Submitted Plan
After checking that the form being submitted is the one we want, and the submitted value is valid, we now need to assign the new plan to the customer. We do this using our xx_add_plan_to_user() function. Pass the function the current user’s id, and the new plan value. Once assigned, we add our success message to the WooCommerce notice queue using the WooCommerce wc_add_notice() function and redirect the customer to the next step in the journey, the Select Your Meals page ( i.e. our Shop Page ), using our xx_send_to_journey_step() function and the Select Your Meals page slug, ‘meals’.
Our Customer Journey Step 2
Select Your Meals Page
The second step in our customers journey is to have our newly registered customer select the meals they want to be included in their Meal Box Subscription ( what we’re calling their fresh box! ).
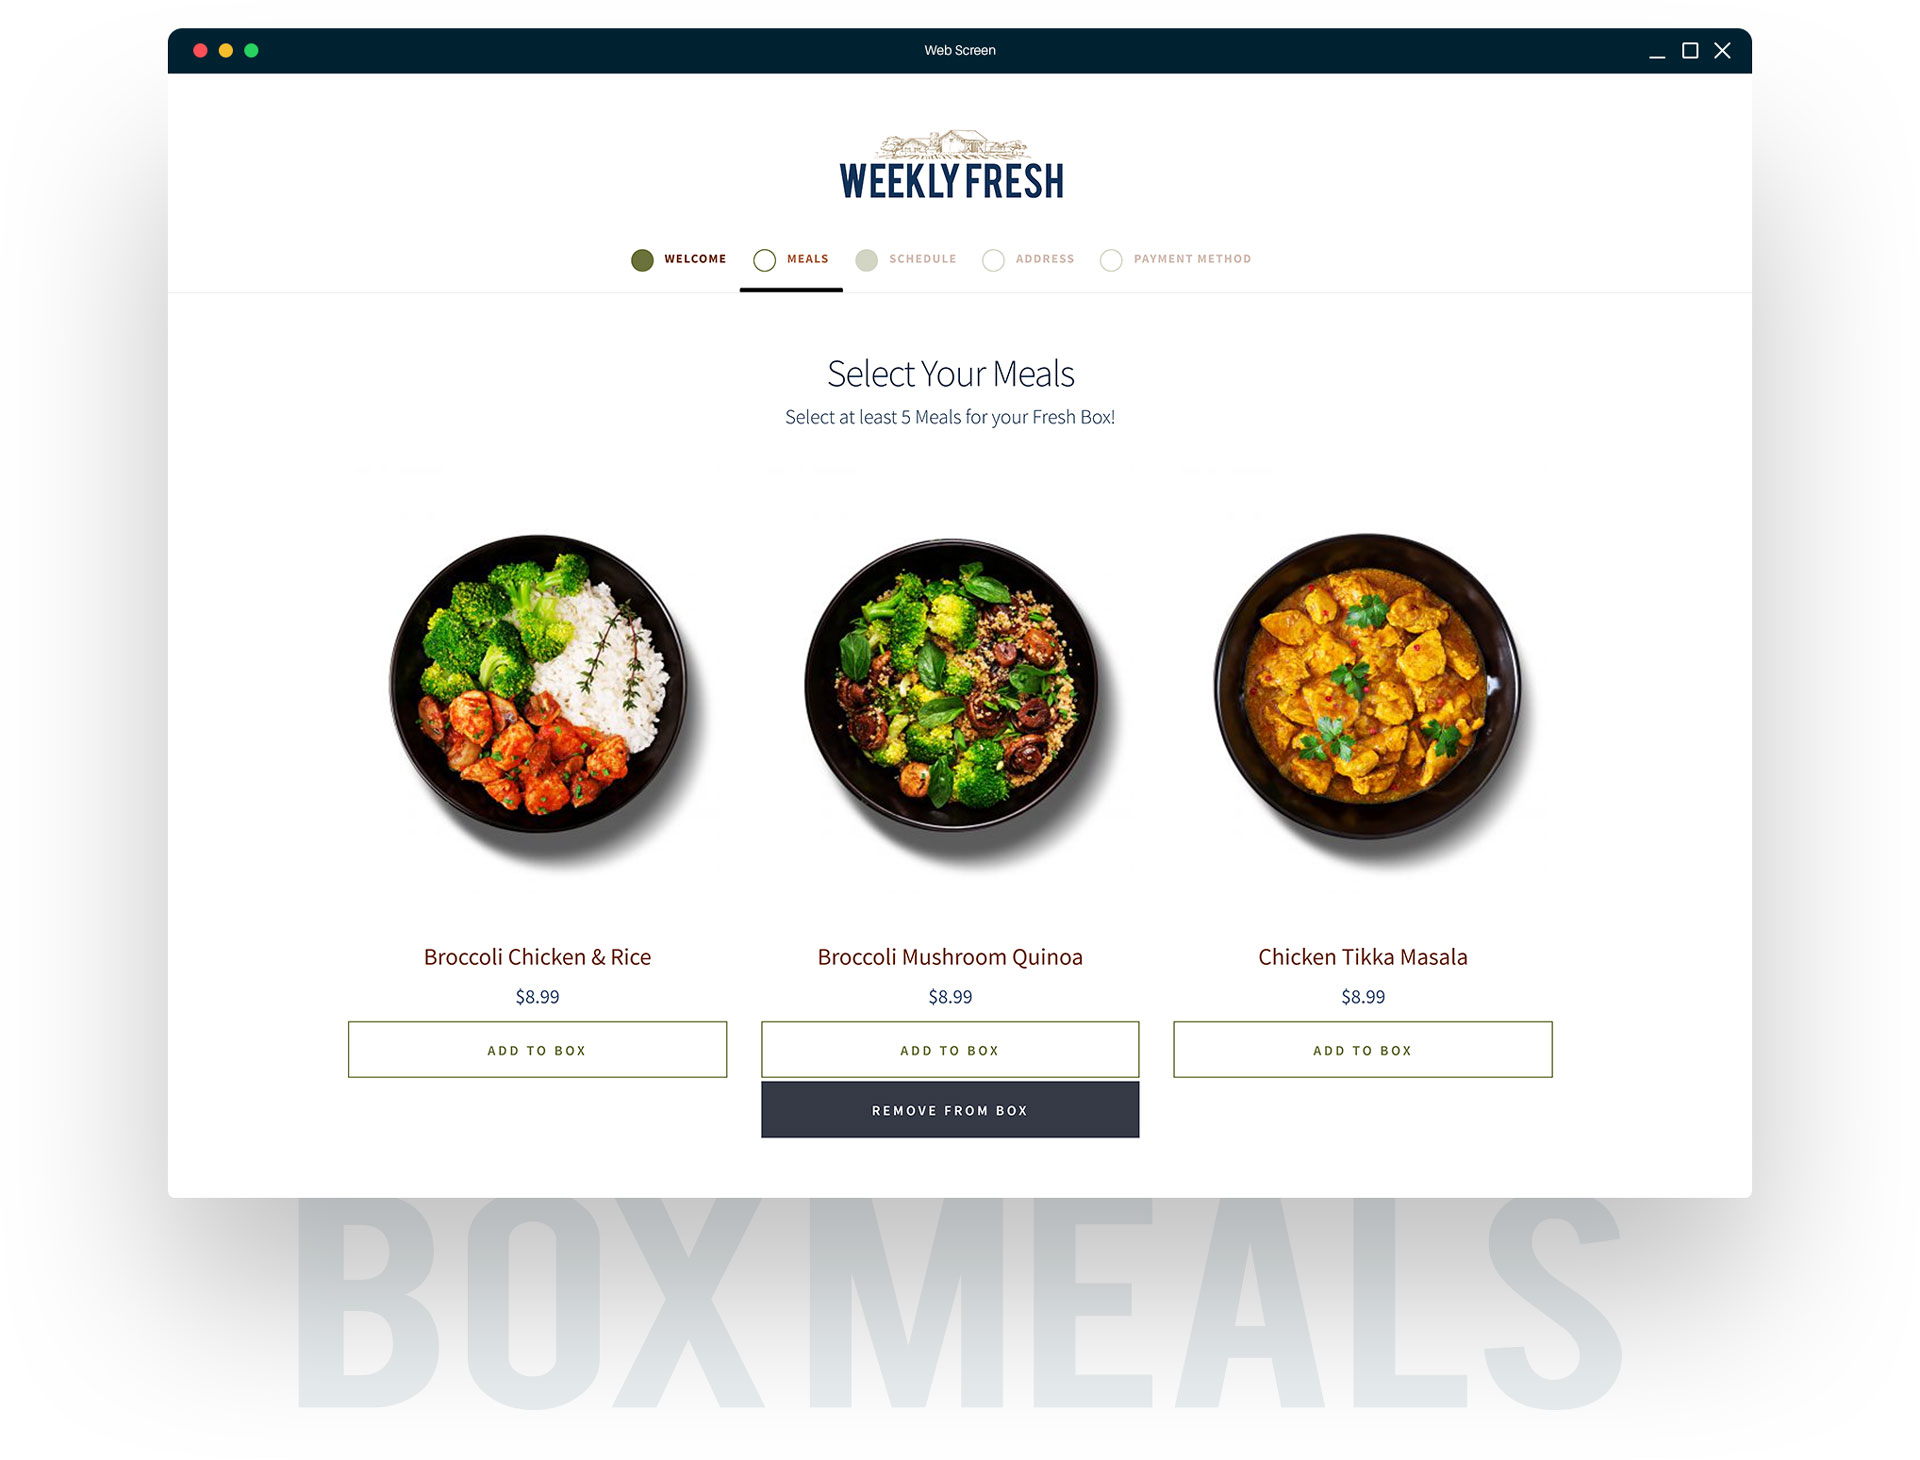
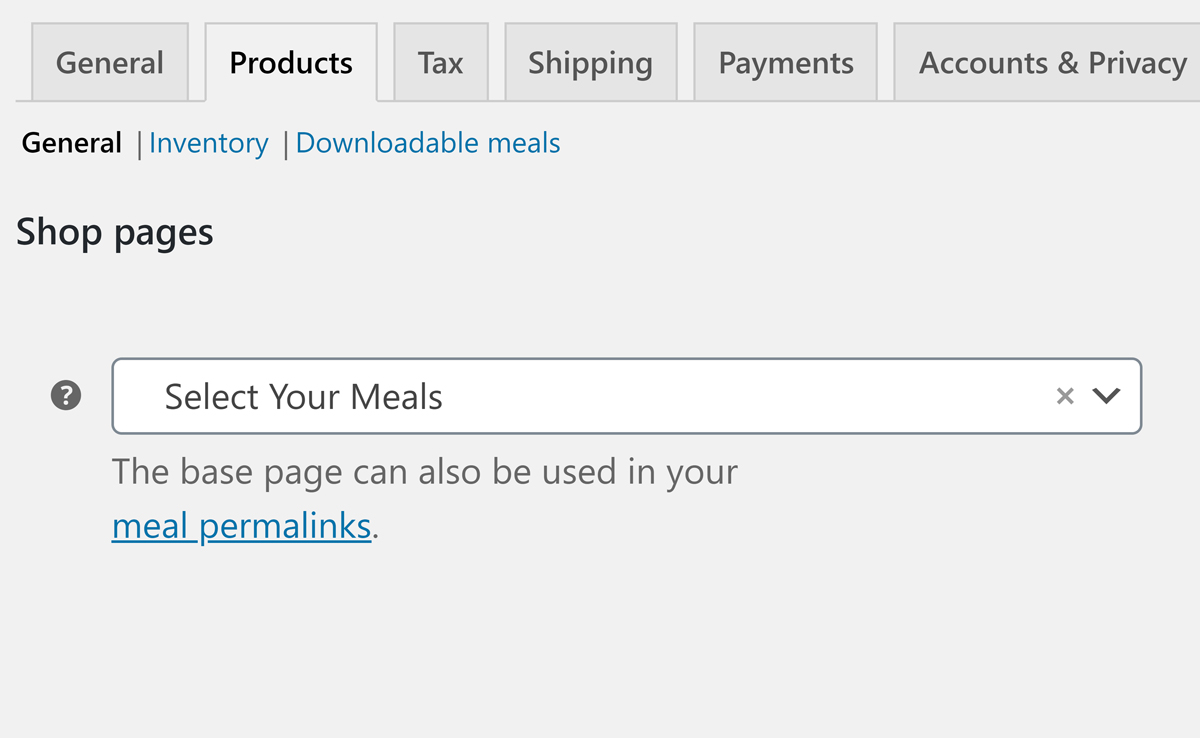
Since we’re using wonderful WooCommerce we setup this page by pointing the WooCommerce Shop page to our new Select Your Meals page. In WP Admin > WooCommerce > Settings > Products ( tab ) select the Shop Page drop down and choose our new Select Your Meals page.
Our Customer Journey Step 3
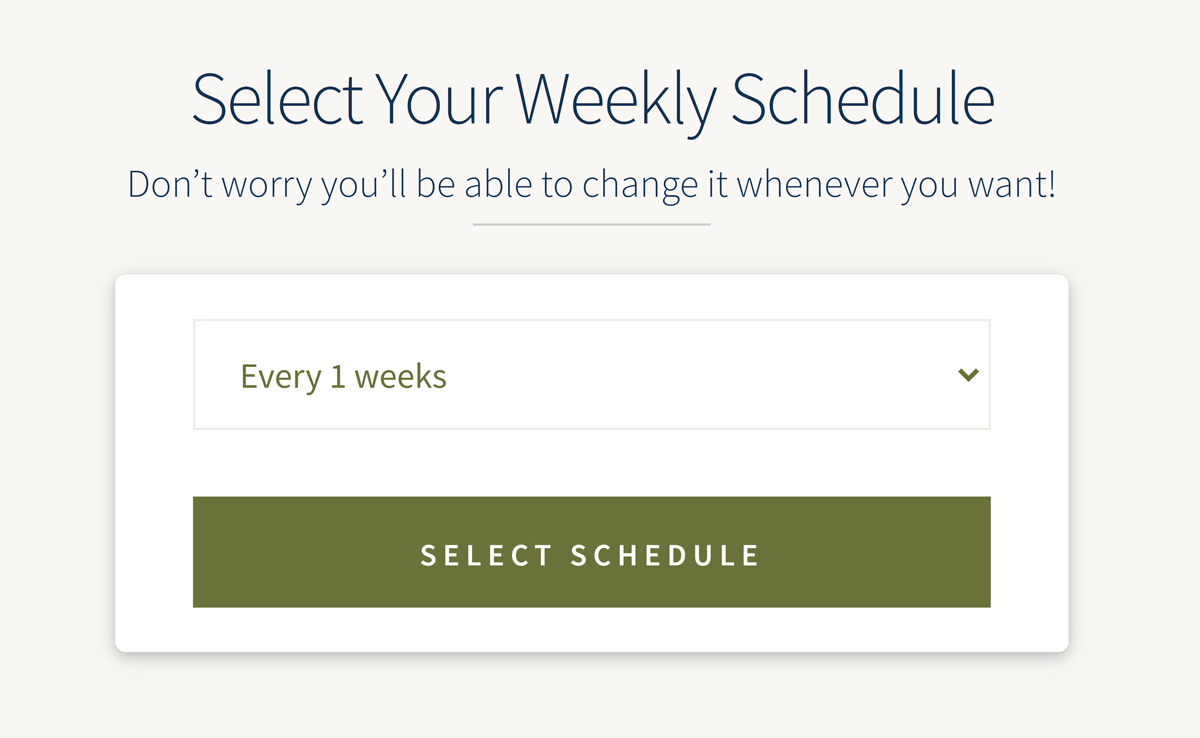
Select Your Schedule Page
After our Customer’s have selected the meals they want included in their box they need to select a schedule for their meal subscription scheduled order…do they want their Fresh Box shipped Daily? Weekly? Monthly? a specific day of the Month? The good news is that Autoship Cloud powered by QPilot is built for this and allows us to use the out of the box functionality to assign a schedule to products and a cart, using default Frequency and Frequency Types or customized schedules.
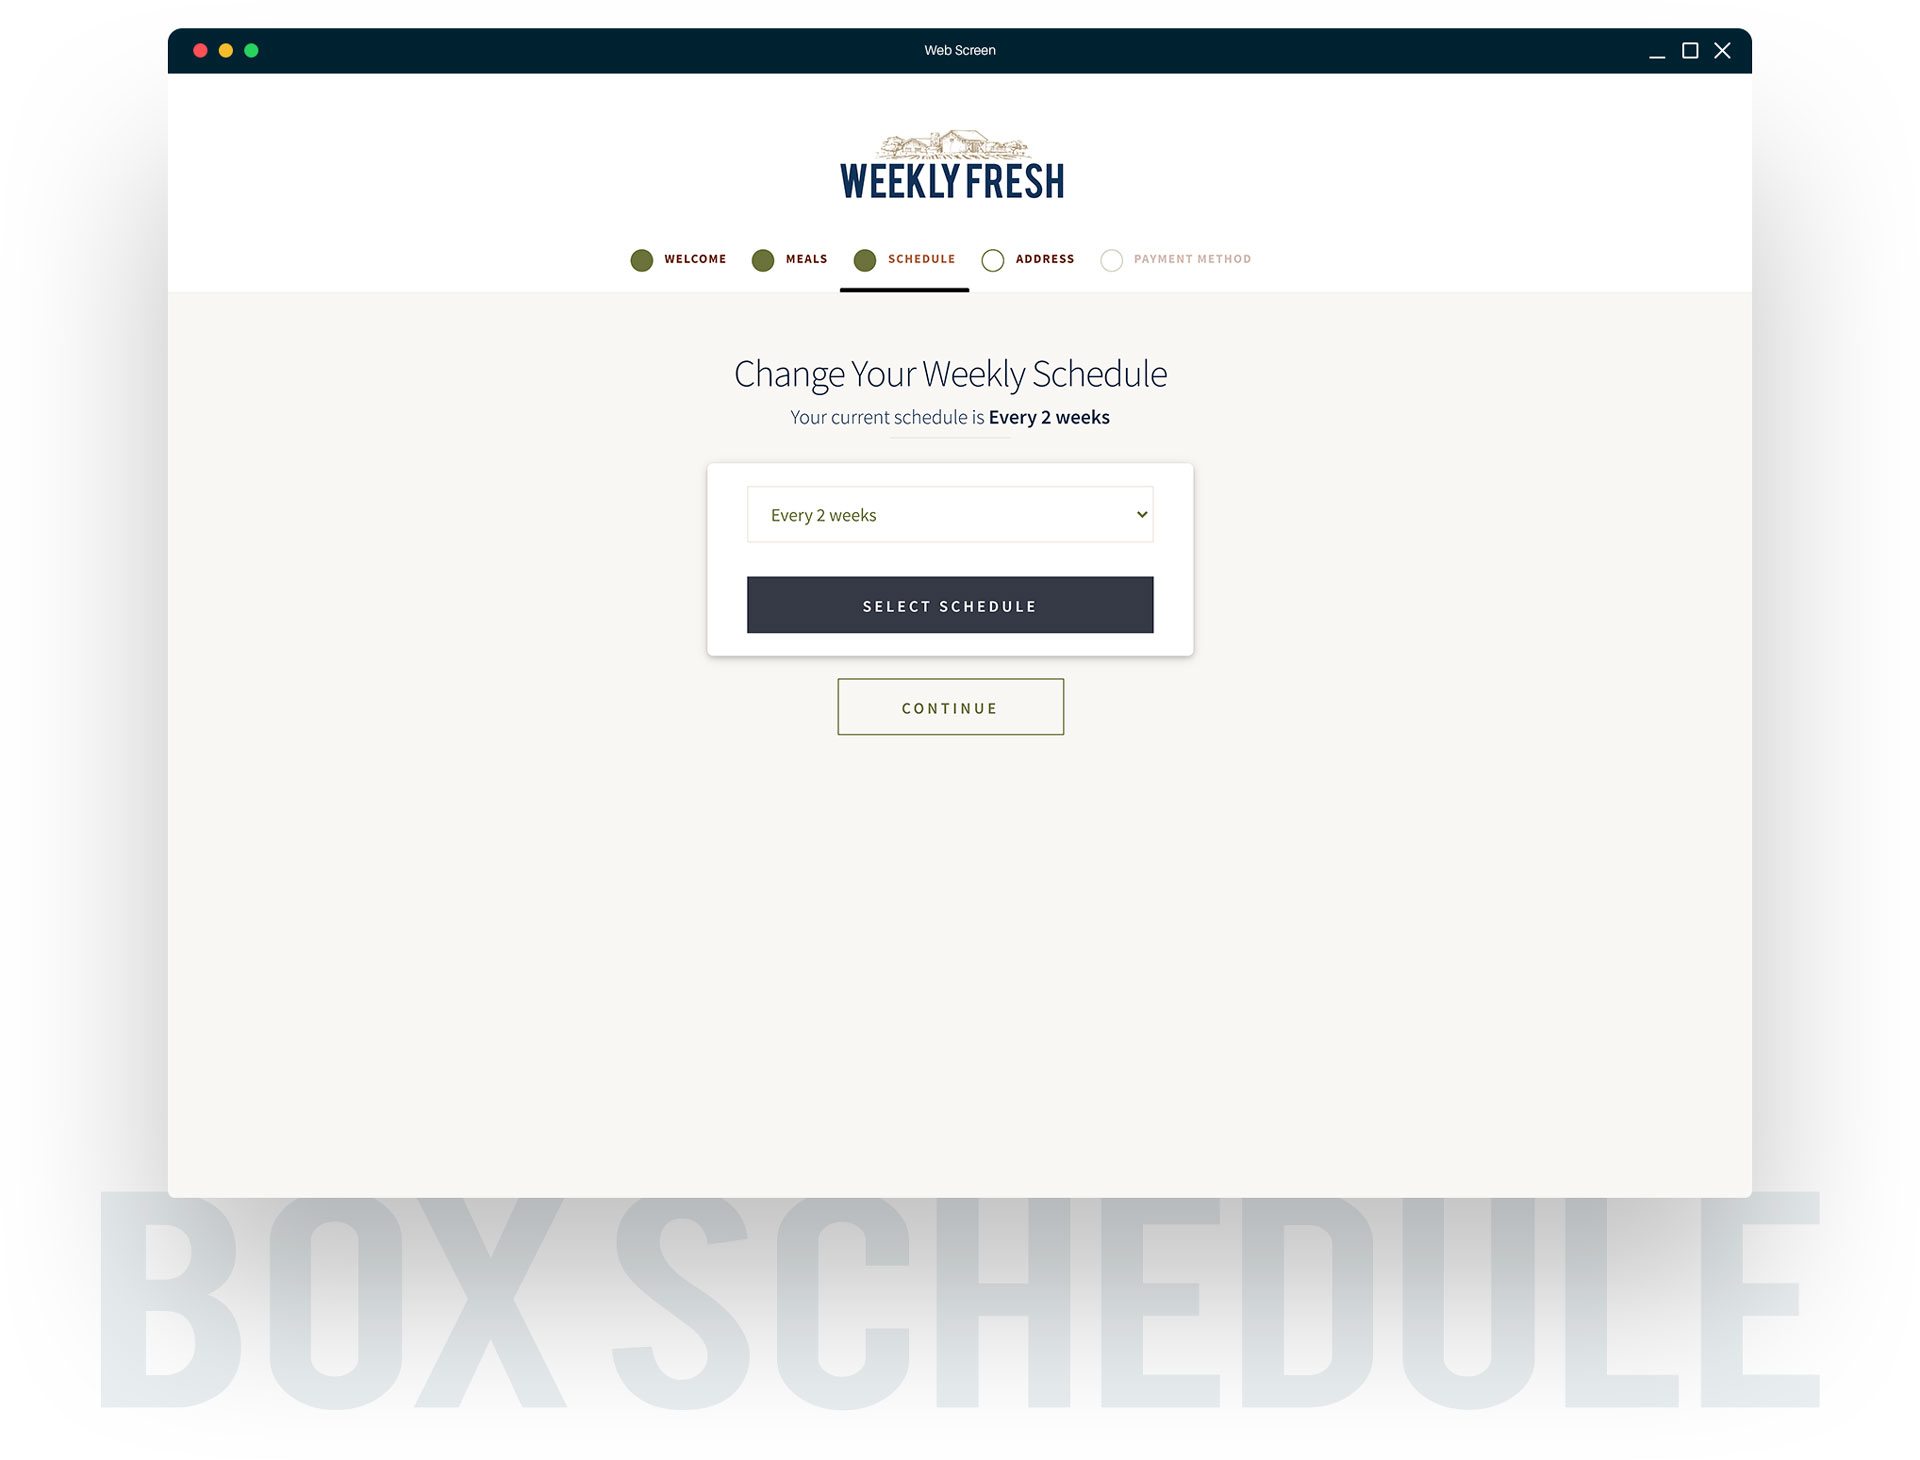
Since we’re using WooCommerce we’re using the cart to hold the contents of our Fresh Box and since the customers need to assign a schedule to their box we’re going to do this by assigning a schedule to the cart items. We’ll use this schedule later along with Autoship Cloud’s library functions to automatically generate a Scheduled Order for the Meal Box Subscription in QPilot.
Interesting Fact! Autoship Cloud allows for each cart item to have a different schedule ( awesome right?! ). At checkout Autoship Cloud will automatically group items by their assigned schedule and generate a separate Scheduled Order for each group of items. A truly powerful and flexible way to create recurring orders and allowing for almost endless possibilities. However, for our purposes we’re shipping all the items in the same Fresh Box so they all get the same schedule and we’re not going to be using the checkout in the typical fashion.
Autoship Cloud Functions
In our Customer Journey Step 3 we’re going to start using several different off the shelf functions from the Autoship Cloud powered by QPilot plugin library for creating our Select Your Schedule Page functionality. Autoship Cloud is build as a library of functions that can be used to customize customer experiences and create, update, and manage Scheduled Orders from WooCommerce.
autoship_set_full_cart_schedule()
The first Autoship Cloud function we’re going to use it the autoship_set_full_cart_schedule() function. This function can be used to assign a single schedule ( i.e. Once a Months, Every Two Weeks, daily, etc. ) to all the items currently in the cart. It takes two parameters, an integer for the frequency and a string for the frequency type ( valid values are Months, Weeks, Days, DayOfTheWeek, or DayOfTheMonth ).
found in Autoship Cloud/src/cart.php fileautoship_get_full_cart_schedule()
The second Autoship Cloud library function we’re going to use is the autoship_get_full_cart_schedule() function. As the name implies, the function will return an array of all unique Schedules assigned to the cart and the total count of items with that schedule. As we mentioned previously, a cart could have multiple Scheduled products with different Schedules so the result from the function call could be an array with multiple records. However, again we’re using a single schedule for our entire Fresh Box ( i.e. WC Cart ) so we’re not concerned with multiple schedules.
found in Autoship Cloud/src/cart.php fileautoship_default_frequency_options()
The third Autoship Cloud library function we’re going to use is the autoship_default_frequency_options() function. This function will returns an array of available schedule options ( frequency and frequency types ), and the associated display name to use as the label. The options returned by this function include 1 – 5 Months by default but can be adjusted to match you’re desired schedule options using the autoship-default-frequency-options filter.
found in Autoship Cloud/src/products.php fileautoship_get_frequency_display_name()
The last Autoship Cloud library function we’re going to use is the autoship_get_frequency_display_name() function. This function will returns a user friendly display label based on the supplied frequency and frequency type. We’ll be using this function when we customize our schedule Options.
found in Autoship Cloud/src/utilities.php fileOur Customer Journey Step 3a
Custom Schedule Options
As our site name ( Weekly Fresh ) implies we’re going to adjust the Autoship Cloud default frequency options to Weekly options by creating a new xx_populate_schedule_options() function, hook it to the autoship-default-frequency-options filter using the add_filter() function call, and finally populating the options array with our weekly options.
Within our new hooked function we’ll be using the autoship_get_frequency_display_name() library function to generate our schedule Option display names as well as a counter to generate weekly options from every week to every 4 weeks.
- Every 1 Weeks
- Every 2 Weeks
- Every 3 Weeks
- Every 4 Weeks
Our Customer Journey Step 3b
Select Schedule Form
Above we reviewed the functions that we can use to assign and retrieve the schedule from a WC Cart and we’ve adjusted the schedule options we’ll be making available to our customers. Now we need to create the form that will be displayed on our Select a Schedule page which customers can use to choose the schedule they want. Create a new xx_output_schedule() function that takes a single array as a parameter ( $atts ) and create it into a shortcode by making an add_shortcode() call so that we can include it on any page we want.
First, in our new function create a new HTML form with a Select drop down and a Submit button. To populate the Select drop down use the autoship_default_frequency_options() function we mentioned above to get the values, then iterate through the values to populate the select drop down’s option using the key as the value and the associated display_name value as the label.
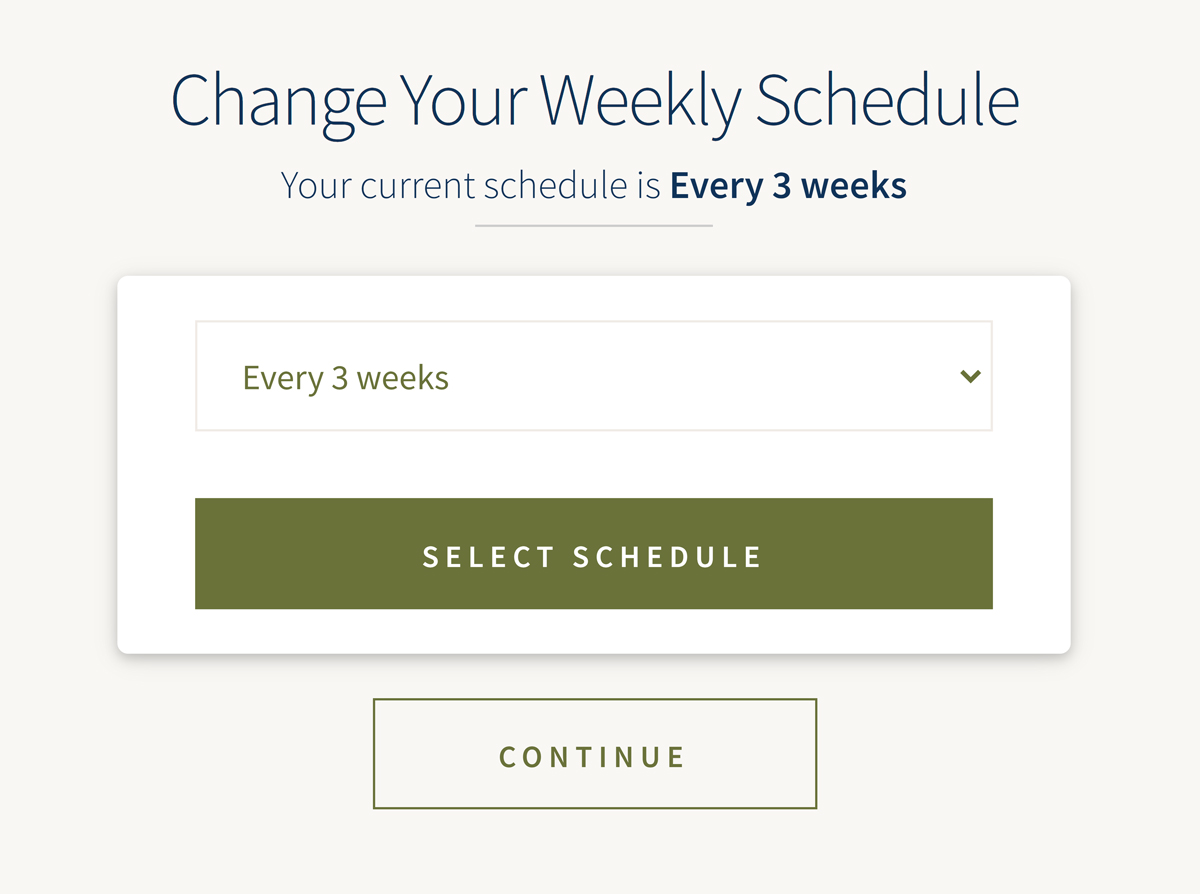
We also need to make sure we show the customer the current schedule assigned to the cart. To do this use the Autoship Cloud library autoship_get_full_cart_schedule() function ( mentioned earlier ) to retrieve the current WC Carts schedule. Then while iterating through the frequency options returned by the autoship_default_frequency_options() function check if the frequency and frequency_type matches and if so add the selected value to the Select option using the WordPress selected() function.
Our Customer Journey Step 3c
Select Schedule Form Action & Security
Just like we did for our Select Your Plan form we’re going to add a custom action ( in this case lets use “xx_assign_box_schedule“), and a security nonce ( let’s use xx-assign-schedule as the action and xx-assign-schedule-nonce as the name ) to our form.
Finally, because our goal is to make our form as usable as possible, let’s also wrap this form in a shortcode call using the add_shortcode() function.

Our Customer Journey Step 3d
Process the Form Submission
Now that we’ve created the HTML form the customer will use to submit the selected schedule, we need to add a function to process the form submission. Create a new xx_autoship_apply_box_schedule_handler() function ( which doesn’t take any arguments ) and add a new add_action() call with the action set to “wp” and our new function as the hooked function.
As we did with the handler for our Select Your Plan form, we’re going to add the same four validation checks. First checking that the action being submitted matches our custom action ( i.e. xx_assign_box_schedule ), then add our check to see if the user is logged and once those are in place lets add the security nonce check. In the last two checks if they fail let’s add notices to the WooCommerce Notice queue and return the user.
The last check we’re going to add, just like we did with the Select Your Plan form, is to validate the contents of the cart-schedule-option form field. In this case we’re going to validate the actual schedule option submitted using Autoship Cloud’s autoship_default_frequency_options() function. Remember this function returns an array of valid schedule options, so we only process this form if the value submitted exists in the results.
Our Customer Journey Step 3e
Assign Submitted Schedule
After checking that the form being submitted is the one we want, and the submitted value is valid, we now need to assign the schedule to the cart and to the customer. We do this using the Autoship Cloud autoship_set_full_cart_schedule() function referenced above and our custom xx_update_fresh_box_schedule() function. Once assigned, we add our success message to the WooCommerce notice queue using wc_add_notice and redirect the customer to the next step in the journey, Address ( our Address Page ), using our xx_send_to_journey_step() function passing it the slug for our Address page, “address”.
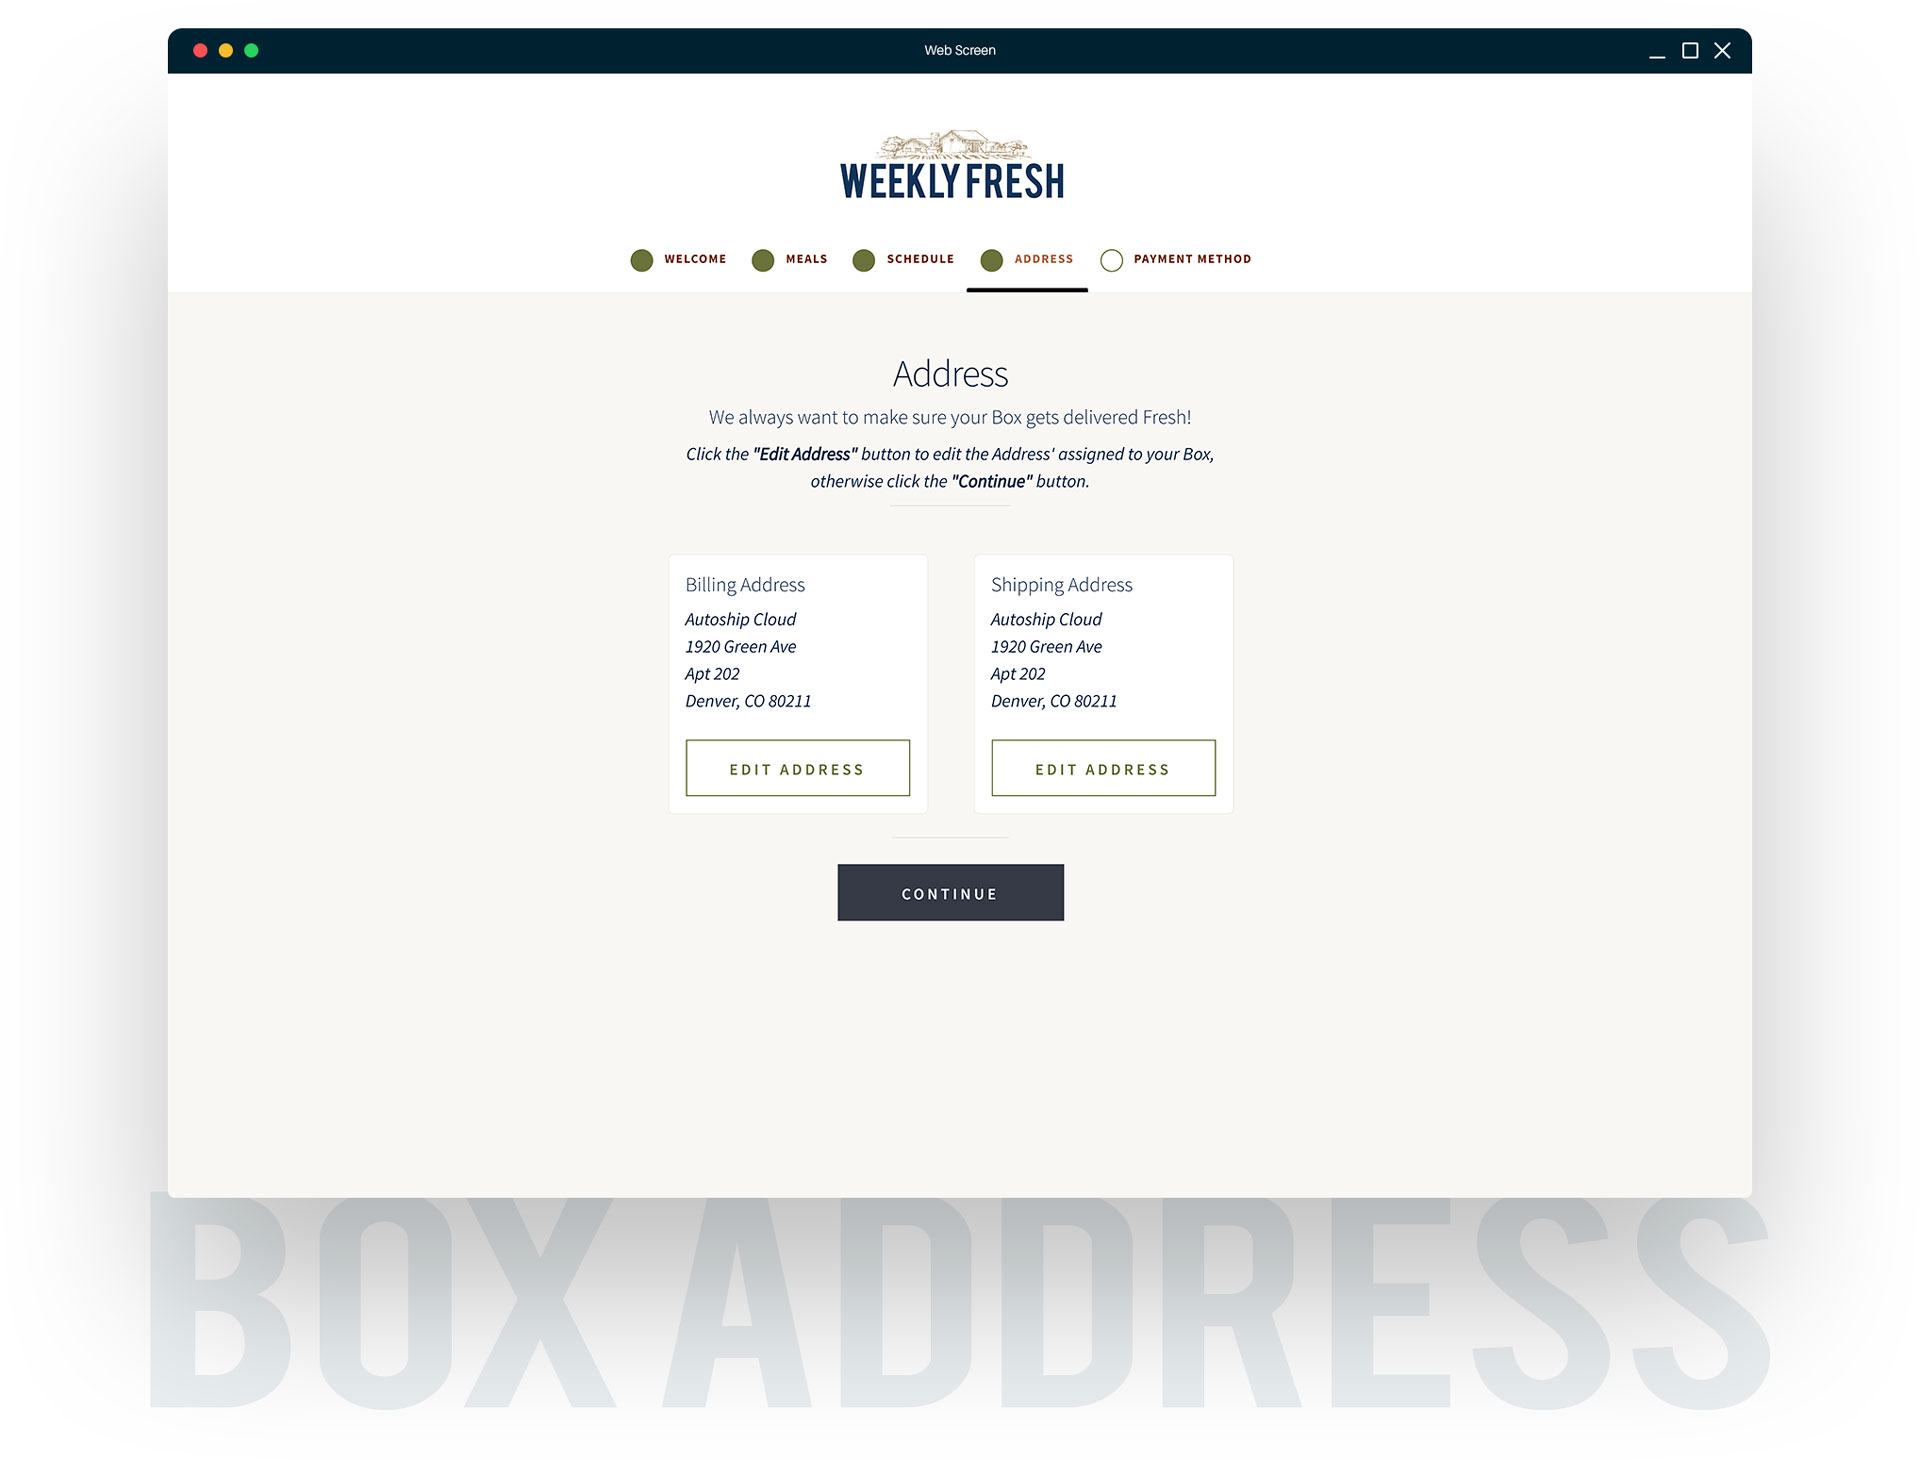
Our Customer Journey Step 4
Address
We’ve now had our customers register, choose a plan, select their meals, and choose a shipping schedule. The next step is to figure out where we’ll be shipping their box by having them enter a Shipping and Billing Address. To accomplish this we’re going to create a custom edit address form and display that on our Address page, add server side code to process the new form, and finally add a way for our Customers to view their address ( similar to the WooCommerce My Account > Address page ).
Our Customer Journey Step 4a
View Address Component
Our Address form is going to have two main components, the view Address component ( similar to the My Account > Address page when not editing an address ), and the second is the actual edit address form. If the customer has already entered a billing and shipping address then we’ll just display those with options to edit them, otherwise if they haven’t entered all the information for the billing and/or shipping addresses then we’ll automatically display the edit form.
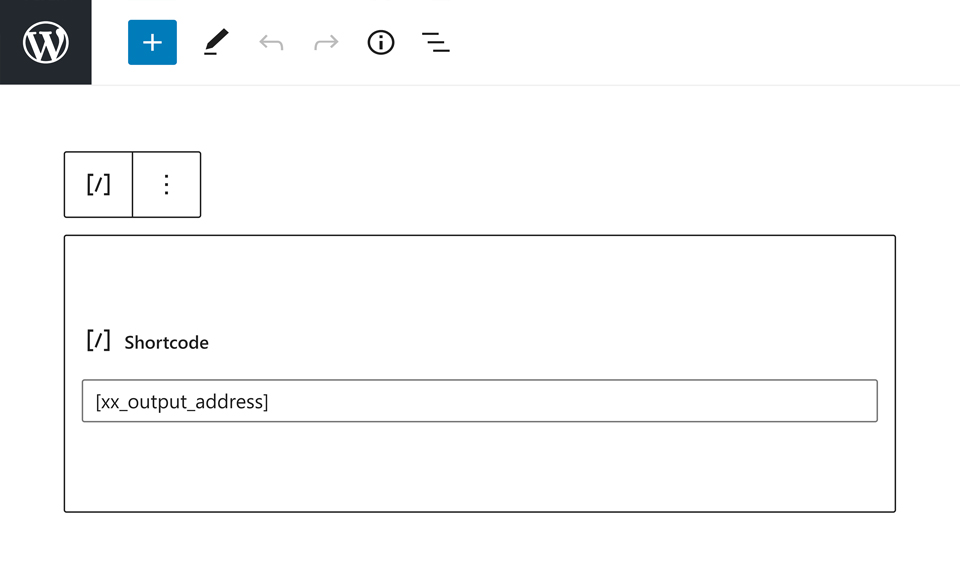
First, create a new xx_output_address() function that’s going to contain our form and will eventually be hooked to a shortcode. The function will take a single array as a parameter ( $args ), which will be passed from the shortcode. As we described above we’re only going to show the edit address form if the customer is missing either the required billing and/or required shipping address information OR if they have explicitly chosen to edit an existing address. We’re going to start by using our xx_user_has_required_address_vals() function to check if the customer has the required address information for their billing and shipping.
NOTE We’re also including a check to see if the WC Cart is NULL and if it is we don’t run our shortcode. This helps make sure our shortcode only runs on the front end of our site since we’re using front end functions from WooCommerce.
We also need know if the user is choosing to edit the shipping and/or billing address information. There are a host of ways this could be done though we’re going to use a URL parameter to trigger the display of the edit form and to control which portion ( shipping or billing ) gets shown. We’ve added our checks to see if the address information exists, so now lets add a check to see if the URL contains an action parameter and if that action parameter is either our “edit-shipping” or “edit-billing” values. We’re going to use WooCommerce’s wc_get_var() function to check if the action parameter is set in the URL and if it’s not default it to an empty string.
The next step is to check if a specific address is not being edited and if not then we output our view address HTML. The first step in creating our view portion of the form is to retrieve the Shipping and Billing addresses using WooCommerce’s wc_get_account_formatted_address() function which returns the formatted address ready to be displayed. We’re also going to use our xx_send_to_journey_step() function to retrieve the edit billing and edit shipping address links.
The last step for the view portion is to output the HTML and for this we’re going to copy the contents of the woocommerce/templates/myaccount/my-address.php file, making some adjustments for our own layout and style as well as including our custom Edit Address links.
Our Customer Journey Step 4b
Edit Address Component
We’ve covered our view address component so now is the time to add our edit address form which will be displayed if the action URL parameter equals either “edit-shipping” or “edit-billing” OR any of the required information for the billing or shipping addresses is missing. As with a lot of what we’ve done so far we’re going to make our lives easier using WooCommerce’s built in WC_Checkout class to generate our form fields since that class, using the WooCommerce settings, will automatically determine which fields are required. Get started by creating a new HTML form with three main div sections, a shipping, billing, and the submit action section. The shipping and billing sections should be set to hidden if the corresponding action value doesn’t match that section.
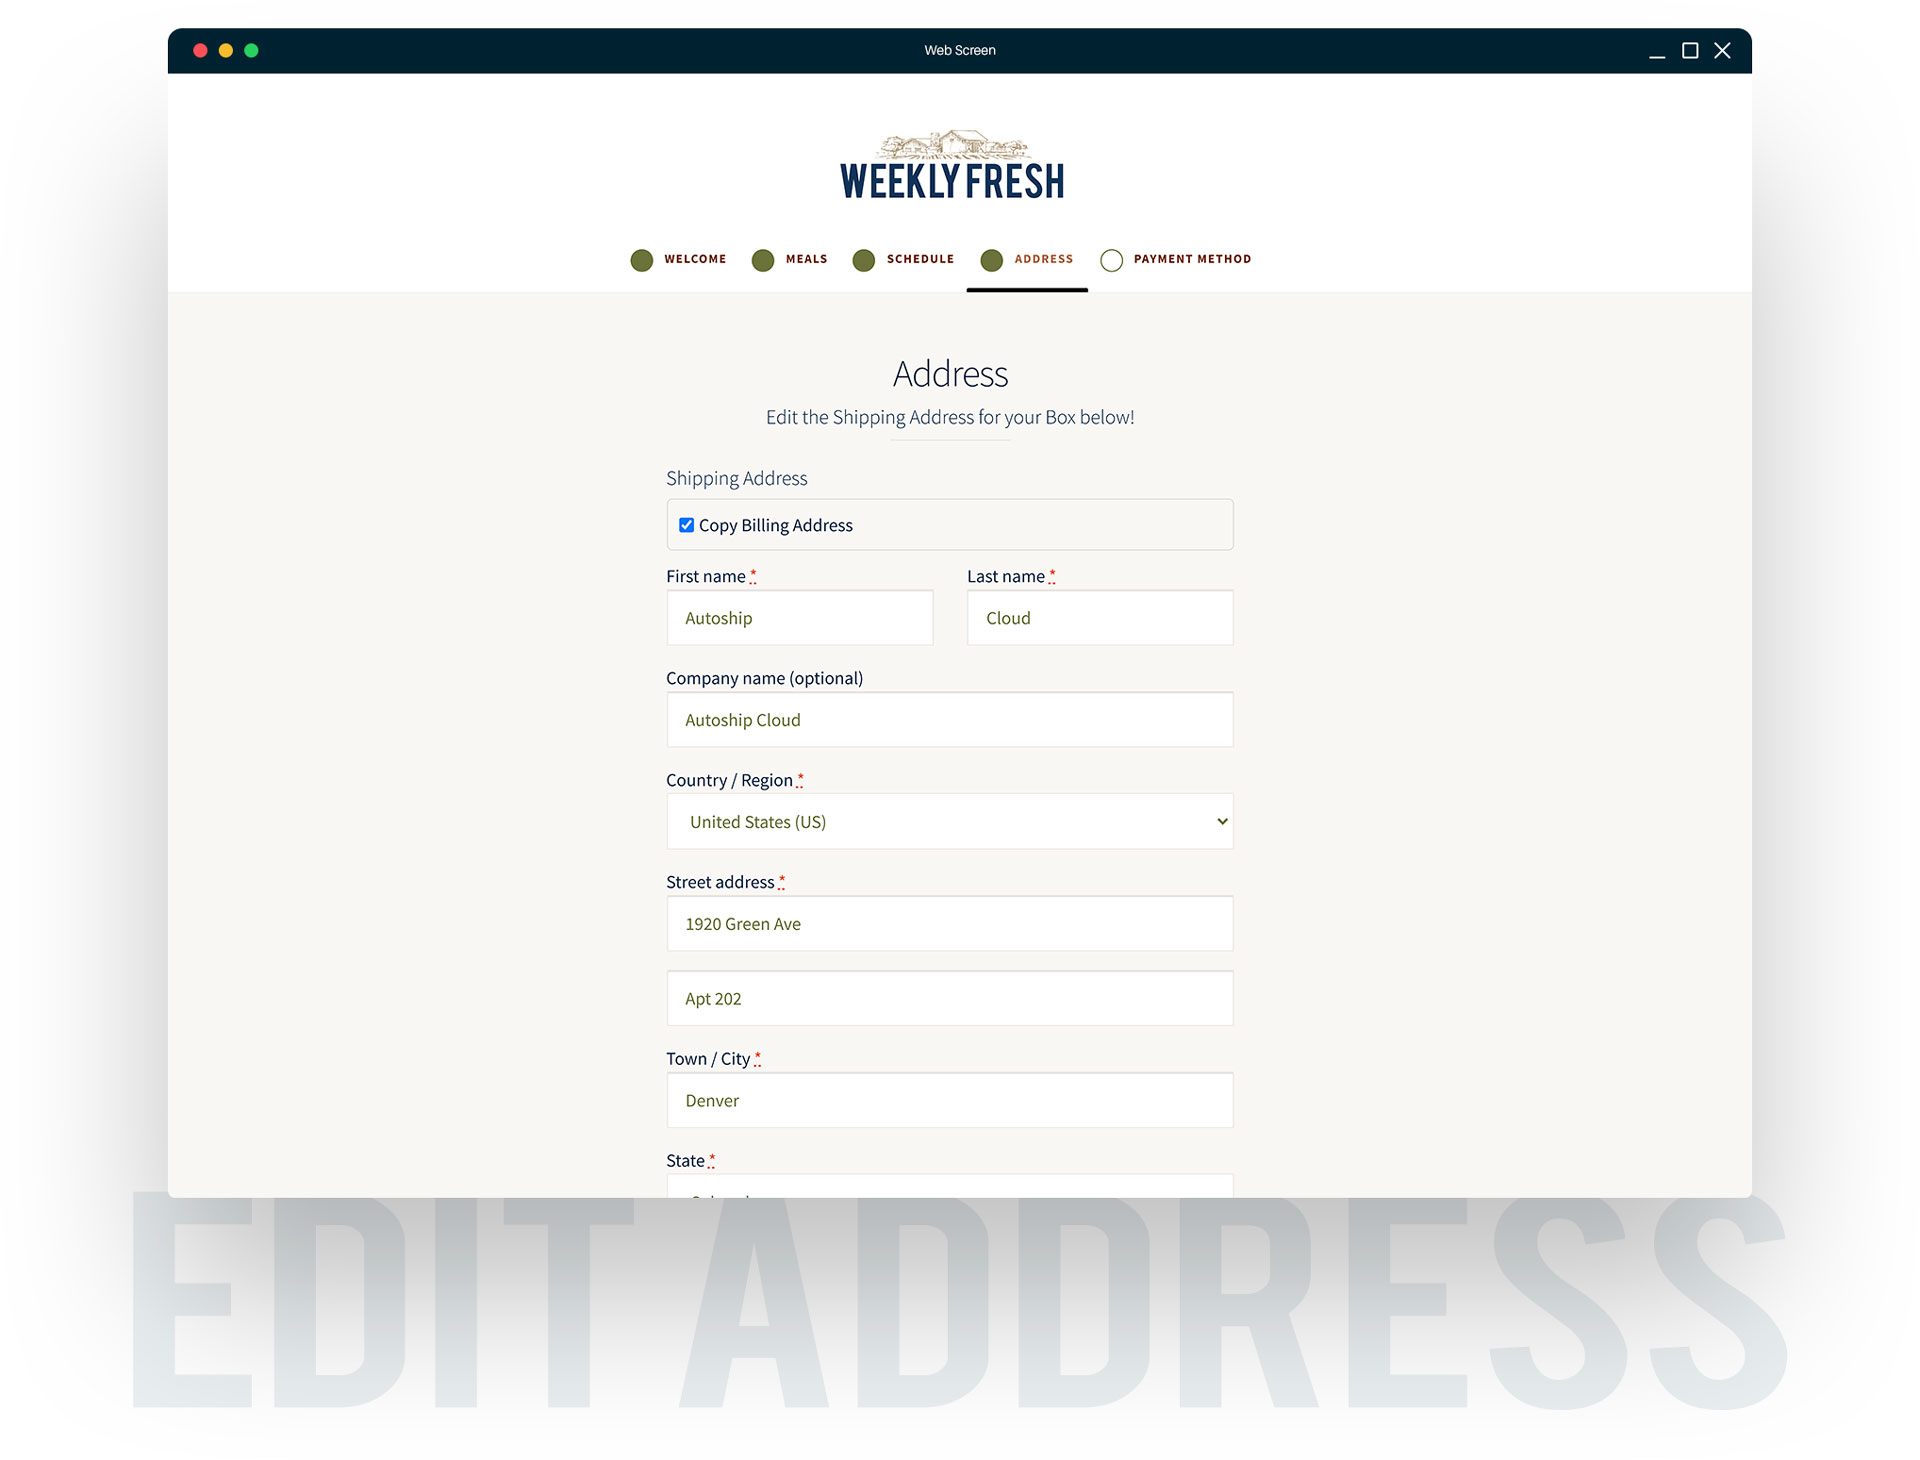
Now, lets first populate the shipping section using the WC_Checkou::get_checkout_fields() method passing it ‘shipping’ value to get an array of shipping fields and a foreach loop printing the fields returned by the get_checkout_fields() method using WooCommerce’s woocommerce_form_field() function. We’re using a similar method to what WooCommerce uses in it’s checkout so that developers can still adjust the required fields for your business and not worry about updating this code. We’re also going to add an “Edit Billing Address” link so that customers can flip between editing their shipping and billing addresses easily. Lastly we’re going to add a “Copy Billing Address” checkbox that we’ll hook some jQuery code to ( we’ll cover this in a bit ) so that customers can copy their address from the Billing address fields, making filing out the required information more turnkey.
Just like we did for the shipping address portion of the form let’s populate the billing address fields using the same WC_Checkou::get_checkout_fields() method to get an array of billing fields and a foreach loop printing the fields using WooCommerce’s woocommerce_form_field() function. We’re also going to add a “Edit Shipping Address” link here as well so that customers can flip between editing their shipping and billing addresses easily.
The last part to fill in is the submit action section. In addition to adding a submit button here we’re also going to add a hidden action field and a security nonce. However, in this instance rather than adding our own custom action to check for on the server side, we’re going to use the same action and security nonce that WooCommerce uses in it’s Edit Address form. This way WooCommerce’s own form handler WC_Form_Handler will catch our form submission and process it ( hey, less work for us right? ). To do this add a submit button with a hidden field with a name set to “action” and a value of “edit_address”.
Our Customer Journey Step 4c
Creating the Shortcode
Just like we have for the last forms, we’re going to create this Address form into a shortcode using the add_shortcode() function call setting the first parameter ( the tag ) and the second parameter ( the callback ) to the name of our function ‘xx_output_address’.
Our Customer Journey Step 4d
Address Redirects & Query Vars
As we mentioned in our Our Customer Journey Step 4b and the reason we used the “edit_address” action and security nonce we did was so that WooCommerce’s own WC_Form_Handler will catch our form submission and process it. The great news is that because of this we don’t need any form processing on the server like we did with the Select a Plan and Select a Schedule forms. However, we will need to adjust where a user is sent if there are any validation errors when WooCommerce processes the form submission and where they are sent once WooCommerce finishes processing the form submission. WooCommerce’s form handler for the edit address form uses the WordPress Query Variables to determine if the customer is currently on the Edit Address screen in My Account. Since we’re using the form handler from a different page ( our Address page ) we’ll also need to manually adjust the WordPress Query Vars so that WooCommerce processes our form.
Our Customer Journey Step 4d
Address Success Redirect
We’re first going to tackle the success redirect override and to do this were going to use the ‘woocommerce_customer_save_address’ action hook in WooCommerce’s WC_Form_Handler::save_address() method. Create a new xx_save_address_redirect() function that takes two parameters, an integer ( $user_id ) and a string ( $load_address ), both passed from the action hook and and add a new add_action() call to hook our new function to the ‘woocommerce_customer_save_address’ action.
In our new function we’re first going to check if the customer is on our journey using our xx_is_customer_journey() function, since the customer could be in the My Account > Address screen. If the customer is on our journey, let’s clear the current WooCommerce notices using the wc_clear_notices() function since we don’t need to show two success notices, just our custom notice we’ll add in a second.
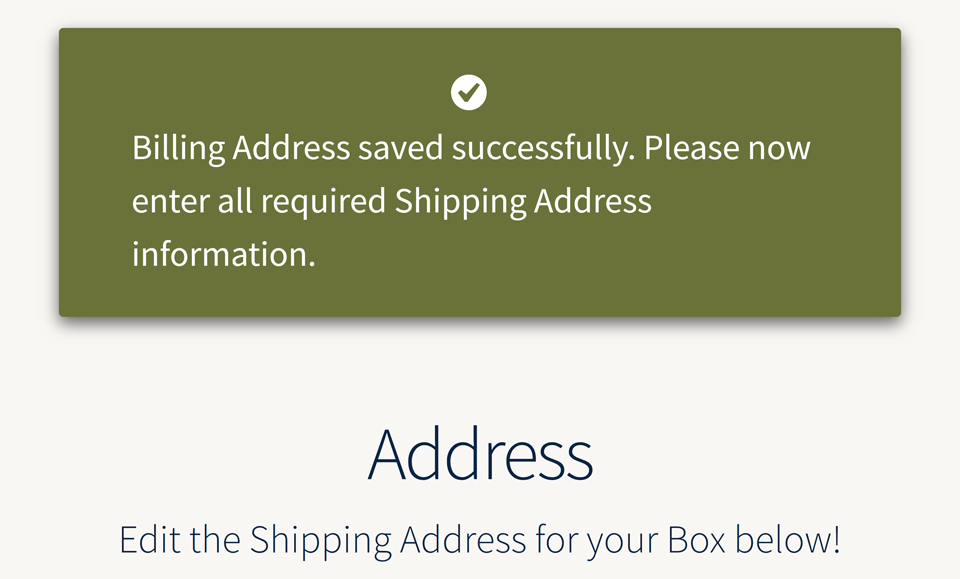
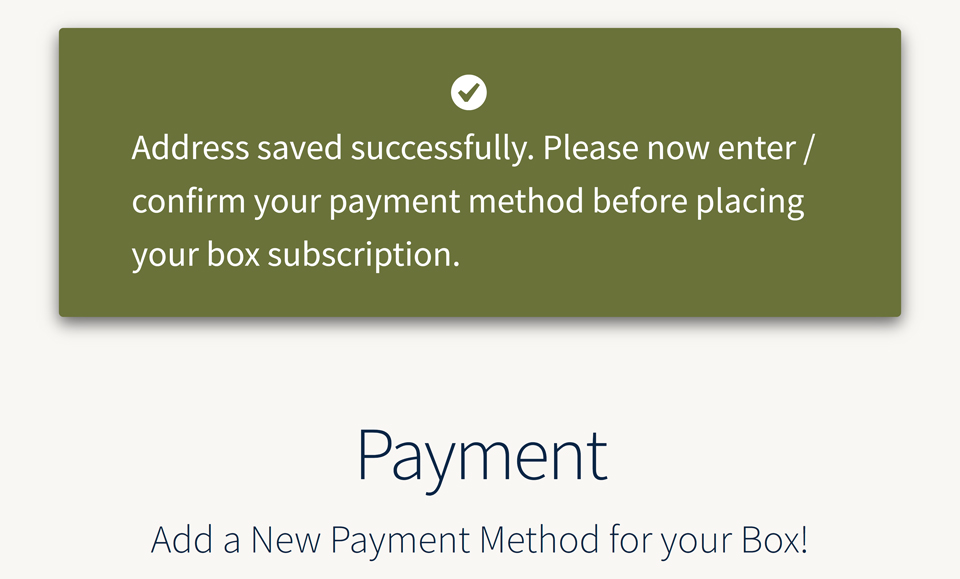
The next step will be to check if the customer has entered all the necessary billing and shipping information and if they haven’t, we’ll add a custom notice using the wc_add_notice() function and redirect them to our ‘address’ step using our xx_send_to_journey_step() function. If they have entered all the required billing and shipping information then we want to add a notice and send them to our ‘payment’ step using our xx_send_to_journey_step() function.
Lastly, if they have entered all the required billing and shipping information then we want to add a notice and send them to our ‘payment’ step using our xx_send_to_journey_step() function.
Our Customer Journey Step 4d
Address Validation Redirect
We’ve covered the redirect for when an address is successfully processed by WooCommerce. Now we’re going to deal with how / where to redirect a user when the form validation fails. We’re going to use the ‘woocommerce_after_save_address_validation’ action hook in WooCommerce’s >WC_Form_Handler::save_address() method to accomplish this. Create a new xx_save_address_failure_redirect() function that takes four parameters, an integer ( $user_id ), a string ( $load_address ), an array ( $address ), and a WC_Customer object ( $customer ), all passed from the action hook. Again, since we’re hooking this function to an action we also need to add a new add_action() call with our new function as the callback.
In our new function we’re going to check if there are one or more errors, using WooCommerce’s wc_notice_count() function, and if the customer is on our journey, using our xx_is_customer_journey() function, since again the customer could be in the My Account > Address screen and not in one or our pages. If there are errors and the customer is on our page then we’re going to use our xx_send_to_journey_step() function to send the user to our “address” page and pass the current URL action as a parameter using WooCommerce’s wc_get_var() function.
Our Customer Journey Step 5
Payment Method
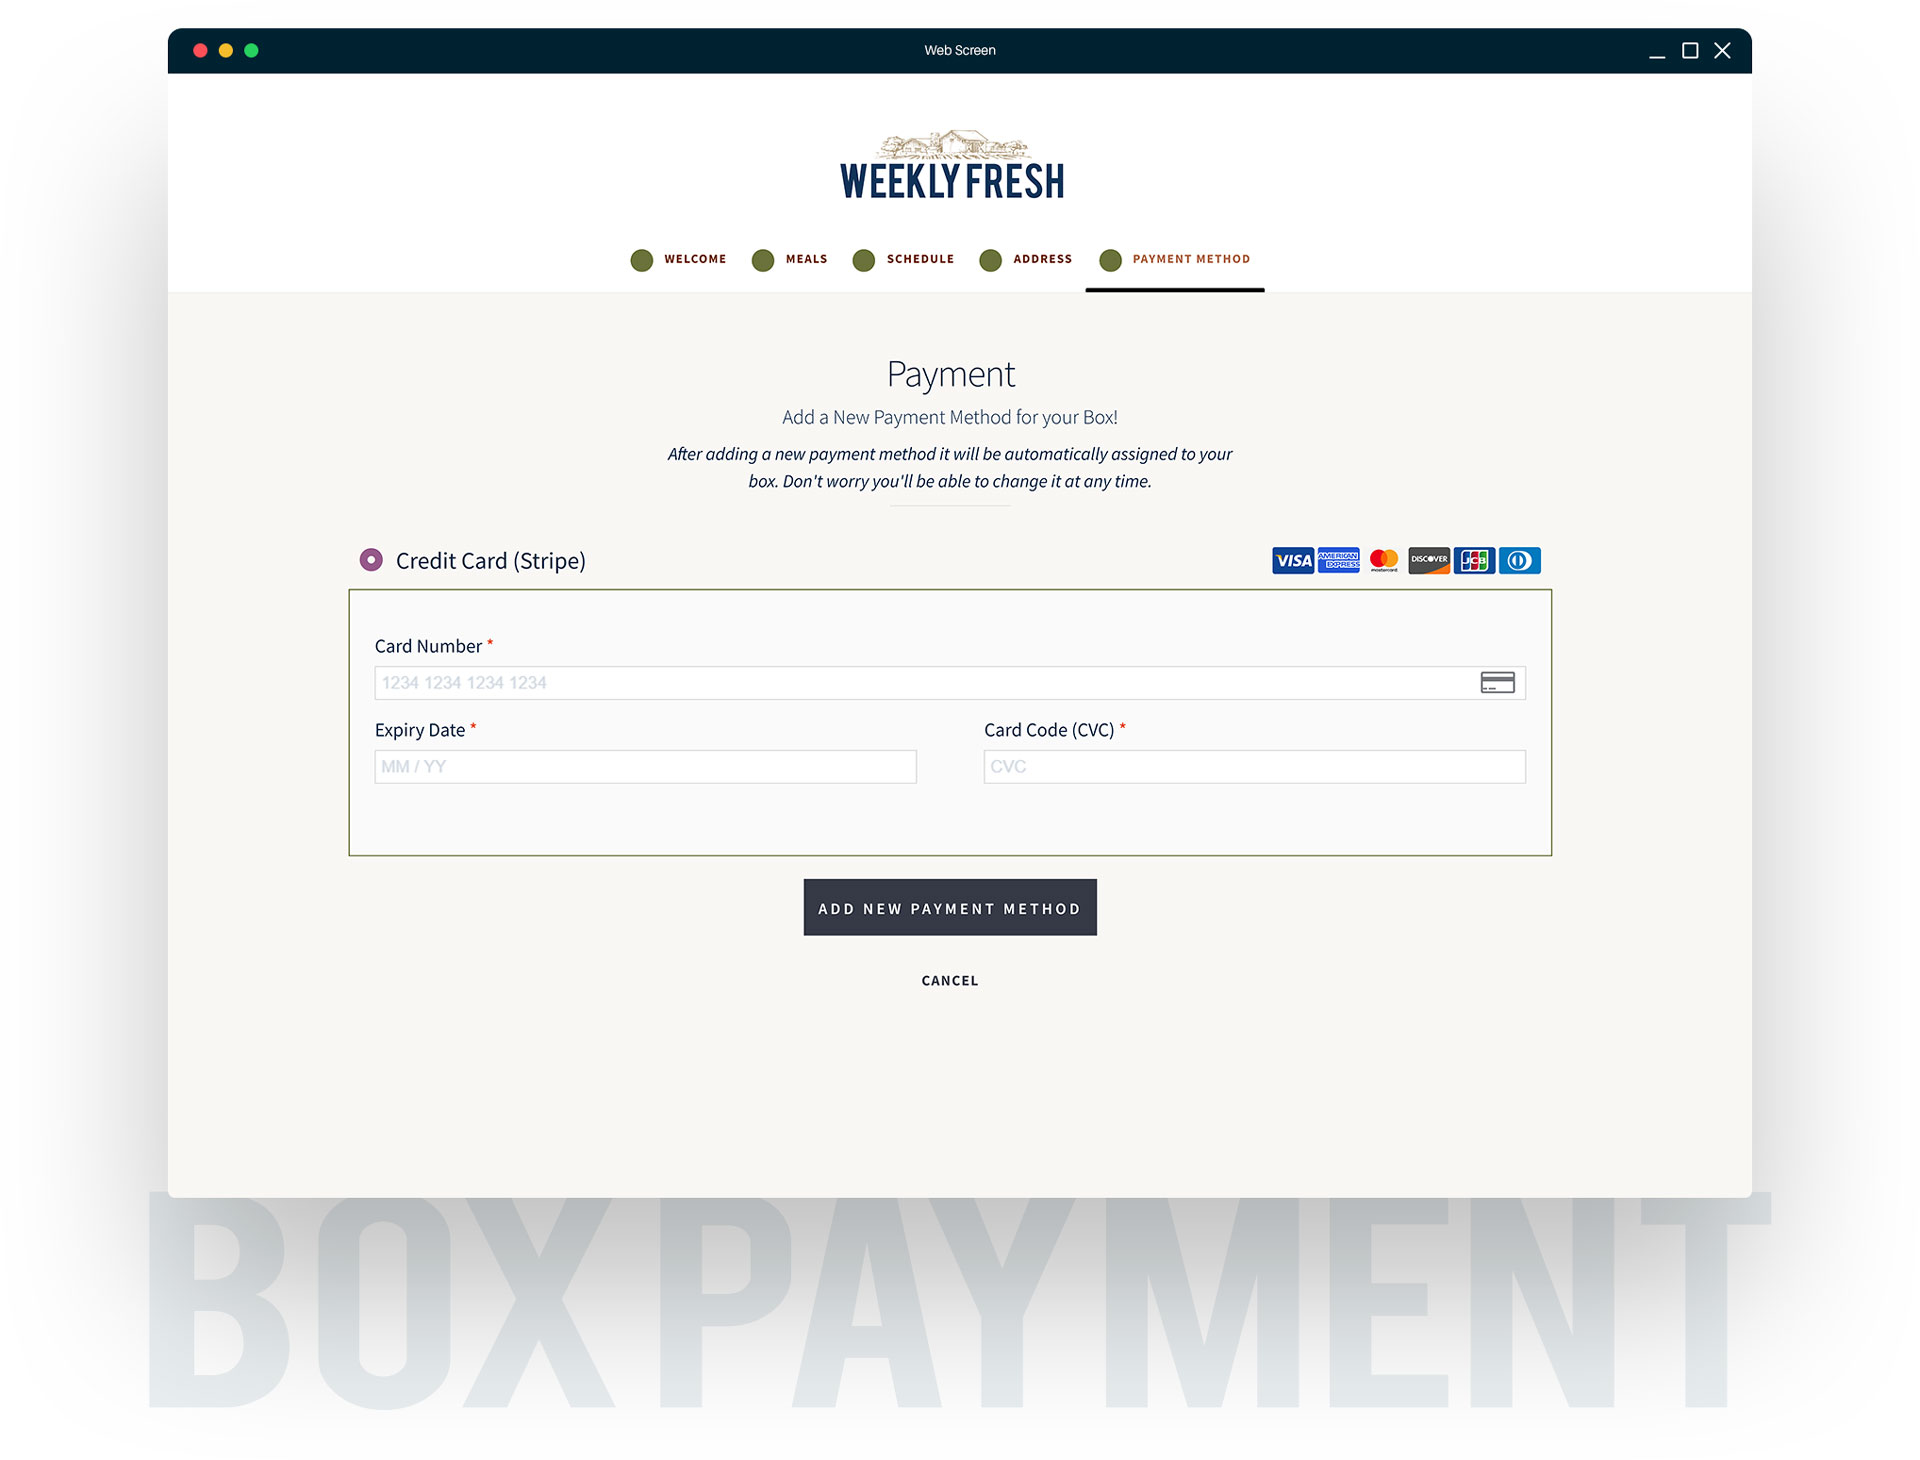
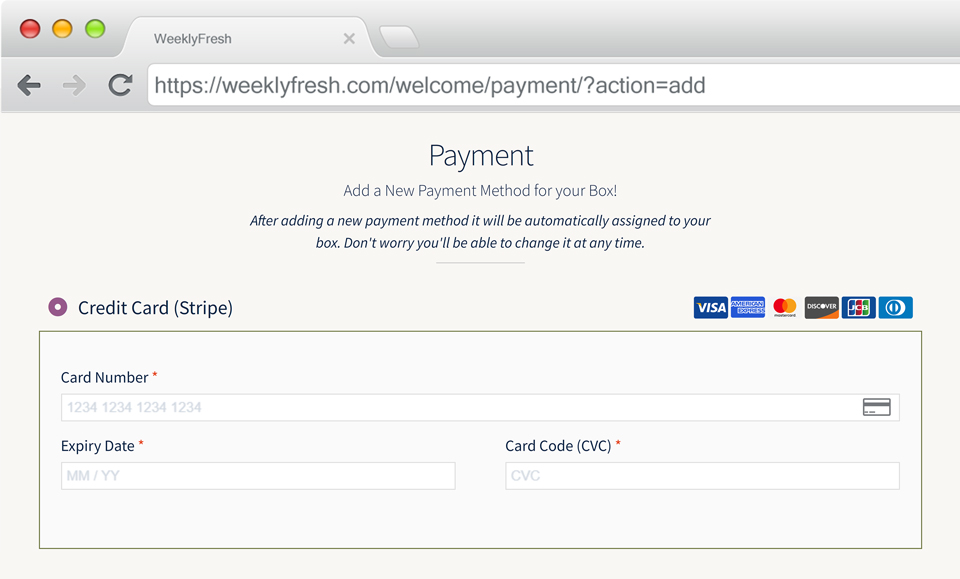
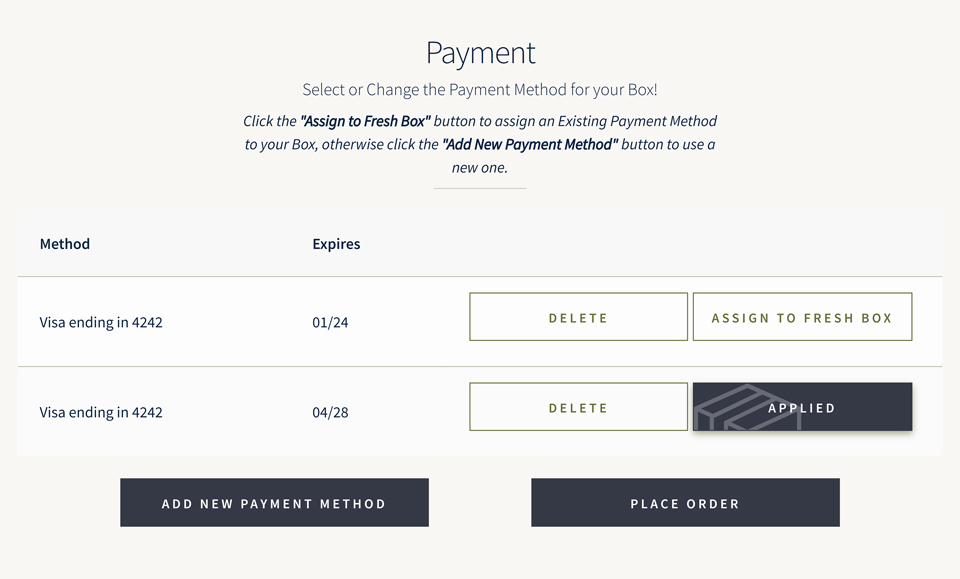
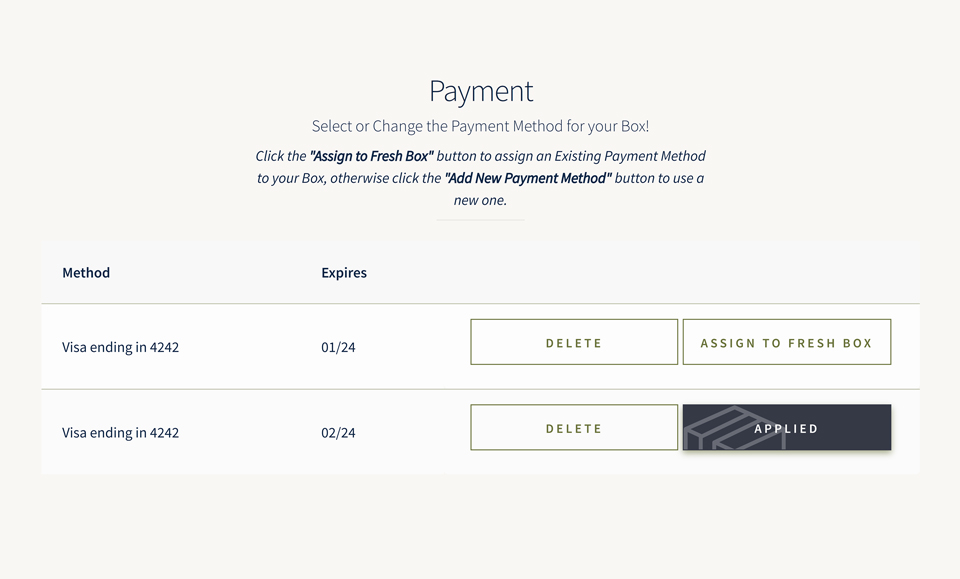
We now have all the info we would need to create a Scheduled Order but we’re missing the most vital piece in order to process the Scheduled Order on a recurring bases, payment information! We’re not using the WooCommerce checkout so in this case we need some way to allow customers to enter a payment method ( i.e. credit card ) without creating a charge but generating a saved payment method and token that can be used with the Scheduled Order ( see Stripe’s information on payment tokens here ). The good news here is that all WooCommerce Payment Gateways Autoship Cloud integrates with allows the creation of saved payment methods from the My Account > Payment Methods page which is what we’re going to use to capture that information on our Payment method page!
Our Customer Journey Step 5a
Select / Add Payment method
Just like our Address form, our Payment Method form is going to have two main components, the view existing payment methods component ( similar to the My Account > Payment Methods page ), and the second is the add payment method form. If the customer has one or more saved payment methods then we’ll display those with an additional option to select them as this box’s payment method, otherwise if they have not saved payment methods then we’ll automatically display the add payment method form.
First, create a new xx_output_payment_method() function that’s going to contain our form and will also eventually be hooked to a shortcode, just like our other forms. This function will take a single array as a parameter ( $args ), which will be passed from the shortcode call. Similar to our Address form we’ll need to know when a customer is either choosing to manually add a new payment method or has no saved payment methods so that we know if we should show the add payment method form or not. In order to know this we’re going to first make a call to the WooCommerce wc_get_customer_saved_methods_list() function which returns an array of saved payment methods for the supplied customer id. When making the call we’re going to use the WordPress get_current_user_id() to easily pass the current user’s id.
NOTE Again, we’re also going to include a check to see if the WC Cart is NULL and if it is we don’t run our shortcode. This helps make sure our shortcode only runs on the front end of our site since we’re using front end functions from WooCommerce.
We also need know if the user is explicitly choosing to add a new Payment Method so just like with our address form we’re going to use an “action” URL parameter to trigger the display of the add payment method form if the value of that parameter is set to “add”. We’ve pulled the saved methods for the user so now we’re going to check for the “action” URL parameter using the $_GET PHPs superglobal array and if either the user has no saved payment methods OR if the action parameters is set to “add” we should show the Add Payment Method form otherwise the saved payment methods.
The next step in creating our payment method shortcode is to display the Saved Payment Methods table if the user already has saved payment methods and hasn’t explicitly chosen to add a new one. In this case rather than create our own form, we’re going to use WooCommerce’s woocommerce_account_payment_methods() function which will automatically output the Saved Payment Methods table, typically found in the My Account > Payment Methods screen, and will mean that we can let WooCommerce deal with processing any form actions that aren’t related to our functionality ( like Delete Payment method ).
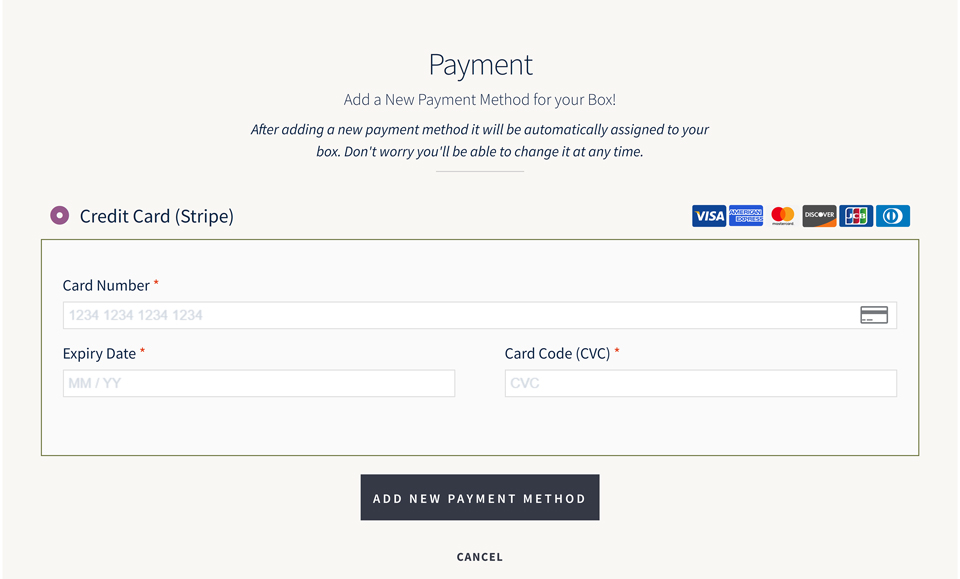
If the user is adding a new payment method or has no saved methods we’re going to display the Add Payment Method form. As we did with the Saved Payment Methods form, we’ll use WooCommerce’s woocommerce_account_add_payment_method() function to output the Add Payment Method form and let WooCommerce deal with processing the form submission.
Lastly, were going to add a “Cancel” button that can return the customer to the Saved Payment Methods table view if they are on the Add Payment Method form and have existing saved methods they want to use.
Our Customer Journey Step 5b
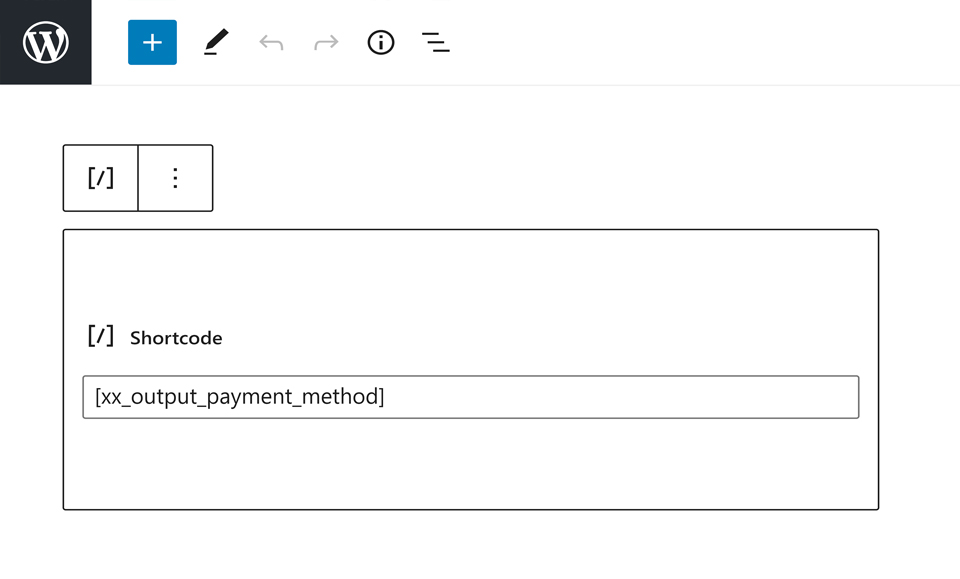
Creating the Shortcode
As we mentioned above we’re going to create this Payment form into a shortcode using the add_shortcode() function call setting the first parameter ( the tag ) and the second parameter ( the callback ) to the name of our function ‘xx_output_payment_method’.
Our Customer Journey Step 5c
Process Newly Added Payment Methods
While we won’t need to worry about actually tokenizing and saving the new payment method to the customer’s account since WooCommerce will deal with that ( hence our use of WooCommerce’s Add Payment Method form ), we will want to apply the newly added payment method to the customer’s fresh box.
Start by creating a new xx_add_payment_method_to_box() function which will be hooked to the WooCommerce “woocommerce_new_payment_token” action. The action fires after WooCommerce successfully adds a saved payment method to a customer’s account and passes two arguments to any hooked functions, the newly added payment token id ( integer ) and the newly added payment token object ( WC_Payment_Token_CC ), so our function should take to parameters, $token_id and $token.
In our new function we’re first going to check if the customer is on our journey using our xx_is_customer_journey() function, since the customer could be in the My Account > Payment Methods screen or in the Checkout screen. If the customer is on our journey, let’s use our xx_update_fresh_box_payment_method() function to assign the newly added payment method to our customer’s fresh box by passing it the current user’s id, the token id ( $token_id ) and the payment gateway id associated with the token. We retrieve the gateway id for the token from the WooCommerce Token object passed to our function and the WC_Payment_Token::get_gateway_id() method.
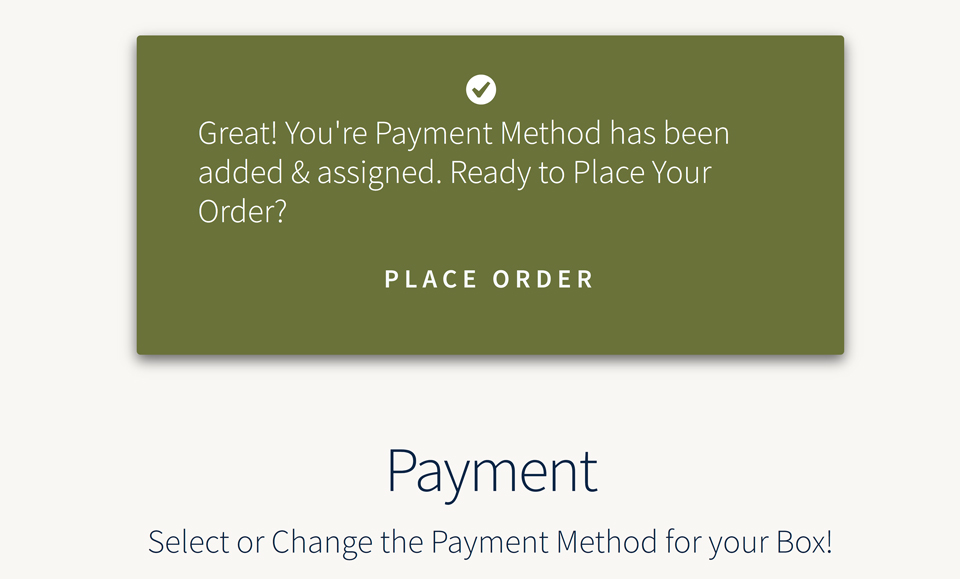
The last piece to our function will be to add a custom notice using WooCommerce’s wc_add_notice() function that includes a link to our Order step, generated using our xx_send_to_journey_step() function. Finally, after adding the notice we redirect the customer back to the Payment Method step in the journey, payment, using our xx_send_to_journey_step() function passing it the slug for our payment page, “payment”.
Our Customer Journey Step 5d
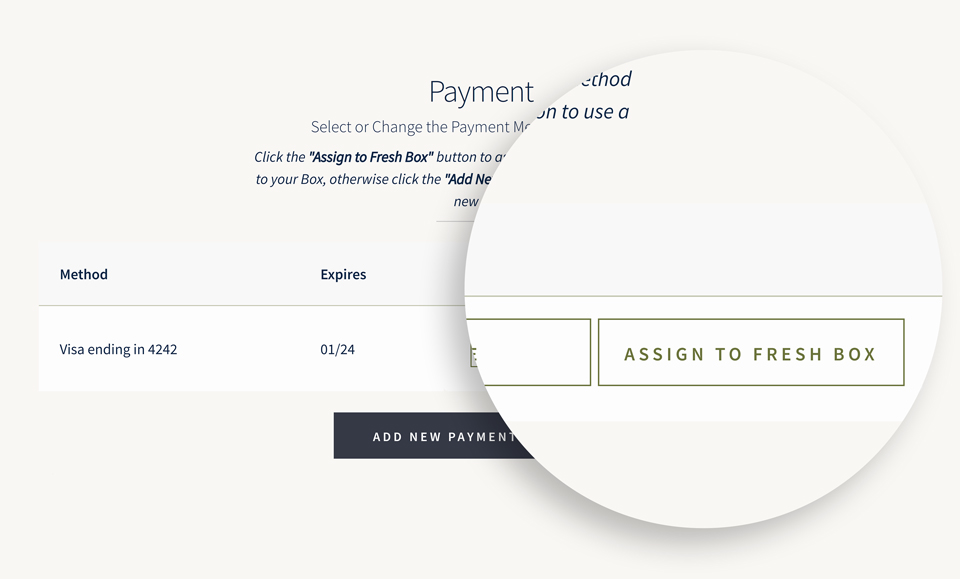
Apply An Existing Payment Method
We’ve covered how a customer could add a new payment method and apply it to their fresh box but what about a customer that want’s to use an existing saved payment method? That’s what we’re going to cover now! We start that support by adding a custom button to each saved payment method that a customer can use to apply that payment method to their box. In order to add our button we’re going to hook into WooCommerce’s ‘woocommerce_payment_methods_list_item’ filter which allows developers to adjust/expand the actions available for each saved payment method on the Saved Payment Method table. Create a new xx_display_apply_payment_method_to_box_btn() function that takes two parameters, an array ( $list_item ) which contains the current saved payment method’s row data and a WC_Payment_token object ( $payment_token ) which contains the payment token object for that row.
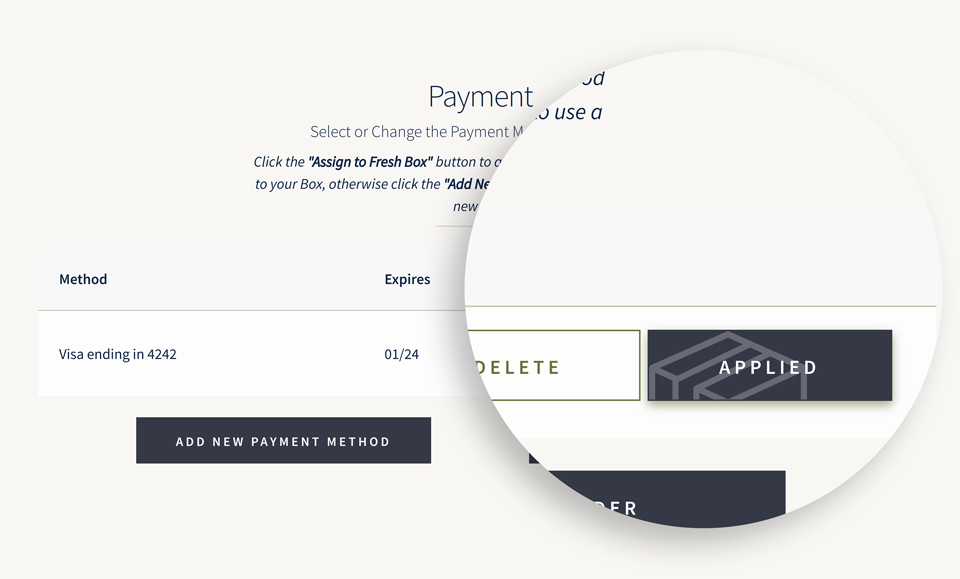
Start the contents of the new function by checking that we’re currently on our journey pages ( we don’t want to show our action in the My Account > Payment Method page ) using our xx_is_customer_journey() function and if the customer isn’t on our page just return the list item data without making any changes. Next let’s use our xx_get_fresh_box_payment_method() function we created earlier to retrieve the payment method currently assigned to the box
The second part we’re going to add to our new function is a check to see if the current saved payment method is the one assigned to our box by comparing the id for the payment token assigned to the box to the WooCommerce Payment Token object’s id using WooCommerce’s WC_Payment_Token::get_id() method. If the current box’s token id matches this row’s payment token we’re going to add a custom action that we’ll use to visually show that this is the current payment token with custom CSS though here is where you could add your own customized way to flag the method.
The third piece we’re going to add to our new function is the action that will allow our customers to assign a saved method to their fresh box. We just checked if the current saved payment method is assigned, so if it isn’t we’re going to add an Apply To Box button. To add the button let’s first use our xx_send_to_journey_step() function to retrieve our payment method step URL, passing it several URL parameters to add on to the returned value. The following URL parameters should be sent to our function which we’ll use in the next function we create to process this call: an “action” variable with a value of “apply”, a “token-id” variable with the current WooCommerce Payment Token object’s id as the value, and finally a “type” variable set to the current WooCommerce Payment Token object’s gateway id. To retrieve the current WooCommerce Payment Token object’s gateway id we’ll use WooCommerce’s WC_Payment_Token::get_gateway_id() method.
Just like we do with our forms we’re going to use WordPress’ wp_nonce_url() function to add a security nonce ( let’s use xx-apply-payment-method-to-box as the action ) to our URL. Now that we have the URL we need to add our new button to the list item’s actions array by adding another ‘apply_to_box’ key with an array as the value that contains the action’s URL ( the one we just created ) and a label to show the customer.
The final step in our new function is to remove the “Make Default” action that should only be available in the My Account > Payment Methods screen and return the list item variable that now has our new action(s). Removing an action is as simple as using PHP’s unset() function on the ‘default’ actions key.
Our Customer Journey Step 5e
Process Payment Method Actions
Now that we’ve added the button to apply an existing payment method to the customer’s fresh box, we need to add the function to process the link action so that when a customer clicks our new button the payment method gets assigned to the fresh box. Create a new xx_autoship_apply_payment_handler() function ( which doesn’t take any arguments ) and add a new add_action() call with the action set to “wp” and our new function as the hooked function.
As we did with all our other handler functions we’re going to add a security nonce check and confirm the action being triggered in the URL matches this handler. First let’s retrieve the nonce value from the URL if it exists and verify it’s valid. To retrieve the URL value we’re going to use WooCommerce’s wc_get_var() function and then to validate the nonce value we’re going to use WordPress’ wp_verify_nonce() function passing our ‘xx-apply-payment-method-to-box’ action as the value.
In addition, and just like our other functions, we’re going to retrieve the action from the URL, the token id, and the token type also using the wc_get_var() function and passing it an empty string as the default value for each. If the action doesn’t match our ‘apply’ action value or if either the token id or type are empty ( i.e. they don’t exist in the URL ) then we bail.
We’ve validated the nonce and the URL parameters so now we use our xx_update_fresh_box_payment_method() function along with the WordPress’ get_current_user_id() function to assign the token id and token type to our fresh box. Once we assign the payment method to the box the only things left to do is add a notice letting the customer know it was successful along with an option to place their order. We’re going to use WooCommerce’s wc_add_notice() function to add our success notice and our xx_send_to_journey_step() function to retrieve the order step’s URL.
Lastly, we’re going to use our xx_send_to_journey_step() function to redirect them back to the payment / fifth step in the journey by passing it the slug to our payment page.
Our Customer Journey Step 6
Creating a Scheduled Order
The last step to add to our customer’s journey is the most important one, the step that creates the Scheduled Order! Typically this step is taken care of by a checkout form ( both in most of the current meal delivery sites on the market and in normal eCommerce shops ), however, in our case we’re not charging our customers when they sign up so we don’t need to run them through a true checkout. We’ve already had our customers fill in the needed information typically gathered at checkout ( i.e. Address, Payment Method, etc. ) in the other steps so all we need to do in this step is generate the Scheduled Order. This step doesn’t actually have any UI or user interaction needed, so no more forms or HTML work ( WooHoo! ), just converting the current cart into a Scheduled Order and for this we’re going to use our Order page as the trigger. While our customers won’t be going through the checkout we are going to use our Order page as the WooCommerce checkout page, not because we need the form but because this will mean that all checkout links and buttons ( from the cart page to the mini-cart ) will automatically point to the correct step, our Order step ( Nice Right? ). Once again WooCommerce makes this adjustment super simple for us and just means pointing the Checkout page to our new Order page. In WP Admin > WooCommerce > Settings > Advanced ( tab ) select the Checkout page drop down and choose our new Order page.
We’ve created our customer journey, including getting them registered, adding a way for them to add meals to their Fresh Box, a way to Schedule their Fresh Box, enter their Address, add a Payment Method and eventually get them to the point where their cart can be converted to a Scheduled Order. However, there’s one more piece to our journey, assisting our customer through it and ensuring that each step is completed before the next step can be taken.
Journey Check Points
Controlling our Customers’ Journey
We’ve created our pages ( from our Welcome Page to our Order Page ) yet we should add a way to control when our customer can move on to the next step. They shouldn’t be able to select a schedule without selecting their meals, right? They shouldn’t be able to place their order without selecting a schedule, right?… these are the safeguards we’re going to put in place with our new xx_redirect_router() function ( see told you we were going to create this! ). Get started by creating a new xx_redirect_router() function and hook it to the template_redirect action using an add_action() function call with a priority of 8. We’re using a priority of 8 so that we can hook in before WooCommerce and catch our customers before any WooCOmmerce validation/functionality is performed.
Journey Check Point 1
Not Logged In
The first check we’re going to add to our new router function is to check if the user is not logged in, and if they aren’t logged in and they are on our journey and on any page other than our Welcome page, we should send them to our Welcome page so that they can sign in or register. We’re going to use the WordPress is_user_logged_in() function to determine if the current customer is logged in and we’re going to use our xx_is_customer_journey() utility function to check if they are on our journey and also if they are on our welcome page by passing it the slug to our Welcome page, “welcome”. Then, if the customer isn’t logged in and not on our Welcome page, but on our journey, we’re going to use our xx_send_to_journey_step() function to redirect them to the welcome page / first step in the journey by passing it the slug to our Welcome page.
- Not Signed In
- Not on Welcome Page / First Step
- Send them to Welcome Page
Journey Check Point 2
Logged In & On a Non-Restricted Page
The second check we’re going to add to our new router function is to check if the user is logged in, and if they are and they are on the Welcome Page, Select Your Meals ( i.e. Shop ) Page, page or Box ( i.e. Cart ) Page, don’t restrict them. Again, we’re going to use the WordPress is_user_logged_in() function to determine if the current customer is logged in, and our xx_is_customer_journey() utility function to check if they are on our welcome page, Select Your Meals page ( i.e. the shop ), or the Your Fresh Box page ( i.e. cart ) ( which we’ve renamed to Your Fresh Box with box as the slug, remember the utility function takes the page slug ). Then, if the customer is logged in and on one of these pages / steps we’re going to let them browse.
- Signed In
- On Welcome Page
- Or on Select Your Meals ( i.e. Shop ) Page
- Or on Your Fresh Box ( i.e. Cart ) Page
- Don’t Do Anything
Journey Check Point 3
Full Fresh Box ( i.e. Cart )
The third check we’re going to add to our new router function is to check if the user is not on the Welcome page, Select Your Meals ( i.e. Shop ) Page, or Box ( i.e. Cart ) Page and they don’t have a full Box. Remember, our customer already chose a plan size ( number of meals ) and before they can move on they need to have selected the right number of meals for their plan. Luckily, we have a handy cart utility function, xx_get_cart_diff(), that can tell us if the Cart Quantity matches the customers plan.
- Signed In
- Not on Welcome Page
- Not on Select Your Meals ( i.e. Shop ) Page
- Not on Your Fresh Box ( i.e. Cart ) Page
- Box / Cart is not Full
- Send them to Select Your Meals Page
Journey Check Point 4
Cart is Full But Not Scheduled
The Next check we’re going to add to our router function is to check if the user is not on the Welcome page, Select Your Meals ( i.e. Shop ) Page, Box ( i.e. Cart ) Page, or Select Your Schedule page and they have a full Box but no schedule assigned. This means that are customer selected their plan, filled their box, but never selected a schedule. If this is the case we need to send them back to select a schedule. In this case we’ll use our xx_cart_has_schedule() function to check if the box has a schedule and if it doesn’t we’ll add a notice and use our xx_send_to_journey_step() function to send them back.
- Signed In
- Not on Welcome Page
- Not on Select Your Meals ( i.e. Shop ) Page
- Not on Your Fresh Box ( i.e. Cart ) Page
- Not on Select Your Schedule Page
- Box / Cart is Full
- Schedule is not assigned
- Send them to Select Your Schedule Page
Journey Check Point 5
Cart is Full & Is Scheduled
We now know at this point in the route that the customer is registered and logged in, has a full box ( i.e. cart ), and has a schedule assigned to their box. We don’t know where they are in the journey but they should be able to go back and fourth between the Welcome page, Select Your Meals ( i.e. Shop ) Page, Box ( i.e. Cart ) Page, and Select Your Schedule page without being redirected. We already have the check for the first three pages so now lets add a check for the Select Your Schedule page, and if they are on that page leave them be. Once again we’ll use our xx_send_to_journey_step() function to check if they are on the Select Your Schedule page by passing it the Select Your Schedule page slug, “schedule”.
- Signed In
- On Welcome Page
- Or On Select Your Meals ( i.e. Shop ) Page
- Or On Your Fresh Box ( i.e. Cart ) Page
- Or On Select Your Schedule Page
- Box / Cart is Full
- Schedule is assigned
- Don’t do anything
Journey Check Point 6
Billing & Shipping Address
The next check we’ll add is to see if the customer is not on one of our first four pages ( i.e. Welcome page, Select Your Meals page, Box page, Select Your Schedule page ) doesn’t have all the required Shipping or Billing information entered and is NOT on our Address page. To check for missing billing or shipping information we’re going to use our xx_user_has_required_address_vals() function, calling it twice once to check for missing shipping information by passing it “shipping” and once to check for missing billing information by passing it “billing”. Just like we did with the other steps, if there is missing information we’re going to add a WooCommerce notice and send the customer back to the Address page using our xx_send_to_journey_step() function. The only difference in this case is we’re going to pass the function an additional “action” parameter to specify which edit address form should be displayed on the redirect.
- Signed In
- Not on Welcome Page
- Not on Select Your Meals ( i.e. Shop ) Page
- Not on Your Fresh Box ( i.e. Cart ) Page
- Not on Select Your Schedule Page
- Box / Cart is Full
- Schedule is assigned
- Missing Billing Or Shipping Information
- Not on Address Page
- Send them to Address Page
Journey Check Point 7
Billing & Shipping Address // Check 2
We just added a check to see if the customer is missing any billing or shipping information and if they aren’t on our Address page send them there. Well now we need to automatically display the address edit form if they are on our Address page, are missing billing or shipping information, and are not currently editing an address. In order to accomplish this we’re first going to use WooCommerce’s wc_get_var() function to check if the customer is currently editing their address by looking for either the URL action parameter or a Posted form parameter. We’ll then check if the customer is on our Address page using our xx_send_to_journey_step() function by passing it the Address page’s slug, “address”, if they are missing any billing or shipping info using the values we just retrieved, and if the action is empty or not our “edit-address” action. If this is the case then we’re going to update the URL to include our action ( so the appropriate dit address form shows ) and send the customer back to the Address page using our xx_send_to_journey_step() function.
- Signed In
- Not on Welcome Page
- Not on Select Your Meals ( i.e. Shop ) Page
- Not on Your Fresh Box ( i.e. Cart ) Page
- Not on Select Your Schedule Page
- Box / Cart is Full
- Schedule is assigned
- Missing Billing Or Shipping Information
- On Address Page
- Not Editing an Address
- Send them to Address Page with an Edit Action
Journey Check Point 8
Payment Method
The last check we need to add is to make sure there is a payment method assigned to the Box if the customer is trying to place their order (i.e. on the Order page ). To make this check we’re going to first use our xx_send_to_journey_step() function to check if they are on our Order page and then use our xx_get_fresh_box_payment_method() function to check if they have a payment method assigned to their Box. If they are on the Order page and have no payment method then add a notice and redirect them back to the Payment Method page.
- Signed In
- Not on Welcome Page
- Not on Select Your Meals ( i.e. Shop ) Page
- Not on Your Fresh Box ( i.e. Cart ) Page
- Not on Select Your Schedule Page
- Box / Cart is Full
- Schedule is assigned
- Missing Billing Or Shipping Information
- Not on Address Page
- On the Order Page
- Does Not have a Payment Method
- Send them to Payment Method Page
Journey Done!
Great! We’ve covered both the basics on how we’re going to manage our customer’s Box Sizes and Delivery Schedules which included crafing some utilty functions to help make our lives a bit easier, and now we’ve covered the creation of our Customer’s Journey. The Next Step is to implement the Cart Requirements, an area that always seems to give developers and merchants trouble… don’t worry, we have you covered!