
Cart Requirements
Alright, so our Meal Box Subscription site is definitly starting to take shape! We’ve covered the Box Sizes and Delivery Schedules, and the Customer Journey. The next section we’re going to cover addresses some of the main questions that seem to come up when building a Meal Box Subscription site, how to control and restrict the cart?! That’s our next step, Cart Requirements, adding and validating our WooCommerce cart.
Box Sizes & Delivery Schedules
View Step 1 SummaryCustomer Journey
View Step 2 SummaryCart Requirements
View Step 3 SummaryCreating the Scheduled Order
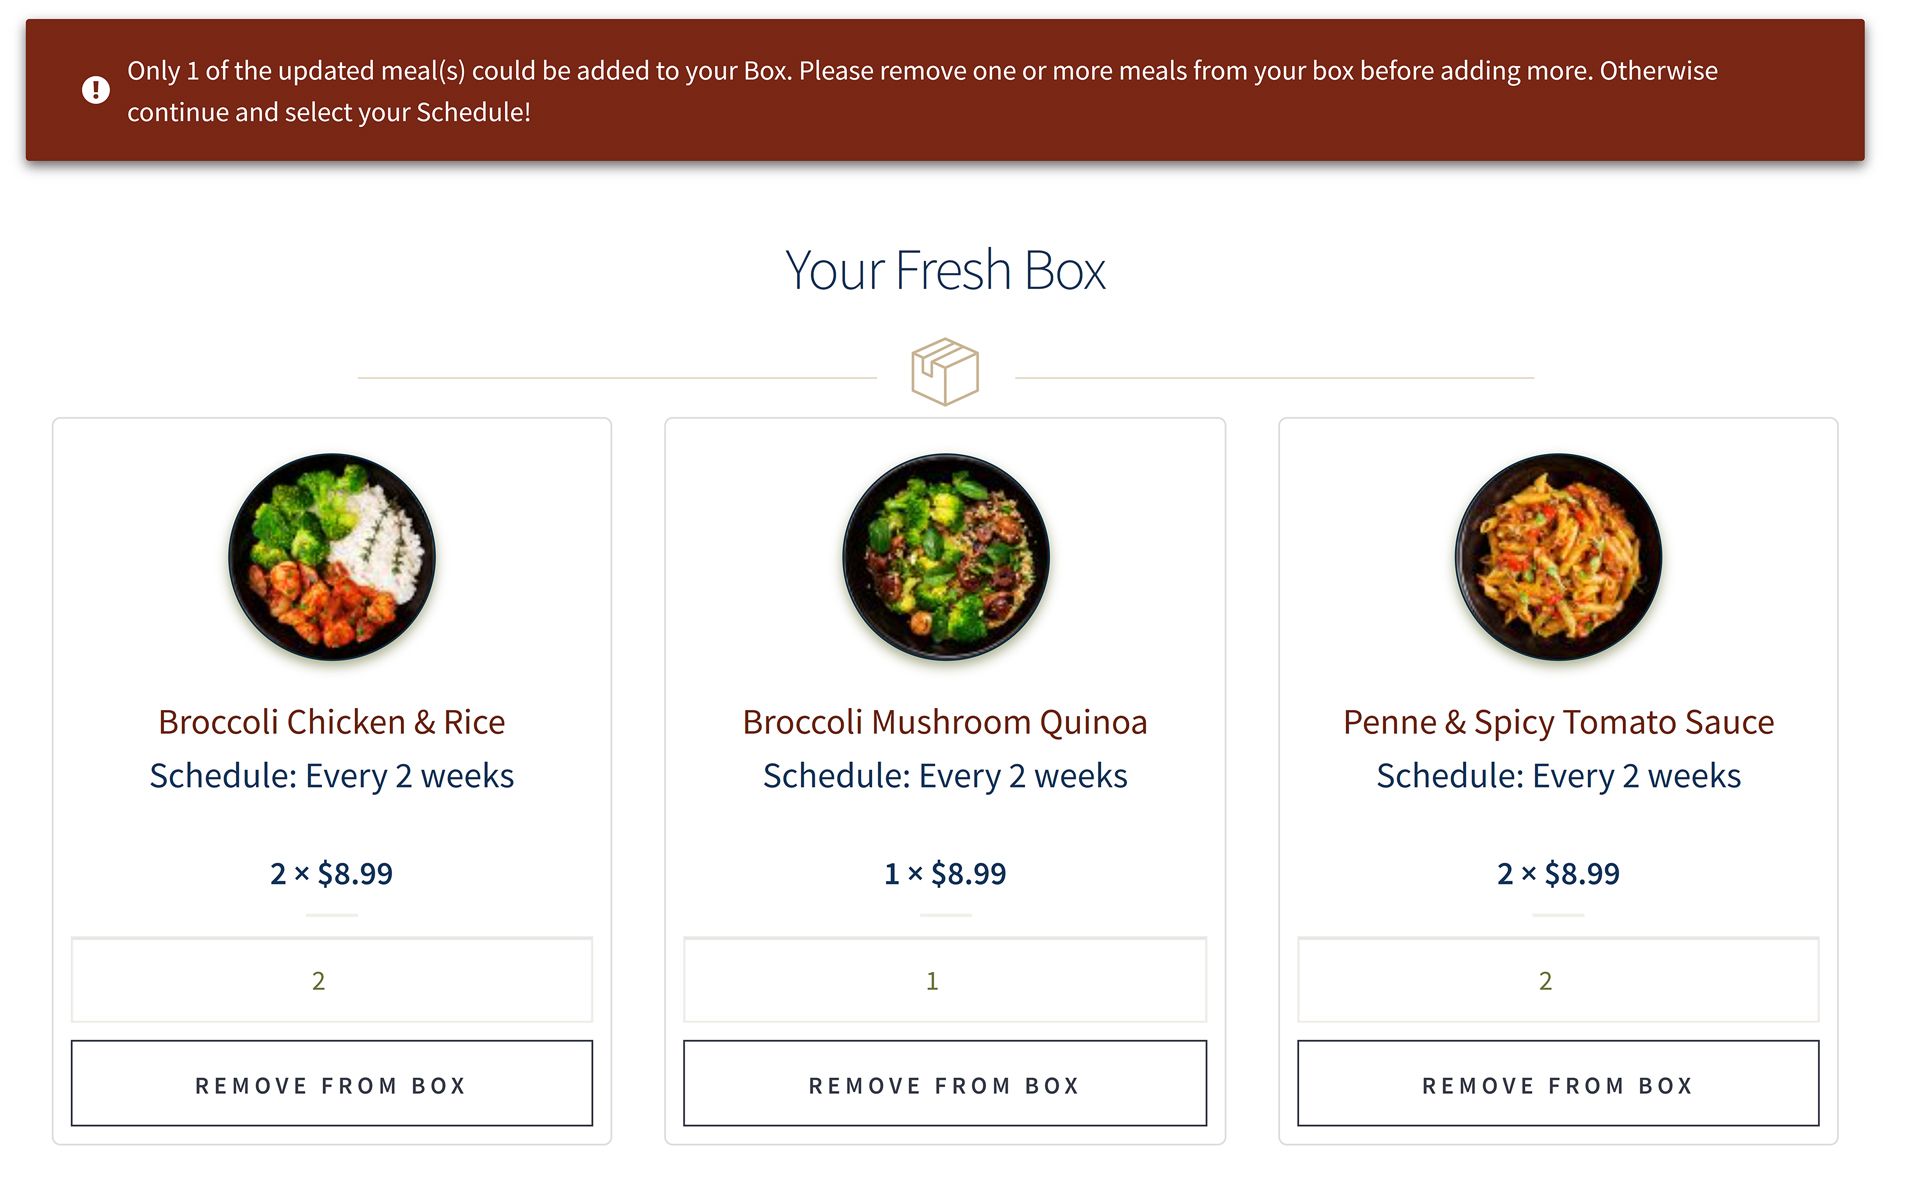
View Step 4 SummaryAs we mentioned, one of the areas that seems to give Merchants and Developers the most headaches when attempting to create a subscription box site and customer journey is the WooCommerce Shopping Cart, adding the necessary requirements for customers to fulfill before they can checkout or place their order. As is the case with most Meal Box Subscription companies, we’re going to require a specific number of meals ( based on their plan ) to be selected by our customer in order for the customer to place their order. Our cart validations will include the following steps:
Cart Validation Step 1
Check if our Cart is already full
Add Validation when a customer tries to add a product to the cart and it’s full.
Cart Validation Step 2
Check if the selected Quantity being added is valid
Add Validation when a customer tries to add N number of a product to the cart and it would be more then our allowed total cart quantity ( i.e. Box Size )
Cart Validation Step 3
Only add the number of meals that will fit in our cart, not more
Add Validation that adjusts the quantity being added to the cart to fit the available space only.
Cart Validation Step 4
Validate the Cart on Update Cart action in the Cart
Add Validation when a customer tries to update the cart to more then our allowed quantity ( i.e. Box Size )
Cart Validation Step 5
Validate the Cart when the Box Size / Plan is Changed
Add Validation that adjusts the carts contents when the customer changes plans.
Cart Validation Step 6
Disabled the Checkout button(s) if the Cart isn’t full
Add Validation that disables the checkout button(s) if the cart isn’t full.
Cart Validation Step 1
Check if our Cart is already full
The first step is to add validation for when a customer is trying to add an item to the cart and it’s already full. To do this we’re going to use the woocommerce_add_to_cart_validation filter. The filter passes the current valid Boolean, the id of the product being added, and the quantity being added.
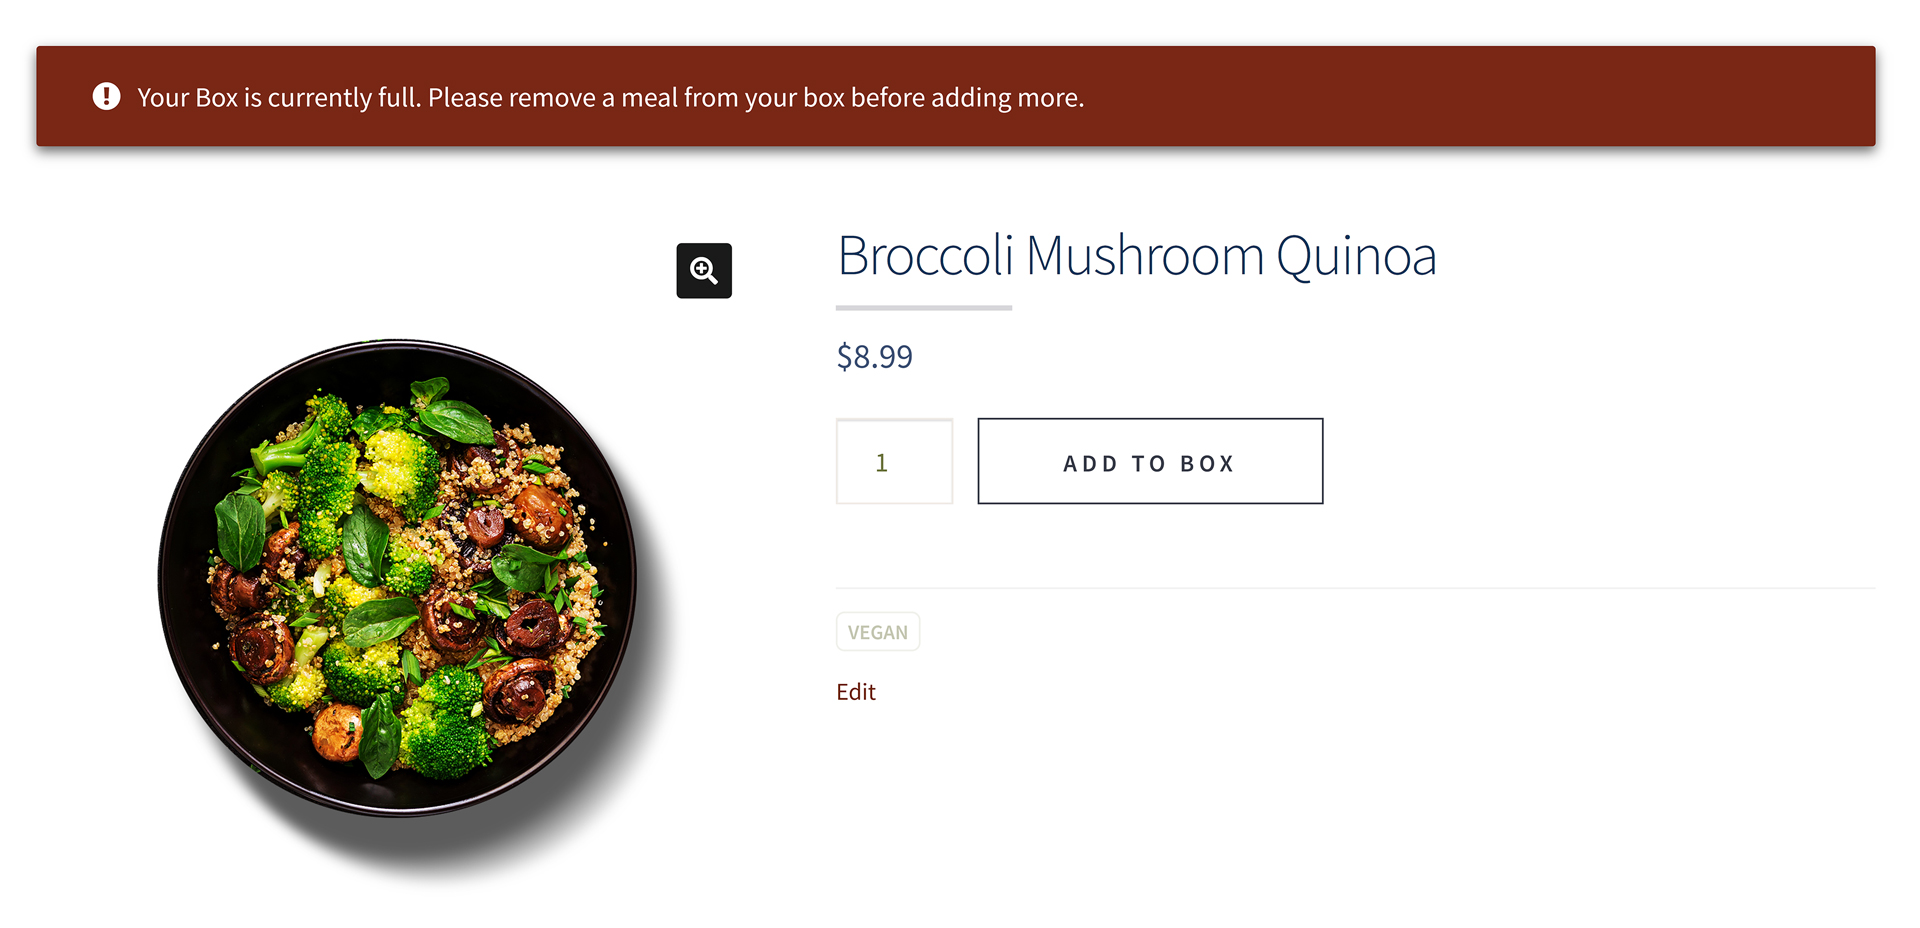
Create a new xx_cart_is_valid_size() function that takes three parameters, a boolean ( $passed ), and two integers ( $added_product_id and $quantity ). We’re then going to use an add_filter() function call to hook this function to the woocommerce_add_to_cart_validation filter. The first check we’ll add to our new xx_cart_is_valid_size( ) function will be to check if the cart ( our Fresh Box ) is currently full. If it’s full, we add an error to the WooCommerce notice queue and return false letting WooCommerce know that the product should not be added and the validation failed.
To check if our cart is full we use the xx_get_cart_diff() function we created above to get the current difference between the box size and cart. If the difference is 0 then we know the cart is full. If it is full we use the wc_add_notice() function to add an error to the WooCommerce notice queue and return false.
Cart Validation Step 2
Check if the selected Quantity being added is valid
The second validation step we’re going to add to the xx_cart_is_valid_size() function we created in Step 1 above is to add a check to see if the quantity being added to our cart makes the cart total exceed our box size. If it does we’re going to display an error notice letting the customer know that not all the items were able to be added.
Important! In this step we aren’t going to invalidate the cart, we’re only going to add a notice since we’re going to adjust the quantity being added in the next step.
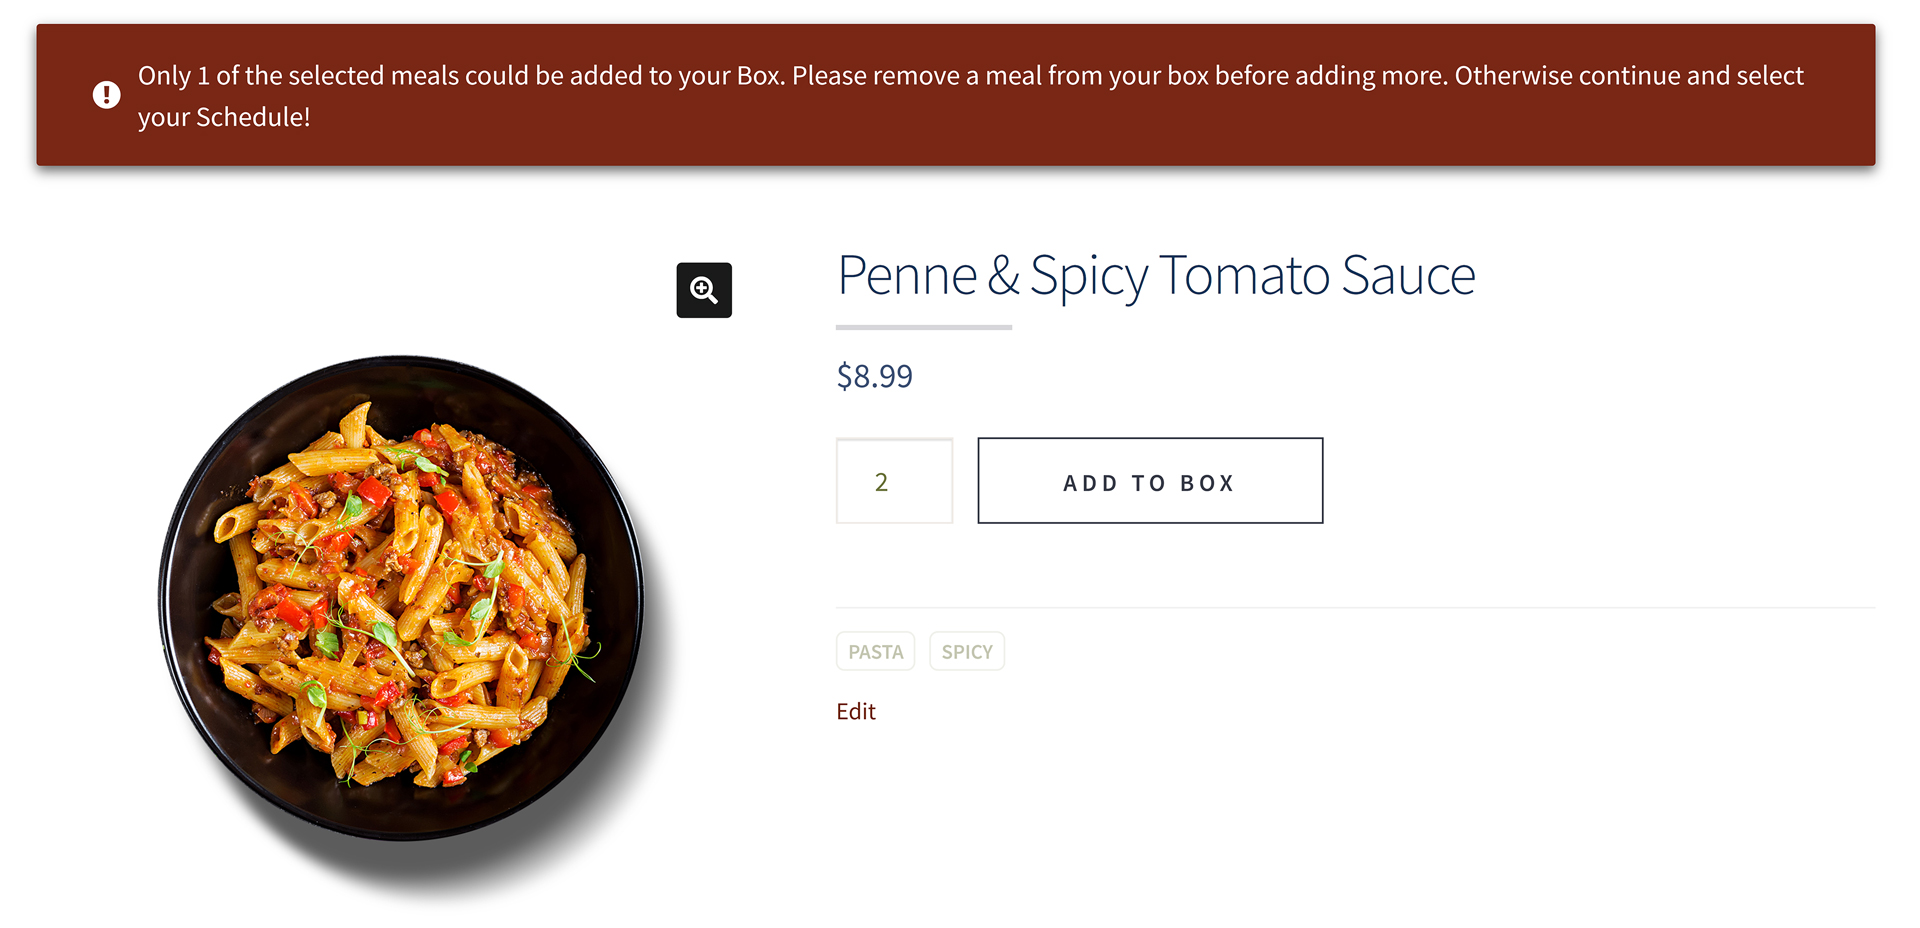
We check if the quantity being added would cause our cart to exceed our box size ( or plan size ) is to subtract the quantity being added from our current available room ( i.e. the $diff value we retrieved using our xx_get_cart_diff() function ). If the result is less than zero it means the quantity being added is to much for our cart size.
Cart Validation Step 3
Only add the number of meals that will fit in our cart, not more.
When it comes to cart validation, while we could prevent any quantity from being added to the cart that would exceed our cart size, why would we? Instead, we’re going to proactively adjust the quantity being added to fit our remaining space in the cart if our cart has room and the quantity of meals the customer is trying to add would be to much for our Box Size.
To do this we’re going to use the woocommerce_add_to_cart_quantity filter. Create a new xx_limit_quantity_added_to_cart() function which takes three parameters, two integers, the new quantity for the item ( $quantity ) and an optional original quantity ( $original ), as well as a boolean flag used to specify if the call is being made after or before the cart has been updated ( hence the optional original quantity parameter ). We’re then going to use an add_filter() function call to hook this function to the woocommerce_add_to_cart_quantity filter.
Remember that our xx_get_cart_diff() function allows for an optional parameter, which if supplied will adjust the cart quantity by that value. We’re going to use the same xx_get_cart_diff() function to get the total allowed quantity. However, we’re going to pass the xx_get_cart_diff() function the difference between the quantity being added and the original quantity if this is post cart update, otherwise we pass it 0 ( meaning telling it not to adjust the cart difference ).
If the current cart difference tells us the cart is full, then no new quantities can be added so we return the original quantity ( no change ). However, if the cart was not full before adding this quantity and adding the quantity puts the cart over the max, determine the amount of the item that can be added and return the new total quantity.
Cart Validation Step 4
Validate the Cart on Update Cart action
Now that we’ve added our custom validation which runs when the add to cart button is clicked, and our function for limiting the quantity of items added to the cart so that it doesn’t exceed our Box Size, we want to add the same checks when the customer adjusts the quantity in the cart form. While we could use the woocommerce_update_cart_validation filter, instead we’re going to use the woocommerce_after_cart_item_quantity_update action. The reason is we want to adjust the quantity ( not just reject the entire amount ) and allow our customers to be able to add as many items as possible but just not more than our max ( remember our helpful new xx_limit_quantity_added_to_cart() function we created above? ). The woocommerce_after_cart_item_quantity_update filter fires after the quantity has already been updated in the cart. Given this, we’re going to back calculate the original quantity in the cart, then determine how many of the newly added items can be included and adjust the cart quantity to include those only if needed.
First create a new xx_validate_update_cart() function that takes the four parameters from the woocommerce_after_cart_item_quantity_update action. The parameters include a string which is the cart item key ( $cart_item_key ), an integer which is the new quantity ( $quantity ), another integer which is the old quantity ( $old_quantity ), and finally the WC_Cart object itself ( $cart ). Use the add_action call to hook this new function to the woocommerce_after_cart_item_quantity_update action. Rather than recreate the wheel we’re going to re-use our xx_limit_quantity_added_to_cart() function ( surprise! ), sending it the new quantity, old quantity, and true to specify that this call is happening post cart update.
If the new calculated quantity ( quantity returned from our xx_limit_quantity_added_to_cart() function ) is not equal to the quantity originally supplied to our function by the hook ( $quantity ) then the quantity had to be changed by our function. Also, we only need to worry about running any adjustments if the quantity supplied by the hook is more than the old quantity, no need to worry if items are being removed. However, if the new quantity returned does not match the total quantity the cart was suppose to be updated to, then we need to adjust the quantity.
Since there was a change in how much we could add out of the new total quantity, we’re going to set the cart items total quantity to the new amount, add a notice using the wc_add_notice function, and lastly update the cart session data using the WC()->cart->set_session() method.
Cart Validation Step 5
Validate the Cart when the Box Size / Plan is Changed
The last cart validation step is to validate and adjust the cart contents when the customer changes their plan. We created our plan form above, as we added the functionality to update and retrieve our customers selected plan. However, remember that the plan size equates to cart size and the total number of meals that can be and must be in the cart before our customer can move on. This is the validation we’re now going to add.
Start by creating a new xx_adjust_cart_size() function for this which takes a single integer ( $size ) parameter, which is the size the cart should be adjusted to fit ( i.e. the new plan size once selected by the customer ). The first component to this function will be to get the current cart count using the WC()->cart->get_cart_contents_count() method and compare it to the supplied size, if the supplied size is bigger or equal to the current count we’re good, and don’t need to do anything. However, if the cart count is bigger than the supplied size then we need to adjust the cart.
To remove excess items we’re essentially going to re-fill the cart until we hit our new maximum quantity. Start by creating a new empty cart array, a counter ( set to 0 ) and grab the current cart item array using the WC()->cart->cart_contents. Next, iterate over the current array of items, each time checking if the quantity of items we’ve added ( i.e. the counter ) to our new cart array is equal to our new size. If it is we break the foreach loop since we’ve keep as many as we could. If it’s not then we add the item to our new array, only keeping the quantity of the item that wouldn’t push us over our max size.
The last part of the new function is to update the WC()->cart->cart_contents to our newly populated items array and set the cart session using the WC()->cart->set_session() method so our new cart contents get applied.
Now that we have our cart adjustment function there’s one more step to put this into action. We need to fire this function when a customer changes / selects a plan so let’s go back to our xx_autoship_apply_meal_plan_handler() function ( remember this is the function that handles our Select a Plan form which we created in Our Customer Journey Step 1c ). In our function’s code, directly after we make the call to assign the submitted plan to the customer, let’s add a call to our new xx_adjust_cart_size() function, passing it the new selected plan.
Cart Validation Step 6
Disable the Checkout button(s) if the Cart isn’t full
We’ve taken care of all the difficult cart validations when it comes to quantity vs Box / Plan Size, now the last step is to take care of any checkout buttons on the mini-cart or in the cart page. While we’ve already added our xx_redirect_router() function and checks for ensuring the steps that need to be completed before checking out are completed, we always want to be as user friendly and proactive as possible, not waiting for the user to encounter an error. In order to prevent our user from trying to checkout before they are ready we’re going to override the woocommerce_widget_shopping_cart_proceed_to_checkout() and woocommerce_button_proceed_to_checkout() pluggable functions ( A pluggable function is a function that can be overridden by either defining it in your theme or plugin, read more here ).
Cart Validation Step 6a
Mini-Cart Checkout Button Override
Create a new woocommerce_widget_shopping_cart_proceed_to_checkout() pluggable function of your own. In the function we’re going to use our xx_get_cart_diff() and xx_cart_has_schedule() utility functions to check if the cart is full and that there’s a schedule assigned to it. If both are true we’re going to display the standard WooCommerce Checkout button. However, if the cart isn’t full we’re going to echo our own disabled version of the checkout button with the URL set to “#” and an added disabled class. This way if the customer clicks the button nothing happens and visually the button will look and act disabled. If the cart is full then we know that it needs a schedule so we’re going to output a button to assign a schedule and set the URL to our Select Your Schedule page using our xx_send_to_journey_step() function.
NOTE on the disabled class : If the theme you’re using doesn’t include the disabled class you’ll want to add it to your CSS and could implement something like .disabled { opacity: .5!important; cursor: not-allowed; }

Cart Validation Step 6b
Cart Checkout Button Override
Just like with the mini-cart’s function, now create a new woocommerce_button_proceed_to_checkout() pluggable function to disable / override the checkout button on the cart page. In the function we’re going to use the same xx_get_cart_diff() and xx_cart_has_schedule() utility functions as with the mini-cart to check if the cart is full and that’s its been assigned a schedule. If the cart count and box size matches and the cart has an assigned Schedule, display the standard WooCommerce cart/proceed-to-checkout-button.php template. Otherwise we’re going to display a “Continue to Next Step” button that either points back to our Select Your Meals page or Select Your Schedule page. To retrieve the URLs for those pages we’re going to use our xx_send_to_journey_step() function and pass it either our Select Your Meals page slug “meals” or our Select Your Schedule page slug “schedule”.
Cart Requirements & Validation Complete!
Woohoo! Go ahead and give yourself a big pat on the back, get a cup of coffee, take a second to take it all in. We’ve now covered almost everything it takes to make a Meal Box Subscription site, from Box Sizes and Delivery Schedules, to Customer’s Journey, and even Cart Requirements. There’s only one last piece to wrap up our site and start shipping some Meals…that’s Scheduled Order Creation!