
In its Merchant Payment Providers report, Forrester pointed out how Stripe is “uniquely strong” in subscription management. With its features like adaptive acceptance, smart retries, and card account updater, among others, it’s clear why it’s one of the best payment gateways when it comes to selling subscriptions.
In fact, when used for setting up subscriptions on a WooCommerce store, Stripe brings a host of functionalities like:
- Offering subscription suspension, cancellation, and reactivation options to both store owners and subscribers
- Allowing multiple subscriptions (i.e., letting subscribers subscribe to multiple subscriptions with different subscription cycles without any hassles)
- Supporting recurring total changes (allowing for changes to the already scheduled orders/subscriptions)
- Allowing payment date changes (allowing for more flexible charging schedules)
- Enabling both subscribers and store managers to change payment methods as needed
Setting up Stripe for WooCommerce is pretty straightforward. And so is using it for selling WooCommerce subscriptions. So let’s see the exact steps you need to do to use Stripe to sell subscriptions on your WooCommerce store.
Integrating Stripe Payments with WooCommerce for charging subscription payments
To use Stripe to sell subscriptions on your WooCommerce store, you need two plugins:
- A WooCommerce subscription plugin like Autoship Cloud, WooCommerce Subscriptions, or Subscriptions for WooCommerce: You need to add a subscription plugin to your store as WooCommerce doesn’t support subscriptions by default.
- A Stripe integration plugin to bring Stripe to the WooCommerce eCommerce platform: We’ll use WooCommerce’ official Stripe integration plugin (WooCommerce Stripe Payment Gateway) for this tutorial.
Your WooCommerce subscription plugin will manage your subscribers’ subscription plans and subscription renewal billing cycles, while your payment gateway plugin will automate the charging part.
Let’s now see how you can use Autoship Cloud and Stripe to start accepting recurring payments on your WooCommerce store. Let’s begin.
Accepting recurring subscription payments on WooCommerce with Stripe and Autoship Cloud
Step #1: Create a Stripe account.

Step #2: Sign up for Autoship Cloud.

Autoship Cloud is a leading WooCommerce subscription plugin that lets you set up subscription products on your WooCommerce store. With Autoship Cloud, you can set up simple subscriptions as well as variable subscriptions. Autoship Cloud enables you to:
- Add Amazon-line subscribe and save schemes to your product pages — Autoship Cloud works seamlessly with your current WooCommerce setup
- Upsell subscription offers on your cart/checkout page
- Let your users manage their subscription experience, including letting them edit their upcoming scheduled orders (add or remove items), reschedule an upcoming delivery, and even upgrade, downgrade, switch, pause, or cancel their subscriptions
- Offer your users their favorite payment methods via payment gateways like Stripe and PayPal (among others)
- Email your subscribers each time there’s an update to their subscription (and even before charging them an automatic payment for renewing their subscription)
- Reward your most loyal users with offers like free shipping or flat rate discounts (or even discounts based on their cart value)
And much more!
The best part is Autoship Cloud does all of this without needing you to buy a host of additional premium WooCommerce extensions or add-ons. It’s a complete WooCommerce subscription solution.
So sign up for Autoship Cloud. There’s no sign-up fee. Plus, you get a two-week trial period to take the plugin for a spin.
Follow this quick two-minute video to set up Autoship Cloud on your WooCommerce store:
Here’s a step-by-step tutorial for the same.
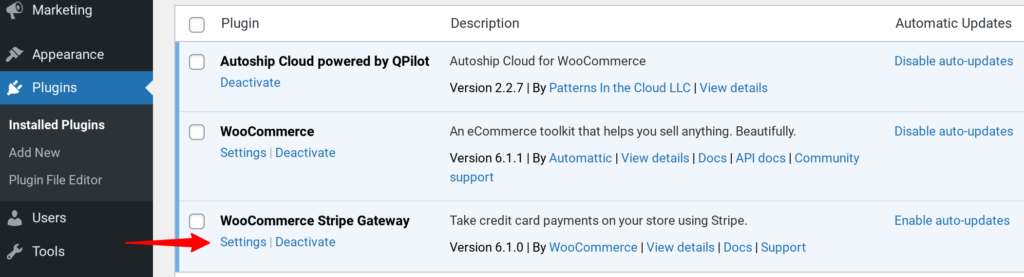
Step #3: Add WooCommerce Stripe Payment Gateway to your store.
WooCommerce Stripe Payment Gateway is WooCommerce’s official Stripe gateway integration plugin. You can download it here.
When it comes to using Stripe as your payment gateway for charging subscription payments on your WooCommerce store, here are a few things to keep in mind:
- As a payment gateway, Stripe supports Apple Pay. However, most WooCommerce subscription plugins, including Autoship Cloud, don’t support this wallet payment method yet.
- Likewise, you can’t use the Stripe Checkout payment option with the WooCommerce Stripe Payment Gateway. This Stripe plugin doesn’t support the feature yet, so most WooCommerce subscription plugins that use it to enable Stripe payments for WooCommerce subscriptions, like Autoship Cloud, don’t have the Stripe Checkout option.
And if you’re wondering what Stripe Checkout is… Well, it’s basically Stripe’s prebuilt, hosted payment page checkout page that it redirects your shoppers to as soon as they click the buy/subscribe button.
- Finally, Autoship Cloud doesn’t support Stripe’s Payments Request API yet, so you can’t set up Payment Request Buttons with Stripe on your WooCommerce store. In other words, you can’t (yet) use Autoship Cloud to set up Google Pay, Apple Pay, and Microsoft Pay payment options for selling your subscriptions. Most WooCommerce subscription plugins don’t support it, so you’ll run into this limitation with most.
Step #4: Configure your WooCommerce Stripe Payment Gateway plugin settings.
Once you’ve activated WooCommerce Stripe Payment Gateway, access its settings inside your WordPress dashboard: Plugins> WooCommerce Stripe Payment Gateway > Settings.
You’ll now be asked to enter your account keys. Click the “Enter account keys” button:

We recommend setting up this plugin in the sandbox or test environment. So let’s quickly set it up:
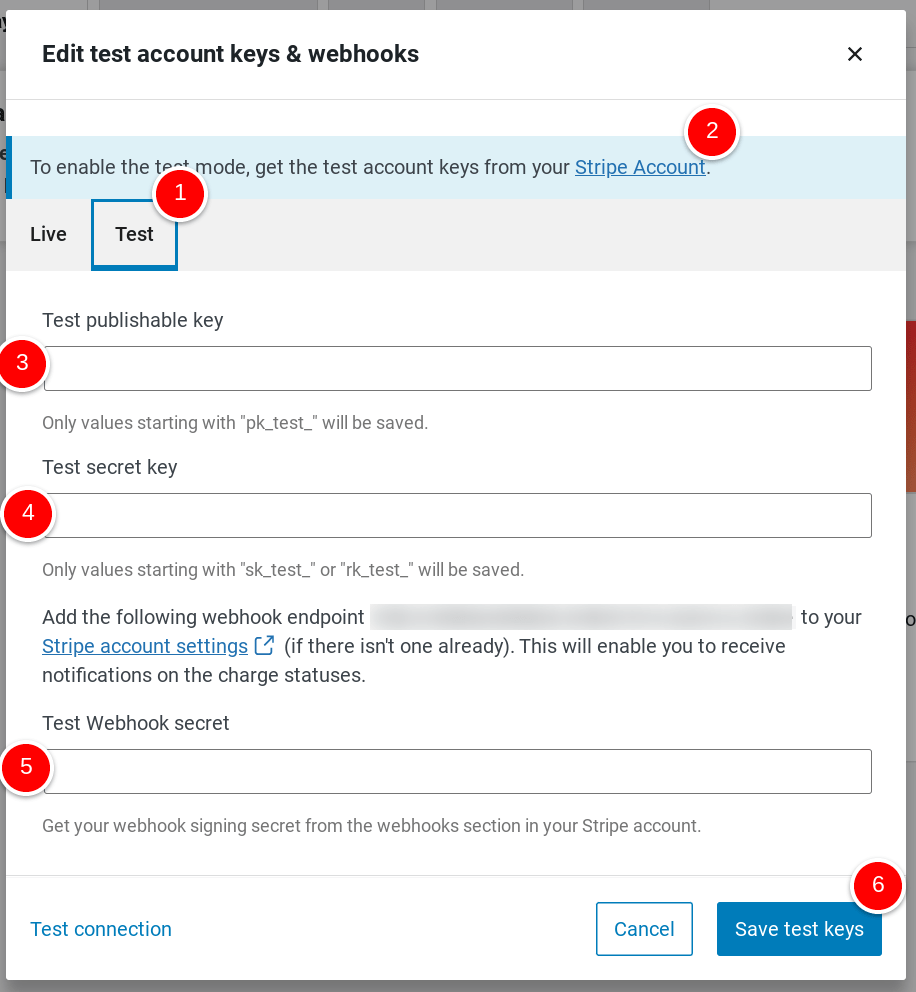
1. Click the Test tab to get to the test mode.
Now open a new tab, visit this link, and sign in to your Stripe account.
2. Once you’re logged into your Stripe account, click the Stripe Account anchor text that you see. Doing so takes you directly to your API test keys. Or use this direct link. Ensure that you’re viewing the test API keys (and not the ones for a live setup):

3. Copy the Publishable key and enter it in the Test publishable key field.
4. Copy the Secret key and enter it into the Test secret key field value.
5. Now we’ll copy the webhook endpoint URL that Stripe shows in this window (blurred in the above screenshot) and click this link. We’ll use it to create our Test Webhook secret field value. To do so, when you see the following, click Add an endpoint

Now:
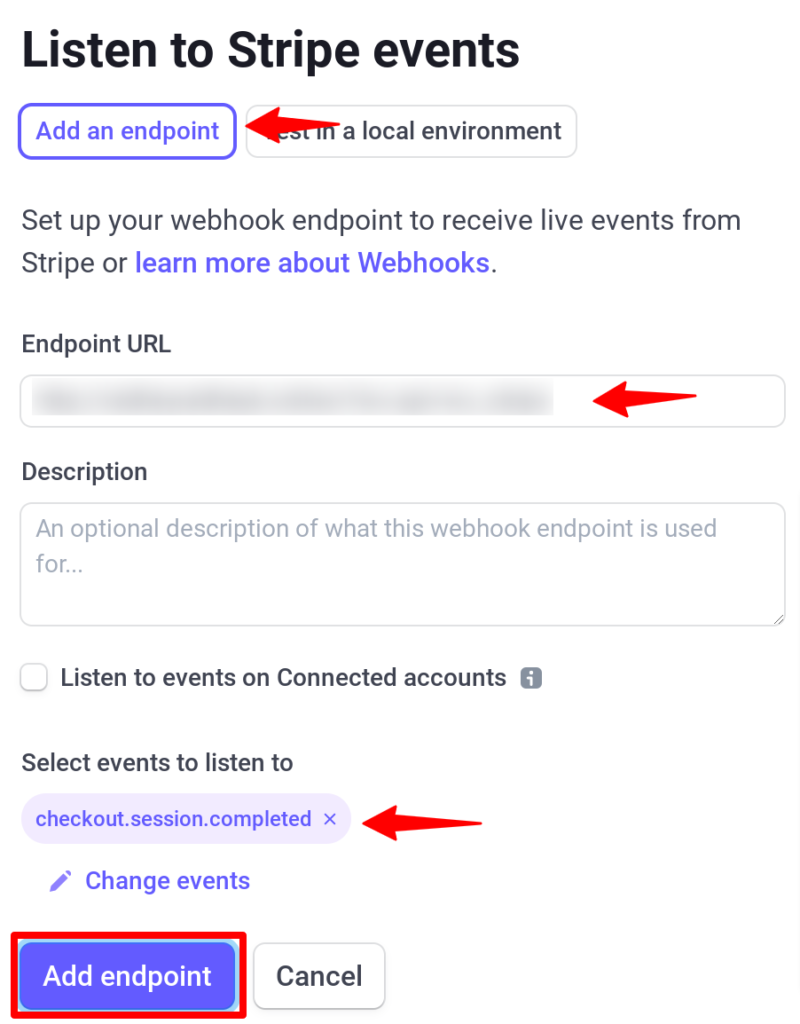
1) Paste the link you copied in the Endpoint URL field.
2) Enter the description.
We’ll leave the Listen to events on Connected accounts unchecked.
3) Finally, in the Select events to listen to section, choose the Stripe updates you’d like to get. For the sake of this tutorial, let’s say that we want to get notifications each time a checkout is processed successfully or simply said when a shopper buys a subscription:
Finally, click the Add endpoint button.
Now click this link to visit Stripe’s Webhooks section inside your dashboard, and you should see your URL in the list of hosted URLs. Click the URL and then find the Signing Secret section and click Reveal:

Once you’ve entered this value in your WooCommerce Stripe test setup, click the Test connection option to test your connection. After checking, click the Save test keys button.
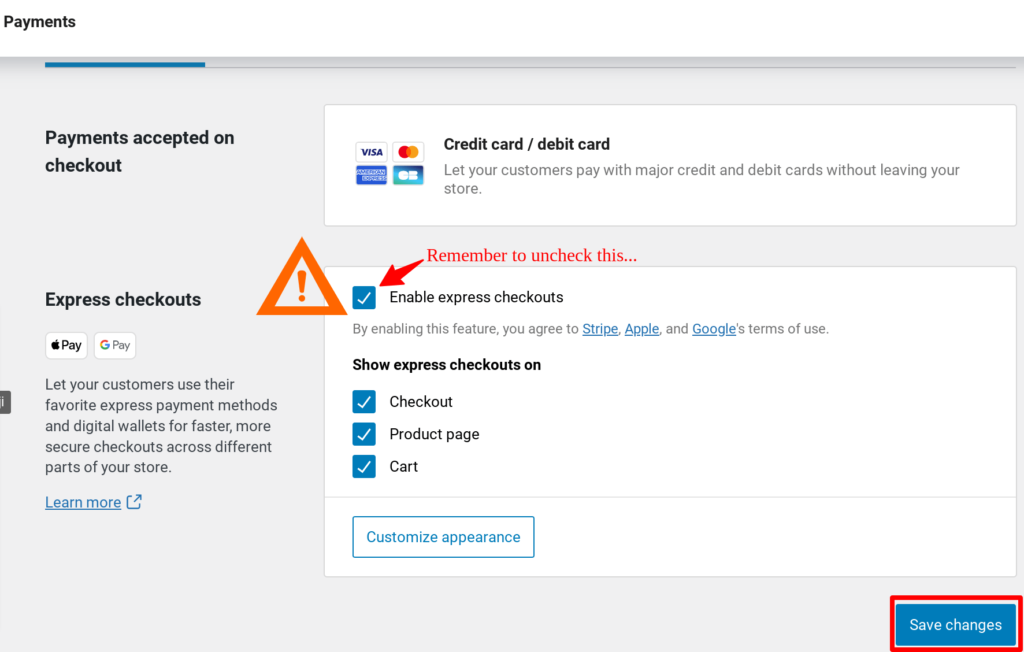
Now that we’ve set up our basic Stripe sandbox environment, let’s configure some more settings. If you aren’t automatically redirected to these settings, find them here: WooCommerce > Settings > Payment Methods.
First up, uncheck the Express Checkouts option (as it’s enabled by default) and click the Save changes button:
Now switch to the settings tab:
Enable Stripe (if it’s not enabled already). Also, check the Enable test mode:

We’ll leave the rest of the settings as they are.
Now it’s time to connect our Stripe payment gateway plugin with our Autoship Cloud plugin so we can sell subscriptions and charge automatic recurring payments.
#5: Add WooCommerce Stripe Payment Gateway to Autoship Cloud
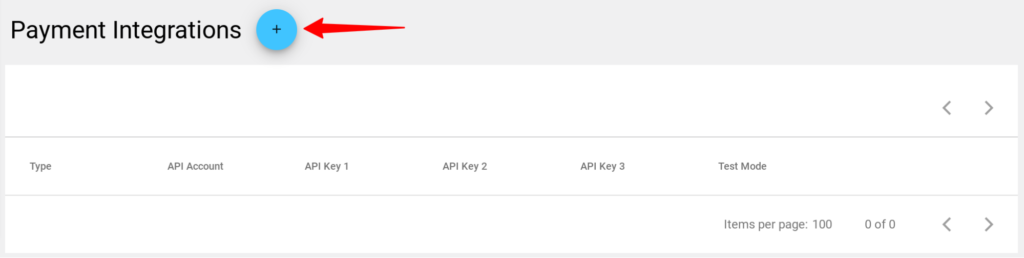
Access Autoship Cloud’s payment integration settings (Autoship Cloud > Payment Integrations) and complete these quick steps:
Click +:
Choose Stripe from the dropdown menu and enter your test API keys from the earlier step: (Ensure that the Test mode is enabled because we’re setting up a test setup in this tutorial.)
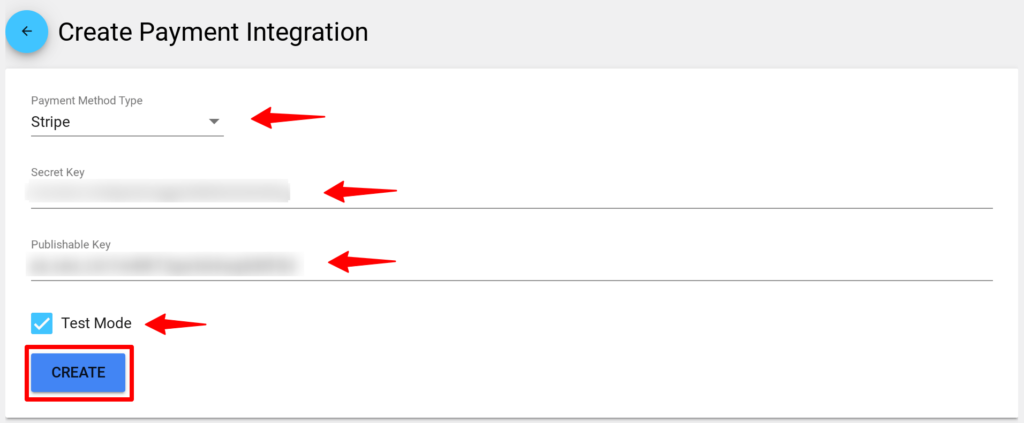
Once you click the CREATE button, your Stripe payment gateway is live on Autoship Cloud.
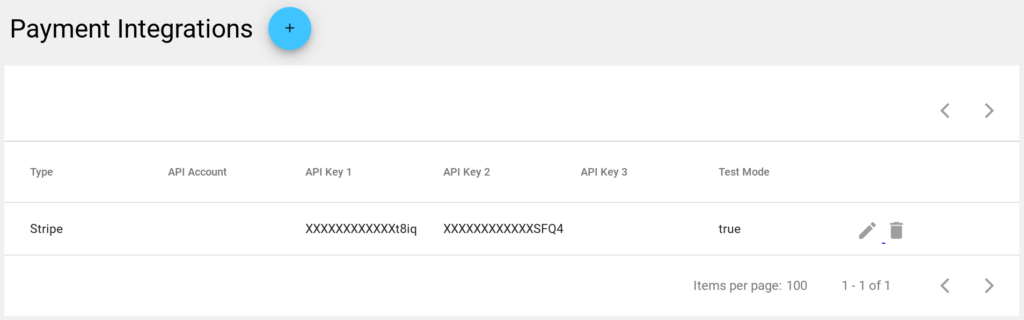
And that’s it! Autoship Cloud and your Stripe Payments account are now connected (in the test mode):
Also read:
Loading Payment Methods for Stripe
Testing your WooCommerce + Stripe Payments integration for processing subscription payments
Since we’ve set up Stripe in the test mode, we can easily perform a test checkout experience.
So go ahead and add a subscription to your cart and proceed to the checkout. You should see Stripe’s trial credit card details to use to complete your purchase. Use them and complete your purchase.
Now sign in to your customer account and see if your new subscription shows up in your My Account section. Likewise, log into your admin dashboard and see if Autoship Cloud shows this new subscription under your Scheduled Orders.
Going live with your WooCommerce Stripe Payment Gateway and Autoship Cloud integration
After verifying your Stripe payment gateway integration with Autoship Cloud, it’s time to go live.
Access WooCommerce Stripe Payment Gateway settings and uncheck the Enable Test Mode box that we checked earlier. Once you disable the test mode, you’ll have to use your live credentials. Fetch them the same way you retrieved your test credentials.
Return to your Autoship Cloud settings and uncheck the Test Mode box that we had checked in one of our earlier steps. Again, edit the setup and use your live keys.
And that’s all! You can now accept credit card payments for your subscriptions on your WooCommerce store via Stripe. You can also process debit cards for the same.
Wrapping it up…
So that’s how you can process subscription payments on your WooCommerce store with Stripe and Autoship Cloud.
Sign up for a free Autoship Cloud trial and set up this integration on your store within minutes.
If you see any errors with your integration or need support, contact us, and we’ll be happy to help!
Explore related to Tutorials