


If you’ve ever signed up for a Meal Delivery site like HelloFresh, Blue Apron, Daily Harvest and Freshly you might remember that after you receive your first order you have a short window to update the meals in your next order before it ships and when updating your order you only get to choose a set number of meals, based on your plan. Try to select more or less and you can’t save your order.
The Problem
Restrictive & Rigid Product Bundles & Subscriptions
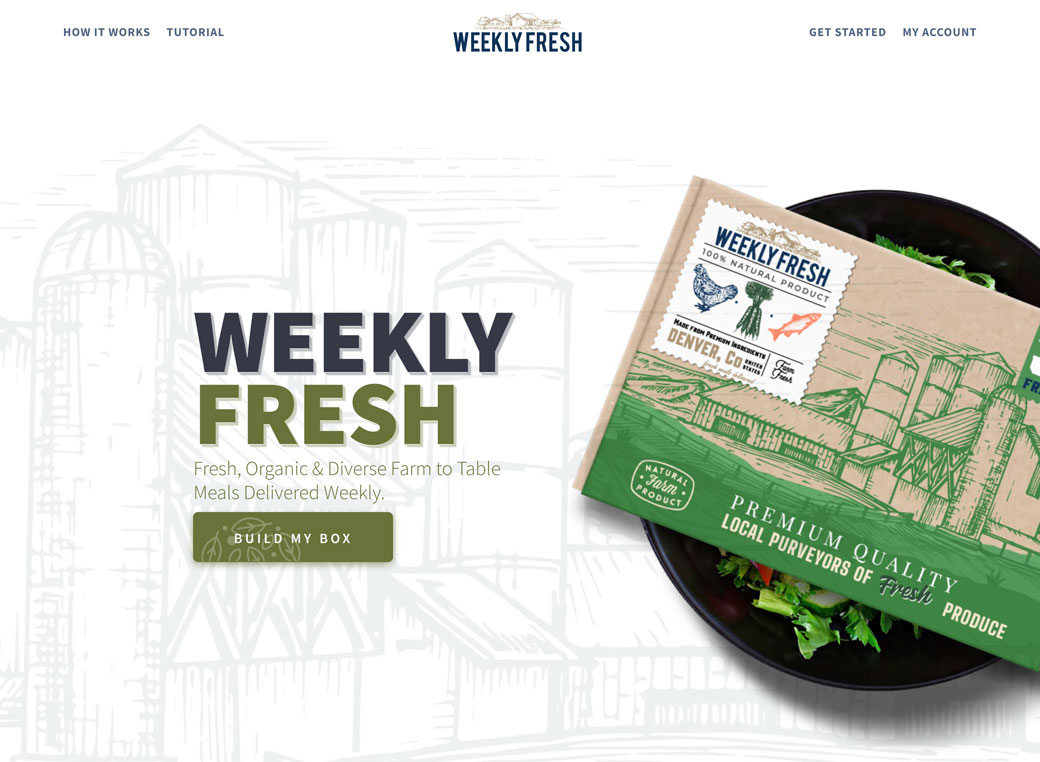
We’ve already walked through how to create a meal box subscription site called Weekly Fresh ( like HelloFresh, Blue Apron, Daily Harvest or Freshly ) using WooCommerce and Autoship Cloud and now we’re going to build on that. The meal subscription site we walked through building allows customers to pick a meal box size ( what we call a Fresh Box ) and then select that exact number of meals to be delivered on a weekly schedule.
Great! …but what happens if the customer doesn’t want the same meals every week?
Exactly the problem. Have you ever wanted to offer a way for your customers to edit their Bundled product Subscriptions after creating it?… ugh not easy!
Haven’t read our step by step tutorial showing how to create a Meal Box Subscription site using the power of WordPress, WooCommerce, and Autoship Cloud powered by QPilot? Click below and check it out!
The Solution
Autoship Cloud’s Scheduled Order Editor
What makes Autoship Cloud powered by QPilot so powerful and flexible is that unlike most of the other solutions on the market ( ahem… ?? WooCommerce Subscriptions with WooCommerce Bundles… ), it comes pre-built with the ability for customers to not only edit their Scheduled Order’s delivery schedule, payment method, coupons, and addresses but also the products included in their order… Yep, that’s right!
Wait…that’s great but we can’t have our customers adding just anything they want to their next order, we have shipping and bundle rules!
No Problem! We can take care of those too! We’re going to use our meal box subscription site as an example to walk through how merchants can easily customize our built-in Scheduled Order editor ( what we call the Native UI since it’s built with native WooCommerce and WordPress components… makes sense right? ) to apply their own rules and restrictions on what a customer can do with their Scheduled Order. Since our Meal Box Subscription site allowed customers to pick a set number of meals to include in their box we’re going to use that same number as our requirement, though as you’ll see this could easily be swapped out for any other restriction.
True Scheduled Order Flexibility
The ability for customers to update and modify the contents of their Scheduled Orders not only keeps things fresh but gives merchants a way to keep those customers engaged with post checkout upsells, cross sells, trials, discounts, new releases, even sampling… all the goodness that makes for great customer experiences and builds long term brand loyalty.

Any Business, Any Needs
No matter if your business rules are weight based, price based, quantity based, category based, some random attribute based, almost anything you can think of is possible with the flexibility of Autoship Cloud’s Native Scheduled Order UI.
Quantity Based Rules
Only want your customers to be able to add a total of five Meals to their box between each delivery, no more, no less? … Done!
Weight Based Rules
Need to restrict a customer from being able to add more than 50lbs of product to their Box? … Done!
Category Based Rules
Need to let your customer’s add one (1) haircare product, one (1) skincare product, and one (1) gift? … Done!, Done!, …and Done! Done!
Price Based Rules
Need to require your customers to meet a minimum total ordered amount for their order? … Done!
Role Based Rules
Does your business offer different products to your wholesale customers? … Done!
Color, Product, or even Size Based Rules?
No Problem… Done!
What We’re Creating
We’re going to walk you through how to add rules & restrictions to your customers Scheduled Order Editor just like the Hello Freshes of the world. This step by step guide will show you how you can easily implement your own rules and controls, regardless of what your shipping.
Want to see it in action? Sign up on our demo site and go to your My Account and edit your order!
Main Focus Areas
When it comes to validating Scheduled Order changes we’re going to implement both Server Side and Client Side rules, checks, and notifications. Why? It’s always good practice to implement both Server and Client Side validation when it comes to forms, the reason being Client side validation can be bypassed, either accidentally ( say Javascript is disabled ) or purposefully. Server side validation however, is much more secure since it’s code on the server that’s being executed and is less likely to be bypassed by the user.
Server Side Validation
As with all things WordPress, Hooks ( Actions & Filters ) are what gives developers the tools to easily customize the system to fit almost any need. Autoship Cloud is no different! Autoship Cloud comes packed to the brim with Actions and Filters, offering all the flexibile yumminess a good developer loves and we’re going to show how you, using just a few hooks, can add custom controls over what a customer can and can’t do to their order.
Client Side Validation
While server side validation is always best practice, it’s not always the most user friendly experience and here at Patterns In the Cloud we’re all about great user experiences! With that said, we’re going to walk through some script code that adds validation to the User Interface, displays notices dynamically and makes for a better experience overall.
Pre-Requirements
Here are several components that you’ll need to install / setup before starting this project.
Install & Configure Storefront ( a free WooCommerce theme ) though you could use any theme you choose.
Install & Configure WooCommerce
Install & Configure Stripe or another a supported Payment Gateway ( See all our supported payment gateways here )
Install & Configure Autoship Cloud powered by QPilot ( Sign up for a free test account here )
Create & Enable Several Products for Autoship ( See our setup docs here )
Create one or more test Scheduled Orders via checkout ( See our help doc here )
Scheduled Order Data Structure
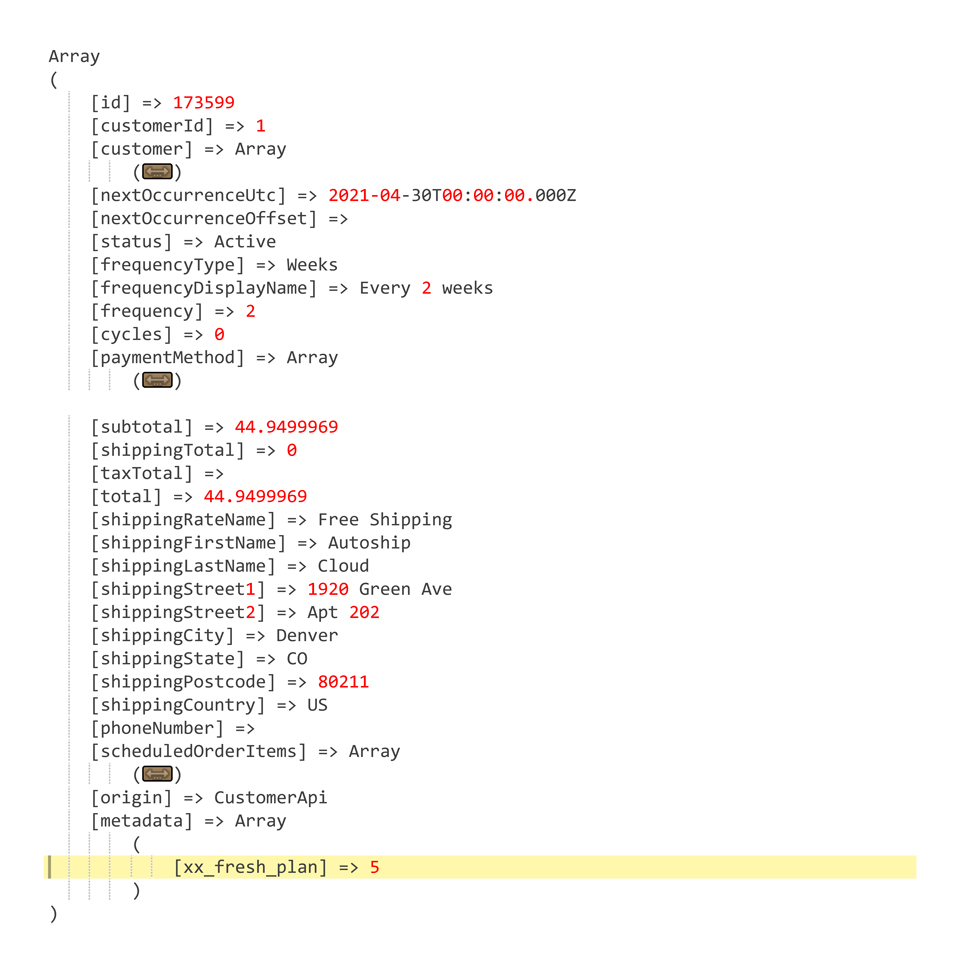
Since we’re going to be applying validation to changes made to a customer’s Scheduled Order it’s important to give some background reguarding what data is available in the orders that we can use to create our rules. Scheduled Orders that are created with the QPilot API have a specific structure and, at a minimum, always come with a specific set of baseline attributes ( Read more about the flexibility, structure, and components of Scheduled Orders created using the QPilot API in the API documentation here ) The following information is the standard information typically found in a Scheduled Order generated with the QPilot API:
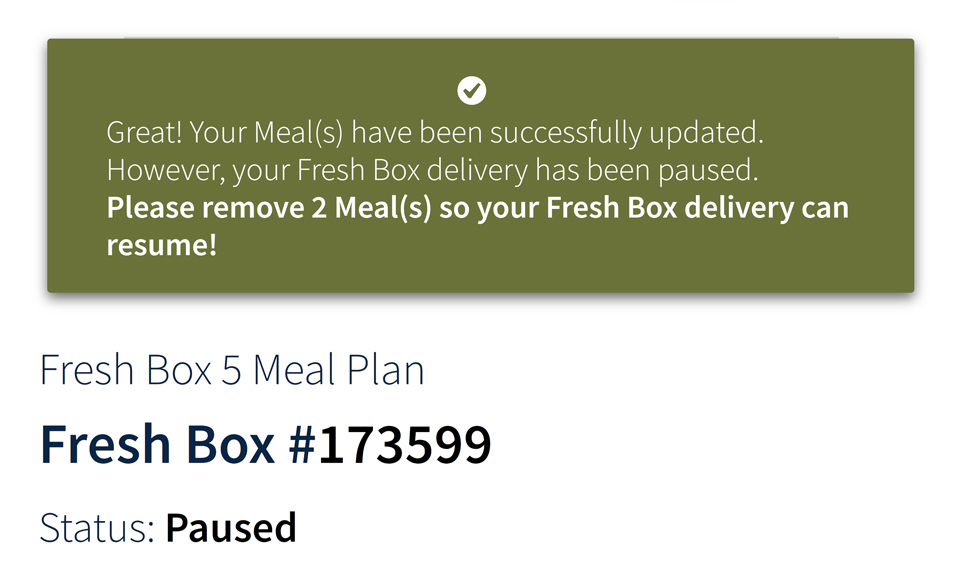
- status: The Scheduled Order’s Status ( e.g. Active, Paused, Failed, etc. ).
- origin: Where did this order originate from ( e.g. Checkout, Merchant, API, etc. ).
- originalExternalId: The Original WC Checkout Order if there is one.
- customerId: The current User’s WooCommerce ID
- scheduledOrderItems: The Scheduled Items ( in our case Scheduled Meals )
- scheduledOrderItems > productId: The WooCommerce Product ID
- scheduledOrderItems > quantity: The Quantity for the Scheduled Item
- frequency_type: The Scheduled Time for the Order ( i.g. Months, Weeks, Days, etc. )
- frequency: The Scheduled Interval for the Order ( i.g. 1, 2, 12, 60, etc. )
- paymentMethod: The Saved Payment Information for this Order
- metadata: An array of custom data attached to the order when it was created ( i.g. In our Case our Customer’s Plan )
If you’ve followed any of our other tutorials, we’re all about making our lives easier. To that end, and before we get into the Server Side Validation, we’re going to create a utility function that we’ll use in this tutorial, and possibly future tutorials, to retrieve specific information from our customer’s Scheduled Orders.
Scheduled Order Utility Function
Retrieve Assigned Plan, Order Quantity, and Current State
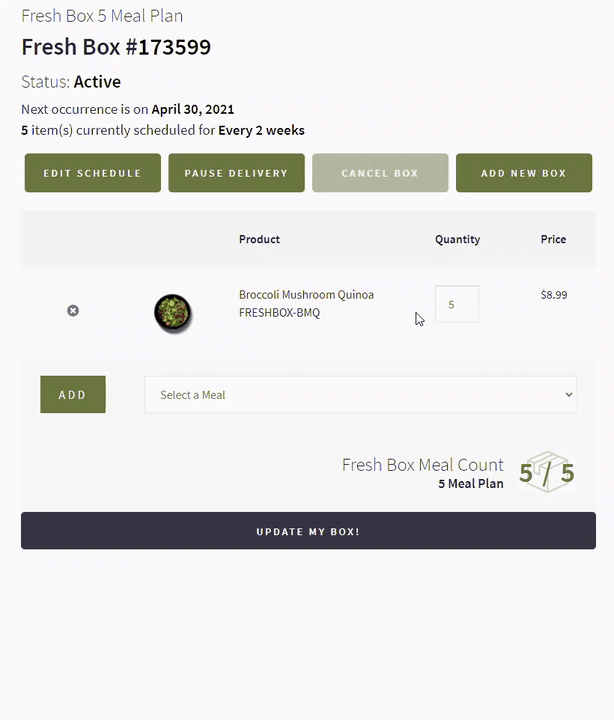
In our example we’re validating that our customers have the correct quantity ( i.e. meals in our example ) in their Scheduled Order based on their plan and we stored the plan assigned to the Scheduled Order created at checkout in the Scheduled Order’s metadata. This means the utility we’re going to create will calculate the total quantity of meals on the order and compare that to the plan from the matadata.
However, this is where you could include any rule you see fit, pull the products and make sure they are all in the same category, make sure the total value meets some threshold, or even that the total weight meets a minimum requirement or doesn’t exceed some limit! What rule you put in place all depends on your business and needs.
Create a new xx_fresh_box_orders_retrieve_box_details() function which takes the Scheduled Order as a single argument, an array ( $autoship_order ), and returns an associative array containing the current plan assigned to the supplied order ( integer ), the total quantity in the supplied order ( integer ), and the difference between the assigned plan and the total quantity.
The first step in our new function will be to retrieve the plan currently assigned to the supplied Scheduled Order. We’re storing that information in a custom ‘xx_fresh_plan’ record in the Scheduled Order’s metadata, which we had attached to it when it was created at checkout, and in order to retreive it we simply access our key in the Scheduled Order data’s ‘metadata’ record.
The Scheduled Order metadata key is a great place to attach various information to an order so that it pursists throughout the Scheduled Order’s lifecycle. This information could include things like the assigned plan in our example or even affiliate information so that an affilite gets credit each time the order gets processed…
Autoship Cloud Support Docs
The second step in our function will be to iterate over the supplied Scheduled Order’s array of items and sum the quantity for each. As we showed above, the Scheduled Order’s array of line items can be found in the ‘scheduledOrderItems’ record, and the quantity for the line item is, as you would expect, found in that lines ‘quantity’ key ( again you can read more about the structure for line items in Scheduled Orders in the API documentation here ).
The last step in our function will be return the plan, quantity, and difference between the two in an array.
Server Side Validation
Autoship Cloud powered by Qpilot is designed for flexibility and customization coming with a host of actions and filters which can be used by developers and merchants to perform unlimited customizations to the functionality. We only need to use one of those hooks to add our controls to Scheduled Orders that are being updated by the user. In our case we’re going to use a “Pause” invalid orders method and only let users “Activate” valid orders for delivery. Using this rule allows users to continuously update their order(s) until they are valid.

Server Side Validation Step 1
Scheduled Order Update Validation
Create a new xx_validate_fresh_box_update() function that takes three parameters, an integer ( $order_id which is the Scheduled Order Id ), a string ( $action which is the name of the current action being performed ), and finally an array ( $data which contains the Scheduled Order data and other additional data typically supplied to the actions call back function ). We’re then going to use an add_action() function call to hook this function to the autoship_after_handler_success action.
Server Side Validation Step 2
Determining which UI Actions to Validate
The second step in our function is to determine which actions we care to validate. When it comes to Scheduled Orders and the Native UI there are a host of actions that can be performed yet we only care about those that would invalidate our rule. In our case that’s the total quantity of items in our box which means, changing quantity, adding or removing items, and status changes ( we can’t have customers activating invalid orders, right? ). We’re going to create an array of actions we care about and assign them a notice we’re going to use later to display to the customer in the UI.
Native UI Actions
- autoship_add_order_coupon | A Coupon is being added.
- autoship_remove_order_coupon | A Coupon is being removed.
- autoship_add_order_item | A new item is being added.
- autoship_remove_order_item | An item is being removed.
- autoship_delete_order | The order is being deleted.
- autoship_update_order_status | The order’s status is being changed.
- autoship_update_order_schedule | The order’s schedule is being changed.
- autoship_update_order_shipping_address | The order’s shipping address is being changed.
- autoship_update_schedule_items | An existing Scheduled order’s item is being changed.
- autoship_update_order_payment_method | The payment method for an order is being udpated.
Server Side Validation Step 3
Validating the UI Actions
Now that we have a list of actions we care about we’re going to add our conditional statement checking to see if the action being performed is one that would affect our rule OR if the customer is intentionally attempting to pause their order.
Why do we care if the user is attempting to change their order’s Status? The reason is that we’re automatically going to be pausing orders when the are invalid and we’re going to automatically activate those orders when the customer “fixes” them. What we don’t want to do is prevent a customer from being able to pause their order, hence why we use that in our conditional statement, but we do want to catch a user who is attempting to Activate an invalid order.
Server Side Validation Step 4
Retrieving the Scheduled Order & Details
The next step in our function is to retrieve the full scheduled order currently being edited by the customer. To do this we’re going to us Autoship Cloud’s autoship_get_scheduled_order() function. Autoship Cloud’s autoship_get_scheduled_order() function takes a Scheduled Order id ( integer ) as the first argument and a boolean value as the second. If the second argument is true then the Scheduled Order returned by the function will be returned as an associative array, otherwise it’s returned as a stdClass object. If an error is encountered when trying to retrieve the Scheduled Order object then an instance of WordPress’ error class will be returned, so we’ll want to add a check for that as well. Once we’ve retrieved the Scheduled Order we’re going to pass it to our xx_fresh_box_orders_retrieve_box_details() utility function we created earlier to get the needed stats for our validation.
Server Side Validation Step 5
Invalid Order Check
We’ve retrieved our order and pulled the stats we’re going to use in our validation check. There are two possible cases at this point, the first is that the quantity of items in the order doesn’t match the assigned plan which would mean the order is invalid, and the second is that the order is now valid and should be activated. First, let’s check for an invalid order and to do this we simply add a conditional statement that checks if the difference returned by our utility function is not 0.
Invalid Order Check Step 5a
Adding Invalid Orders
Inside this first conditional statement we’re going to do a few things, the first of which will be to clear the current notices and retrieve the baseline notice we’re going to want to display based on the action being performed. To clear the notices we’re going to use WooCommerce’s wc_clear_notices() function and then retrieve our baseline notice by retrieving it from our $actions array using the current action being performed as the key.
Invalid Order Check Step 5b
Checking for Active Orders
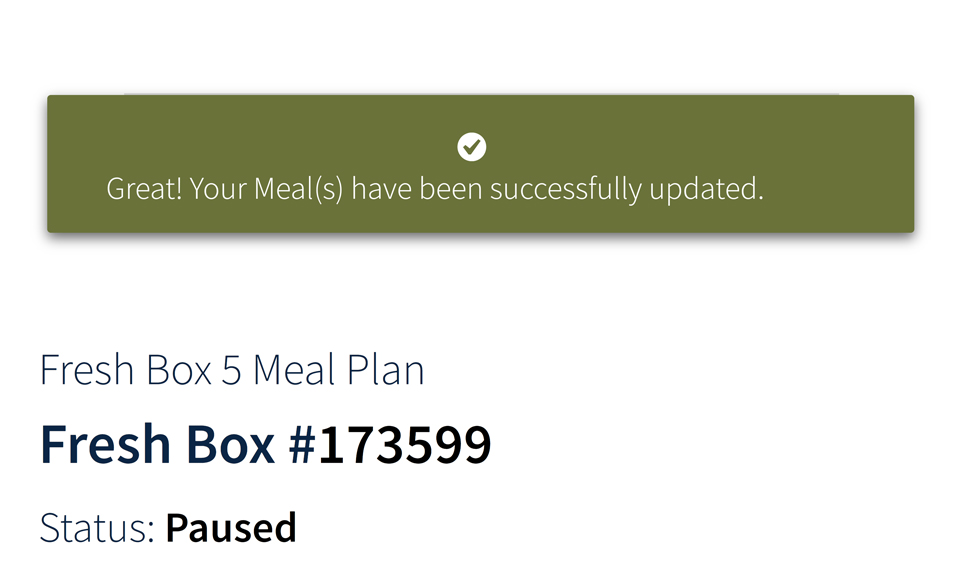
Next we need to check if the current invalid order is active, and if it is we need to pause it. To check the status of the current order we simply access the ‘status’ record in the Scheduled Order data array and then we’re going to use Autoship Cloud’s autoship_set_scheduled_order_status() function to change the order’s status from Active to Paused. Autoship Cloud’s autoship_set_scheduled_order_status() function takes two arguments, the Scheduled Order id ( integer ) and a Status ( string ). The last piece to this portion of the conditional block is to add a notice to the customer letting them know that the order is not valid and that delivery has been paused.

Note that in this case we’re adjusting the notice depending on if the customer was attempting to Activate a Paused invalid order rather than modify the items or quantity.
Invalid Order Check Step 5c
Notifications for Invalid Orders
The last piece to this block is to update the notice we’re going to display letting the customer know if they have to add or remove a number of items to make the order valid and to add our notice to the WooCommerce Notice queue. The good news is that we easily know if the customer needs to add or remove items because our utility function returned the difference. Let’s use the WooCommerce wc_add_notice() function to add our notice to the queue and return.
Server Side Validation Step 6
Valid Order Check
We’ve covered the scenario where the customer was editing a Scheduled Order and the order isn’t valid, now we’re going to catch the scenario where the order was edited and is now valid but wasn’t before. Add a second conditional statement that checks if the current order is ‘Paused’ by checking the ‘status’ record in the Scheduled Order data array. If the order is paused and we know the user is running one of our actions ( add item, remove item, change the quantity of an item ), since we already checked for that, then at this point we know our customer just made a change that “fixed” the invalid order.
Valid Order Check Step 6a
Reset Notifications for Valid Orders
First step will be to clear any WooCommerce Notices currently in the queue and just like before we’re going to use WooCommerce’s wc_clear_notices() function to do this.
Valid Order Check Step 6b
Re-Activate Valid Orders
The second step is to activate the Scheduled Order since it was invalid and isn’t any longer. Once again, we’re going to use Autoship Cloud’s autoship_set_scheduled_order_status() function to change the order’s status from Paused to Active.
Valid Order Check Step 6c
Notifications for Re-Activated Orders
The last step is to use WooCommerce’s wc_add_notice() function to add a notice letting our customer know that their order has been updated and the delivery schedule resumed.
Client Side Validation, Restrictions, and Controls
We’ve gone over the Server Side validation and we could call it a day at this point. Our server side validaion is perfectly fine and can be used for almost all scenarios. This said, and as we’ve already mentioned, adding client side validation ( meaning in the browser ) will make for a better customer experience.
Client Side Validation Step 1
Adding Our Script File
Since we’re going to be using jQuery to implement our client side validation we’re going to need to not only create the script file but enqueue it so that it’s included in our HTML page. The first step is to create a new script file ( we’ll name ours xx_script.js but you could name it anything ) which will hold our code. Once we have our file we’ll need to enqueue it and to do so create a new xx_fresh_box_orders_enqueue_styles() function that takes no parameters. We’re then going to use an add_action() function call to hook this function to the wp_enqueue_scripts action.
Adding Our Script File Step 1a
Conditionally Loading The Script
We only want our script to be included on our site when the customer is on the Scheduled order(s) screen since that’s where we’re implementing our validation. To that end the first statement we’re going to add to our new xx_fresh_box_orders_enqueue_styles() function is going to be a conditional statement using the Autoship Cloud is_scheduled_order_page() function, which returns true when the current page is the Scheduled Order(s) page.
Adding Our Script File Step 1b
Register & Enqueue The Script
Next we’re going to add a wp_enqueue_script() function call and pass it five arguments, ‘freshbox_style_orders_script’ which will be our handle, the URL to our file which we’ll include in our child themes directory so we’re using the WordPress’ get_stylesheet_directory_uri() function, an array of registered script handles our script depends on ( which includes ‘jquery’ and the Autoship Cloud ‘autoship-scheduled-orders’ script ), a version number, and finally a boolean value of true so that our script is inlcuded in the footer of our page rather than the header.
Client Side Validation Step 2
Autoship Cloud’s Add Item Action
As we mentioned earlier, one of the actions we want to handle is when a customer adds a new order item ( i.e. meal ) to their box. Autoship Cloud uses an ajax call to retrieve and add new items to orders and while we could completely override this functionality we could also just hook into the Autoship Cloud ajax call and override the callback function for dealing with new items. Yep… that’s right, Autoship Cloud even makes it’s javascript pluggable!
Autoship Cloud’s Add Item Action Step 2a
Creating Our Callback Function
Create a new xx_fresh_box_additem_callback() function, which takes a single parameter ( a JavaScript object ) which is passed from the Autoship Cloud ajax method. The JavaScript object passed to the callback function includes several properties we’re going to be using, from the jQuery object containing the placeholder element to the new item’s HTML returned by the ajax call.
JavaScript object Structure
- itemAction.target | The Add Item Select Element.
- itemAction.target_option | The Selected Item Option.
- itemAction.target_placeholder | The placeholder HTML Element.
- itemAction.target_val | The Selected Option’s Product ID.
- itemAction.target_form | The Current Form HTML Element.
- itemAction.response | The Ajax Call Response.
- itemAction.response.content | The New Order Item HTML to Add.
What we’ll be doing in our callback function is to hide the placeholder element, insert our newly added element, disable the added item in the Select drop down ( we don’t want the customer to add the same item twice ), hide the current order’s totals ( since the user will still need to click on the update button to save their changes ), unlock the Scheduled Order UI, and finally we’re going to fire a custom event ( which we’ll be hooking into a bit later for some added functionality ).
Get started by fading out the placeholder element ( itemAction.target_placeholder ) using the jQuery .fadeOut() method. The .fadeOut() method allows us to call a function once the animation is complete which is where we’ll be performing the rest of our tasks.
Next we’re going to insert the new HTML element returned by the ajax call at the bottom of the current Scheduled Orders using the jQuery .insertBefore() method targeting the element with the ‘.scheduled-order-add-ons’ class ( which is the element right after the last Scheduled item ).
Now we’re going to take care of the current Add Item Select drop down and disable the newly added item so it can’t be added again, as well as clear any notices. We’re going to use the ‘target_option’ property of the passed JavaScript object to target the Select option, then using the .prop() method we’ll deselect the option by passing “selected” as the property name and false as the property value, and finally add a disabled attribute to the option using the .attr() method passing “disabled” as both the attribute name and value. Lastly, clear any notices by removing any elements with the ‘.autoship-msg’ class and the .remove() method.
The next step will be to add a custom event ( which we’ll end up hooking onto later ) using the .trigger() method and passing it ‘xx_fresh_meal_added’ as the event type.
The last part of our function is to hide the Scheduled Order totals using the .fadeOut() method and remove the processing and empty classes Autoship Cloud adds to the Schuduled Orders, ’empty-order’ and ‘processing’, using the .removeClass() method.
Autoship Cloud’s Add Item Action Step 2b
Registering Our Callback Function
We have our callback function and we’ve populated it with the actions we want to happen when a new item is added via Ajax by Autoship Cloud. The final step is to let Autoship Cloud know that it should be using our function rather than it’s native callback. To register our new function we’re going to set Autoship Cloud’s autoshipSchedulerData global data object’s addItemSuccessCallback property to our new function. However, we’re going to do this after the DOM is ready by wrapping our call in jQuery’s shorthand document ready event call and including it in our xx_script.js file.
Client Side Validation Step 3
Fresh Box Handler
As we mentioned we have several different actions that happen within the Native UI which we need to handle and while we’ve attached our own callback to the Autoship Cloud Ajax method, we haven’t fone anything with it and we haven’t delt with the removal of items, changing quantities, attempting to update orders when they are invalid, etc. This is what we’re going to do now.
Fresh Box Handler Step 3a
Our Fresh Box Object and Base Properties
To keep things tidy we’re going to store all our functionality in a single JavaScript object and handle each action / update with a seperate function.
In our new object, the first step is to add some base properties that we’ll use to references / contain some of the Native UI HTML elements we care about and will need to manipulate based on actions the customer takes and the status of their order. These elements include the Native UI’s Update Items button ( which a customer clicks on to save their changes to the order ), the Native UI’s notice and notice content elements ( which we’ll be using to display messages to the customer ), the Add Item Select drop down ( which we’ll need to adjust when items are removed from the order ), and finally a custom Meal Counter we added to our UI to display the current count of meals vs number of meals in the customer’s plan ( which we’ll manually adjust as meals are added / removed ).
The other base properties we’re going to add will be those that store our Box Stats ( the current total items in our order, the plan currently assigned to the order, and finally the state of the box or in our case the difference between the plan and the current total items ), and the one that will store our notice(s) and we’re validating the box. Note The xx_fresh_box_data is a global object that we included in the page which contains the current order’s plan.
Fresh Box Handler Step 2
Calculating Our Box Object’s Stats // Utility Function
We’ve setup our properies for our Fresh Box object so now we’re going to create a few helper functions we’ll be using in the rest of our Event Listeners. Create a new xx_calcFreshBoxTotal property and assign it a function that doesn’t take any parameters and doesn’t return any values. This function’s job will be to update our Fresh Box objects statistics by summing up the current quantity in the order, compare that quantity to the current plan and store the new total and plan difference in the corresponding properties.
The first step in our xx_calcFreshBoxTotal’s assigned function will be to retrieve the quantity associated with all the current order items by using the jQuery .find() method to retrieve all HTML product quantity input elements currently in the order.
The next step in our xx_calcFreshBoxTotal’s assigned function will be to reset the freshBoxTotal proderty to 0, use the jQuery each() method on the selected product quantity input elements, sum the values by retrieving the value of the current element using jQuery’s .val() method, converting that value to an integer using the JavaScript parseInt() fuunction ( note jQuery’s val method always returns a string ), and then adding that value to our freshBoxTotal property.
The last step in our function is to update our object’s freshBoxState property by assigning it the difference between the freshBoxPlan and the newly calculated freshBoxTotal. We can use this freshBoxState property later to know if the box / order is valid ( i.e. the freshBoxState equals zero ) or it’s invalid.
Fresh Box Handler Step 3
Populating the Notice // Utility Function
The next utility function we’re going to create is the one that will populate our Scheduled Order page notice HTML. Create a new xx_populate_scheduled_order_fresh_box_notice property and assign it a function that doesn’t take any parameters and doesn’t return any values.
The next step will be to fade the current notice HTML element out of view using the jQuery .fadeOut() method on our object’s freshBoxNoticeWrap property ( remember the freshBoxNoticeWrap was populated with our HTML notice container element ).
The last step is going to be to populate the notice HTML element with any notices that are in our notice property and then show it otherwise if no notices exist then just clear the notice HTML. Start by checking if our freshNotice property is empty or not using an if/else statement, then if our property is empty ( i.e. no notices have been added to the queue ) set our freshBoxNoticeBox property to an empty HTML element using the jQuery .html() method and passing it an empty string. If our freshNotice property is not empty we’re going to populate our freshBoxNoticeBox property with the contents of our freshNotice again using the jQuery .html() method and then finally show our notice to the customer using the jQuery .fadeIn() method.
Fresh Box Handler Step 4
Reseting Notices & Recalculating the Stats // Utility Function
The last utility function we’re going to create is the one that will reset the HTML notice and re-run the calculation on the Scheduled Order refreshing our statistics. Start by creating a new xx_freshBoxReset property and assign it a function that doesn’t take any parameters and doesn’t return any values. In the new function we’re going to set our object’s freshNotice property to an empty string, make a call to our xx_populate_scheduled_order_fresh_box_notice() function ( which will clear and hide the HTML notice element ), and finally make a call to our xx_calcFreshBoxTotal() function ( which will recalculate our Scheduled Order’s stats and update the corresponding properties ).
Fresh Box Handler Step 5
Change Quantity Event Listener
We’ve now added our properties to track state and stats for our Scheduled Order and we added some utility functions to help perform some of our basic functions ( recalculate stats, populate our notice, and refresh the object ) so the next step will be to start handling validation on the various actions. The first action we’re going to create a function to handle is when a customer changes the quantity for one of the items on the order. We’ll need to validate the order when a user increases or decreases the number of items in the order ( i.e. number of meals in the fresh box ).
Create a new xx_fresh_box_adjustment_check property and assign it a function that takes a single boolean parameter ( displayNotice ) yet doesn’t return anything. We’re also going to default the parameter if it’s not supplied by checking if the parameter is equal to “undefined” using the typeof JavaScript operator and if it is we’ll default it to true.
The first step in populating our listener function ( after checking for an undefined parameter ) is going to be some cleanup by reseting the object’s statistics and notices using our xx_freshBoxReset() method. We’re also going to update our custom HTML Meal Counter ( which shows the current total items in the cart compared to the plan assigned to this box ) by using jQuery’s .html() method on the freshBoxMealCounter property and passing it the newly updated freshBoxTotal stat.
The second portion ( and main portion ) of our new function is going to be an if/else if statement which checks if the current Scheduled Order is invalid because it has more items then the plan requires, or is invalid because it has less items then the plan requires, or is valid becuase the number of items in the Scheduled Order is the same as the plan. Depending on which state the current Scheudled order is in we’re going to disable or enable the Update Order Items button, display one or more notices as well as adjust a custom data attributes we’re using for our style rules. Start by adding an if / else if / else where in the first condition checks if the freshBoxState property is greater than 0 ( i.e. our Scheduled Order is invalid and there are less items in the Scheduled Order then the plan requires ), the second condition checks if the if the freshBoxState property is less than 0 ( i.e. our Scheduled Order is invalid and there are more items in the Scheduled Order then the plan requires), and finally if our freshBoxState property is neigher more nor less then our plan then it must be equal and is valid.
In the first conditional block ( where there are less ordered items then the plan requires ) we’re going to add a notice letting the customer know that they need to add meal(s) before they can save the order, disable the Update Order Items button by using the jQuery .attr() method on the freshBoxUpdateBtn property and pass it ‘disabled’ as the property name and value. Lastly, as we mentioned above we’re using a data attribute on our body element to specify if our Scheduled Order is invalid or valid by using the jQuery .attr() method on the body element where we’re passing ‘data-box-level’ ( i.e. the name of the data attribute ) as the first argument and ‘under’ as the second.
Within the second conditional block ( where there are more ordered items then the plan requires ) we’re going to add a notice letting the customer know that they need to remove meal(s) before they can save the order, also going to disable the Update Order Items button by using the jQuery .attr() method on the freshBoxUpdateBtn property and pass it ‘disabled’ as the attribute name and value. Finaly, wer’e going to use the jQuery .attr() method on the body element where we’re again passing ‘data-box-level’ as the first argument and ‘over’ as the second.
In the last conditional block ( where the number of meals is the same as the plan ) we’re going to again add a notice but this time let the customer know that they can click the Update Order Items button to save their changes. We’re also going to make sure the Update Order Items button is enabled by using the jQuery .attr() method on the freshBoxUpdateBtn property passing it ‘disabled’ as the attribute name and false as the value. The final step ( which I’m sure you can guess ) is to set the ‘data-box-level’ data attribute on the body element to ‘full’.
The third and last part of our function is to display the updated notice(s) using our xx_populate_scheduled_order_fresh_box_notice() function if the displayNotice boolean parameter is set to true.
Fresh Box Handler Step 6
Add New Item Event Listener
In an earlier step we created our own callback function for Autoship Cloud’s Add Item action and within that new function we added a new custom event ( i.e. ‘xx_fresh_meal_added’ ). We didn’t do that for just any reason but because we wanted to add some functionality we’ll eventually attach to that event. Just like we added a function to deal with when a customer changes the quantities on items in their Scheduled Order we’re now going to add one to deal with when a customer adds a new item to their order.
Create a new xx_populate_fresh_box_add_meal_success_notice property and assign it a function that doesn’t take any parameters and doesn’t return any values. The first piece to our function will be to fadeOut the current HTML notice element out of view using the jQuery .fadeOut() method on our object’s freshBoxNoticeWrap property.
Once the animation is complete we’re going to be to call our newly created xx_fresh_box_adjustment_check() function passing it a value of false. This way the Scheduled Order will be checked and the appropriate notice will be added to our notice property but the notice won’t be displayed yet.
Finally, we’re going to override the current notice if the Scheduled Order is valid by checking if the freshBoxState property is false / zero so that the customer knows that the item was added successfully and they should click on the Update Order Items button to save their changes. Then once we’ve delt with the notice we’re going to run our xx_populate_scheduled_order_fresh_box_notice() function which displays the notice(s) currently in the queue.
Fresh Box Handler Step 7
Remove Item Event Listener
We’ve dealt with handling the Scheudled Order validation when the quantity is changed for an existing item and when a new item is added to the Scheduled Order, so now we need to deal with validation when an existing item is removed ( since that also changes the quantity in a Scheduled Order right? ). Start by creating a new xx_remove_scheduled_fresh_item property and assign it a function that take a single parameters ( the event ). Typically, when a user clicks on the remove link for an item in the Autoship Cloud Native UI the plugin will remove the item, refresh the page and save the changes. However, we don’t want to automaticaly save the changes to the order nor remove the item perminently since that would invalidate the order so instead we’re going to prevent the default remove action using the Event interface’s preventDefault() method.
The first portion of our event listener function is to setup the HTML elements and variables we’ll be manipulating in the Scheduled Order ( i.e. the Scheduled Order Item ID, Scheduled Order Item Row, Scheduled Order Item Product ID, and the Scheduled Order Item’s Quantity ). These are all retrieved using jQuery methods .attr(), .closest(), and .find() on the current Scheduled Order Row being removed.
The next step will be to re-enable the product being removed in our Add Item Select drop down by first finding the corresponding option using the Scheduled Order row’s product id in the select drop down using the jQuery .find() method on the freshBoxMealSelect property ( which contains the Select Drop down ) and passing it the Product ID associated with the current row being removed ( i.e. scheduledOrderItemProd ). Then on the resulting element we’re going to remove the disabled property using the jQuery .attr() method passing it ‘disabled’ as the first parameer and false as the second.
Lastly, we want to hide the row being removed, change it’s quantity to 0 ( since it’s being hidden and we don’t want it counted towards our Scheduled Order’s stats ), add a successfully removed notice, and then re-run our check on the Scheduled Order to reset the statistics, the state and add any invalid or valid notices. To do this we’re going to use jQuery’s .fadeOut() method on the current row being removed and in the complete function to the .fadeOut() method we’ll use jQuery’s .val() method on the row being removed to change the quantity to 0. Then we’ll set the freshNotice property to our updated notice and run our xx_fresh_box_adjustment_check() function to refresh the statistics and run full validation on the Scheduled Order.
Fresh Box Handler Step 8
Update Order Items Button Listener
We have all the validations in place for adding items, removing items, and changing quantities and at this point we really wouldn’t need to add any more validation but… we’re all about the customer experience right? And there are always those customers who just don’t read notices and will just keep bashing the update / save button so we’re going to add one more listener, one that will deal with the button clickers.
Create a new xx_update_scheduled_fresh_items property and assign it a function that takes a single parameter, an event. Since we’re hooking into the click event, and we’ll be overriding the related action, we need someway to allow the click event action to run when the order is valid so to do this we’re going to use a custom variable we can set that will signify to our function that the click shouldn’t be stopped. Create a new allow_update_scheduled_fresh_items property and assign it a default boolean value of false.
The first step to take in our function is to add a conditional block that checks our variable to see if we should stop the click action.
Since we’re listening for our button click and we want to “manually” deal with the click the first step is to check if our allow_update_scheduled_fresh_items property is false and if it is false prevent the default action of the click event by using the Event interface’s .preventDefault() method on the event passed in.
W’ve now prevened the default action from triggering for the Update Order Items button so now we’re going to recheck the Scheduled Order to see if it’s valid or invalid using our xx_freshBoxReset() function. If the order is valid, our object’s freshBoxState property is zero, then we want to change our allow_update_scheduled_fresh_items property to true and simulate the click on the button using the .trigger() method by passing it ‘click’ as the argument.
If the order is not valid, our object’s freshBoxState property is not zero, then we want to have the appropriate notice be displayed to our customer so they know that they won’t be able to update the order until they correct the issue. As we’ve done previously, we’ll use our xx_fresh_box_adjustment_check() function to run the checks and populate the notice.
Finally, in the else block ( i.e. when a customer clicks on the Update Order Items button and our allow_update_scheduled_fresh_items property is set to true ) we’re going to want to set the same allow_update_scheduled_fresh_items property to false. The reason is to essentially reset the property so that our if block is triggered next time the customer clicks on the button and the checks are all re-run.
Fresh Box Handler Step 9
Attach All Listeners
We’ve created all our event listeners which will validate the Scheduled Order, update our stats, disable and enable the Update Order Items button, and even display notices so now we need to actually attach these listeners to the corresponding events. Create one last new init property and assign it a function which doesn’t take any parameters.
There are four total events that we’re going to attach our listeners to: removal of a Scheduled Order item, a change of a Scheduled Order item’s quantity, when a new Scheduled Order item is added, and finally when the Update Order Items button is clicked. In each case we’re going to attach the functions we created to handle those events using the jQuery .on() method. where we pass the method the event we’re listening for ( i.e. ‘click’, ‘change’, etc ) and the selector to target the element on which the event happens ( i.e. a css rule ). We’re going to start with the remove item event by targeting the anchor links in the Native UI passing ‘click’ as the event, ‘a.remove-item-action, a.remove-new-item-action’ as the selector, and finally our xx_remove_scheduled_fresh_item method as the handler argument to the .on() method.
The second event we’re going to deal with is the quantity change event by targeting the input elements in the Native UI passing ‘change’ as the event, ‘.product-quantity input.qty’ as the selector, and our xx_fresh_box_adjustment_check method as the handler argument to the .on() method.
Next we’re going to add our listener to the item added event by using our custom event we added in our custom callback ‘xx_fresh_meal_added’ as the event, and our xx_populate_fresh_box_add_meal_success_notice method as the handler argument to the .on() method.
The last event we’re going to attach a listener to is the update order items click event by targeting the update button element in the Native UI passing ‘click’ as the event, ‘button[name=”autoship_update_schedule_items”]’ as the selector, and our xx_update_scheduled_fresh_items method as the handler argument to the .on() method.
Fresh Box Handler Final Step
Wrap it all up and kickstart the listeners
The last step needed to get the handler object started is to run our init() function. This will attach our handlers to the events we’re listening for and our handlers will take care of the rest! WooHoo!
What’s Next?
We’ve now walked through how you can modify and add rules and validation to the built-in customer facing Scheduled Order Editor ( what we call the Native UI ) both using server side and client side validation. Whether you’re selling yearly, monthly, weekly, or even daily Autoship options, Autoship Cloud gives you the tools and flexibility to create a unique and customer friendly journey.
Looking for tools to convert one-time purchasers into subscribers? Look no further! Read our tutorial on using the Autoship Cloud built in Link Builder tool and how it makes cross selling, up selling and converting one-time purchasers into subscribers turn key and simple.