Developing a good customer acquisition strategy can take a lot of time and effort which is why it’s critical to have a strong loyalty strategy in place to keep those customers you worked hard to acquire.
At QPilot (the hosted service that powers Autoship Cloud for WooCommerce) we help online sellers grow & scale their most loyal customer base by scheduling and automating repeat deliveries.
For online sellers (like you!) the best loyalty programs are often achieved by multiple services working together: integrations. That’s why integrations are so valuable for online businesses: you want your eCommerce services to work together!
One of the fastest ways to integrate online services & apps is to use a process called “webhooks”.
Webhooks are one way that apps can send automated messages or information to other apps. It’s how PayPal tells your accounting app when your clients pay you, how Twilio routes phone calls to your number, and how WooCommerce can notify you about new orders in Slack.
“What Are Webhooks?” – Zapier
QPilot offers an API with webhooks as well as a Zapier App to help our merchants integrate their online services to automate winback, upsell, and conversion strategies for their Autoship programs and support their loyal, repeat customers.
What You Will Learn: How to Win-Back Inactive Customers Using Automation
When a repeat Autoship Customer chooses to “pause” an upcoming Scheduled Order, it’s hard to know why. Are they coming back later? Did they order too much last time? Will they remember to un-pause when they’re ready?
For the purpose of this tutorial, we’re going to consider an “Inactive” Autoship Customer as any Autoship Customer who has put their Scheduled Order on Pause.
Customers pause Scheduled Orders for many reasons, but it’s almost certainly not that they no longer want the product (otherwise, they could just cancel the Scheduled Order altogether). They ordered from you and they scheduled that order to come again in the future.
Your job as a marketer is to figure out how to “win-back” those inactive customers, make them active again and figure out why those customers paused their Scheduled Order.
But the first step is to know who those inactive customers are and target them in an automated way…
QPilot Webhooks: Tools for Automation!
Webhooks are automated calls that are made from one system to another when an action happens. The action could be a customer placing an order, a comment that is posted to a blog, or even an Autoship Customer pausing a Scheduled Order, but the method with webhooks is always the same: an action that triggers a custom call to a specified URL.
In this article, we’re going to walk through how to use QPilot’s Webhooks to automatically trigger a workflow whenever an Autoship Customer pauses a Scheduled Order. In this example, we’re automating with Klaviyo a powerful email + SMS system, but you could also use MailChimp, Gmail, or any of the 2,000+ apps found in Zapier.
Don’t know how to code? No problem! We are showing you how to use Zapier, which enables you to set up integrations and automate with webhooks but without any code!
The Final Result We’re Creating
The end result of this tutorial is to create a “Zap” ( i.e. Zapier automation ) which will automatically add a customer to a new “Customers with Inactive Orders” Segment in Klaviyo whenever they pause their Scheduled Order. This will allow us to automatically trigger an email flow via Klaviyo specifically geared towards finding out why a customer paused their Scheduled Order and winning them back by getting them to re-activate their paused Scheduled Order.
Create the Automation!
Step 1: Account Setup & Test Order
The first step is to create a free account in Zapier and in Klaviyo if you don’t already have an account.
Next, we need to setup an API key in our Klaviyo account for our Zapier connection. To setup the key, first sign into Klaviyo and go to your Account page and choose API Keys from the Settings drop-down menu ( or click here ).
In the “API Keys” page click the Create API Key button, give the newly created Key a label, say Zapier Integration and copy the Private API Key value and the Public API Key / Site ID from the screen for later use ( For more help see Klaviyo’s instructions for setting up the API keys here ).
The last step we’ll want to take before setting up our Zap is to create a Scheduled Order we can use to test our Zap to make sure everything is working as intended.
Step 2: Start creating the “Zap”
Sign into Zapier and under the main menu on your dashboard click on the Make a Zap button. In the new window give the Zap a name. We named our Zap “Trigger Inactive Customer” but you can choose any name. Names are just used to help you identify a Zap in your dashboard.
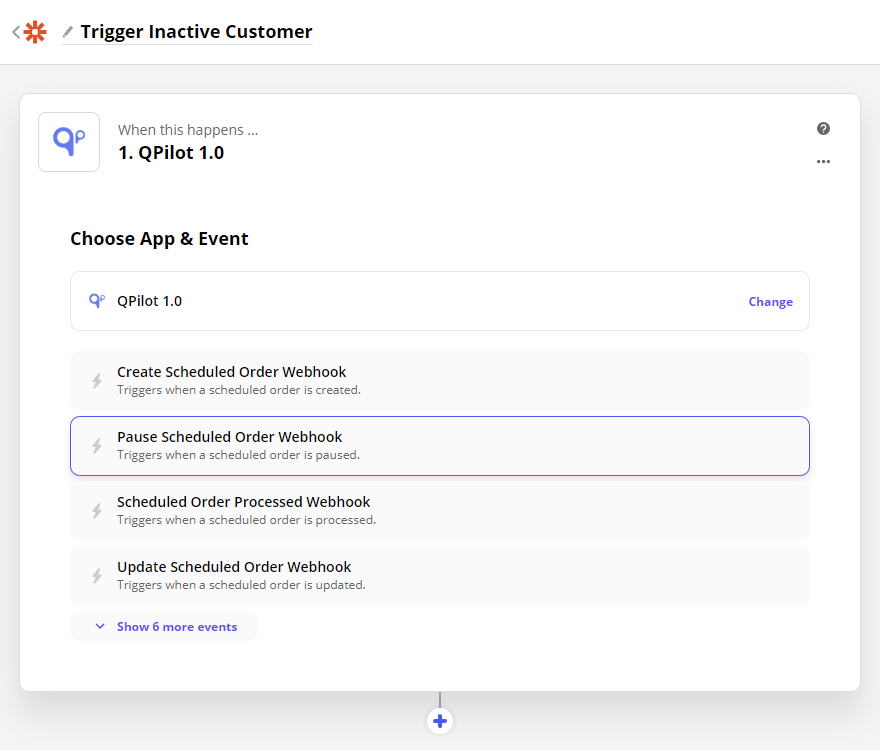
Step 3: Choose the trigger event
The goal here is to start a workflow when a customer pauses a Scheduled Order in QPilot, so with this Zap our trigger event will be a QPilot Webhook, specifically the “Pause Scheduled Order Webhook” event.
To set this up, first select “QPilot” from the Your Apps section or type in “QPilot” in the Search field. From the available Webhooks that are displayed after selecting QPilot, select the “Pause Scheduled Order Webhook “ option then click on the Continue button.
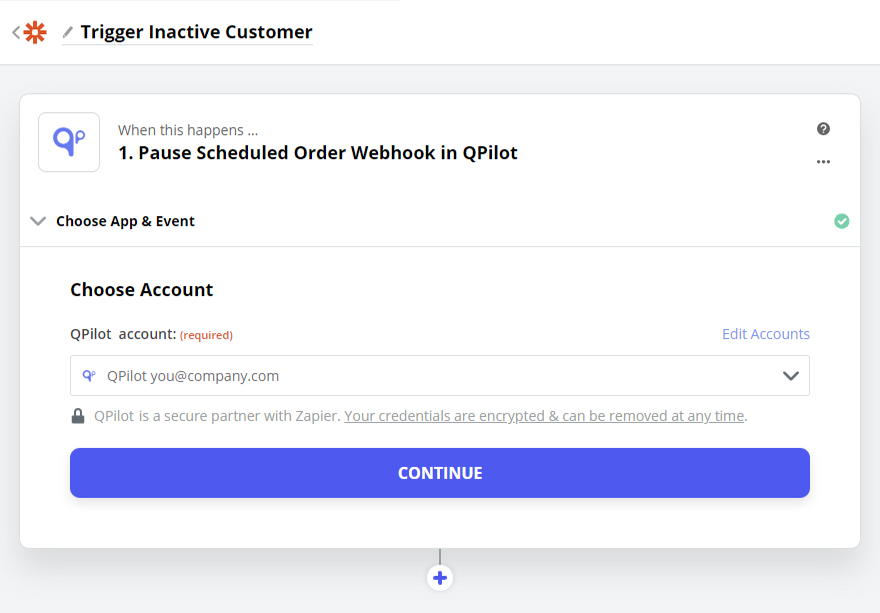
Step 4: Choosing the trigger account
If you’ve already connected QPilot to Zapier then you can simply select your QPilot account from the “Choose Account” drop-down if it’s not already selected, otherwise select the “Sign in to QPilot” button.
In the “Connect QPilot” dialog, enter your QPilot account username and password and select the “sign in” button. Next, in the Grant Access screen check the box stating that you agree to the Terms and Conditions and click the Grant Access button. Once the connection is made you’ll be redirected back to Zapier and your QPilot account should now show up under the “Choose Account” dropdown. Select the “Continue” button to go to the next step.
Step 5: Customize the Trigger details
In the Customize Scheduled Order Webhook section we need to specify which Site connected to QPilot we want to initiate this trigger.
Under the Site dropdown select the QPilot Site you would like to connect to this Zap and select the “Continue” button. Only Sites created in QPilot will be listed in the dropdown list. If you don’t have any connected sites in QPilot, see our help documentation here. If you don’t see the site you’re trying to select in the list try using the “Load More” button.
Step 6: Testing the Trigger!
The last step in setting up the trigger to our Zap is to test that the connection works and that Zapier can find our QPilot Webhook. To do this, select the Test trigger button found under the Find Data section. In addition to some technical information about the webhook and details about the data sent to Zapier, you should see a “success” notice like the one below… Great! Now select the “Continue” button.

Creating The Action!
In Step 3 we chose the event that we want to capture ( Pause Scheduled Order ) and that we want to trigger an event in our Klaviyo account when that event occurs ( i.e. when an Autoship customer pauses a Scheduled Order ). Now we need to set up the Klaviyo connection, segment, and resulting event.
Step 7: Choose the App and Event to trigger
Select the plus (+) button to add a new chain in our Zap and either select Klaviyo from available Apps sections or enter Klaviyo in the Search field and select the App from the results.
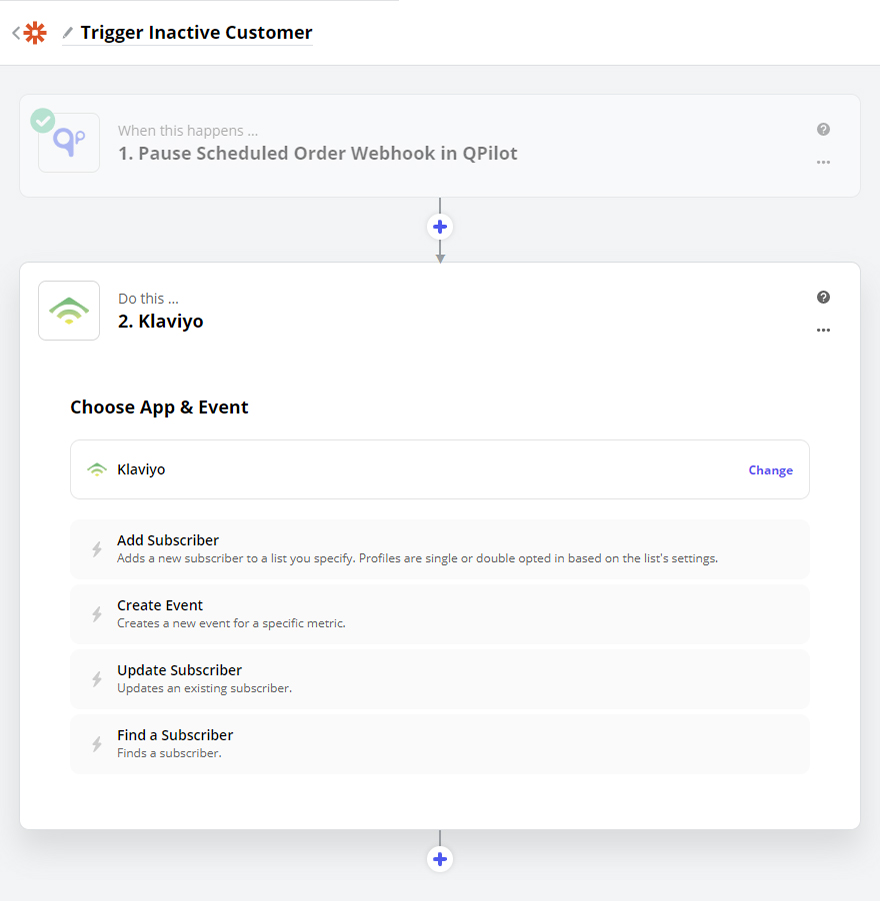
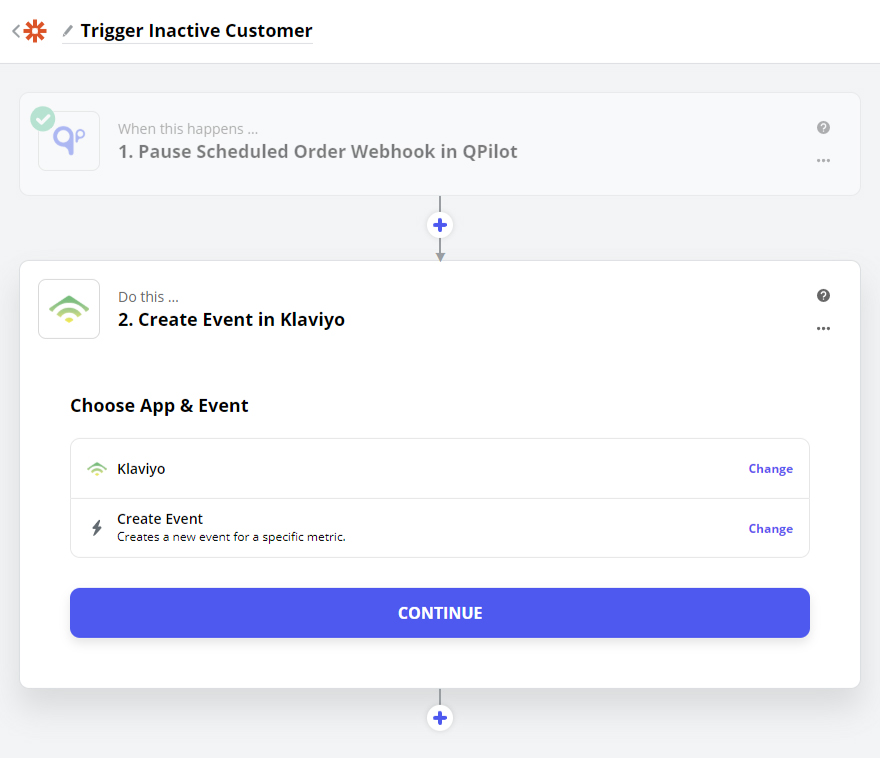
Secondly, from the available Action Events that are displayed after selecting Klaviyo, select the “Create Event“ option then select the “Continue” button.
Since we want to send targeted emails and trigger an email flow we will use a segment in Klaviyo to add the user to as a “Create Event” in Zapier.
Step 8: Choosing the Action account
Just like when we connected QPilot to Zapier in Step 4 we now need to connect Klaviyo. If you’ve already connected Klaviyo to Zapier then you can simply select your Klaviyo account from the “Choose Account” dropdown, or, we can select the Sign in to Klaviyo button.
In the dialog “Allow Zapier to access your Klaviyo Account?” that comes up, enter your Public API Key / Site ID and Private API Key we setup before we started. After entering the keys, select the “Yes Connect” button. When the connection is made you will be redirected back to Zapier and your Klaviyo account should now show up under the “Choose Account” dropdown if it’s not selected by default.
Select the “Continue” button to go to the next step.
Step 9: Customizing the Event
In the Customize Event section, we need to specify the details of the event that we are triggering in Klaviyo.
Metric
First, create (or select) a custom Metric to use for this event. Since we don’t have one yet, we are going to create a custom Metric named PausedScheduledOrder. This will allow us to use Zaps to create other email flows based on users who pause their Scheduled Order.

Email Address
We need to tell Klaviyo who we are adding to the segment. The beauty of QPilot Webhooks is that they include the Customer Information so we can grab the value from there. To select the value from the Webhook select within the “Email Address” field and either a) scroll down until you find the Scheduled Order Customer Email or b) type “Scheduled Order Customer Email” in the search field and select the resulting option.

Note: The Zap will pick up on any waiting data matching the trigger, so you might already see a customer’s email address listed next to the selected field name or you’ll see our placeholder which will be used to test the Klaviyo integration.
Event ID ( Optional )
Optionally, enter a unique id for this event. See how Klaviyo defines the Event ID in their help documentation here.
Value
The value field is used to assign a numeric value to this event (e.g. the dollar value of the purchase) and since this is a Scheduled Order that a customer has paused, we are going to use the Scheduled Order Total as the value so that we can track potential revenue re-gained and lost.
Select within the “Value” field and either a) scroll down and select the Scheduled Order Total or b) type “Scheduled Order Total” in the Search field and select the Scheduled Order Total option.

Custom Event Properties ( Optional )
Optionally, you can also add more custom properties and values to associate with this event. See Klaviyo’s help documentation here for more information.
After adding any more custom event properties, select the “Continue” button.
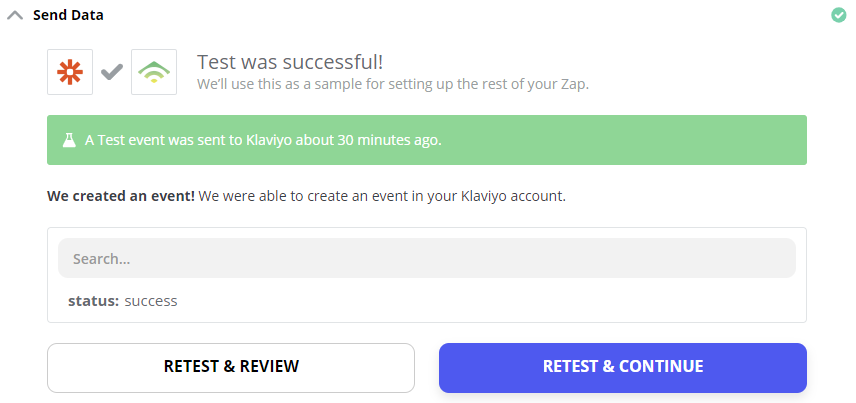
Step 10: Testing the Action!
Now that we’ve set up the Klaviyo Action for this Zap, we need to test that the event will send to Klaviyo and that the integration works. Note the email listed in the test data since a successful test will add the email address to your Profiles in Klaviyo and you might want to delete it when we are done.
Under the “Send Test Event to Klaviyo” section, select the Test & Review button. If the event was successful you will see a Test was successful! notice.
To finish and save our new Zap, select the Done Editing button. Now that our Zap is done, let’s turn it on by selecting the On/Off toggle in the upper right corner. Once selected, and after Zapier finishes turning our Zap on, it should be green.
Great!…Now what?
We have now created our Zap which will Send a custom event to Klaviyo for any user who changes a Scheduled Order’s status in QPilot. Well, that’s great but the important part is to actually add that user to a new Segment in Klaviyo that you can then build your email strategy and messaging for.
Step 11: Create a new Segment in Klaviyo
Log into your Klaviyo account and select the Lists and Segments option from the left-hand menu.
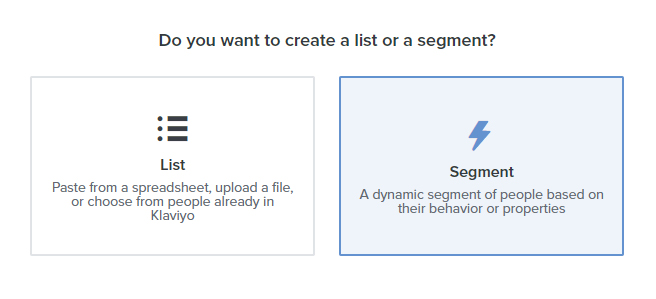
Now that we are in the Lists & Segments screen we want to add a new Segment by selecting the Create List / Segment button in the upper right corner of the screen.
When asked Do you want to create a list or a segment? choose “Segment”. Now name the new Segment so that you know these are customers who have paused their Scheduled Orders. We’ll name ours Customers with Inactive Orders, so that can easily recognize who is in this segment and why.
Step 12: Create the rules for who gets added to our New Segment in Klaviyo
Now that we have our new Customers with Inactive Orders segment, we need to add some rules in Klaviyo for who should be added to this segment. What we are going to do is add any customer who has a PausedScheduledOrder metric. Under the Definition > Select a Condition… dropdown choose the What someone has done (or not done) option.
In the Has dropdown, select our custom PausedScheduledOrder metric from under the API section. We will leave the other values with the default at least once and over all time.
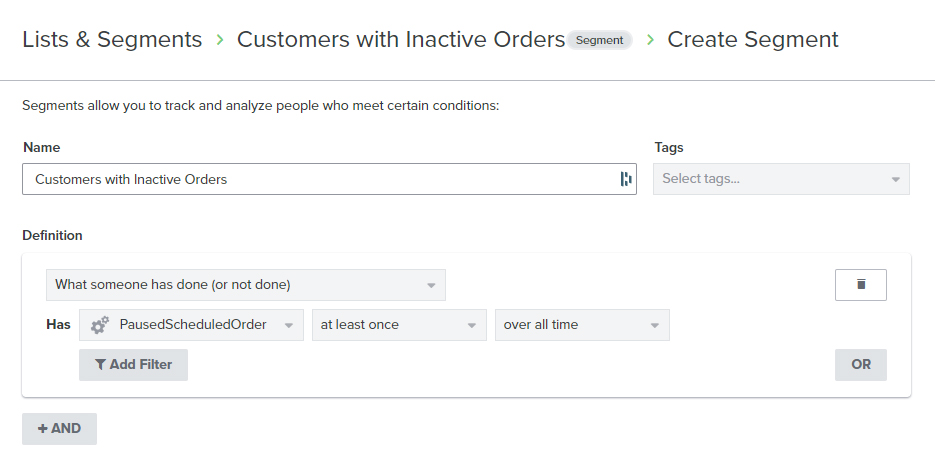
Once you havve setup the rules, select the Create Segment button.
Once the segment is created, it should already have one email assigned to it: the email address displayed in Step 10. Since we used that email to test the Zap and create the event in Klaviyo, that email address already has the PausedScheduledOrder metric attached to it and it will automatically be added to the segment.
Now you are all setup to win-back customers with Klaviyo!
We’ve setup our Zap, connected QPilot to Klaviyo, setup our new Segment, and are now auto-building a list of customers we to win-back with an automated email flow in Klaviyo. We can now use Klaviyo to automatically message our “paused” Autoship Customers, figure out why they paused their Scheduled Order, and work to win back their business!
Explore related to Tutorials